When the Microsoft Dynamics 365 app for Outlook installation fails to install, it can interrupt email tracking, record linking, and overall CRM workflow inside Outlook. If this is the same case for you, fret not, as we are, in this article, going to figure out plausible reasons behind this error, and solutions to troubleshoot it.
Microsoft Dynamics 365 app for Outlook installation failed
If the Dynamics 365 app for Outlook installation fails, execute the solution mentioned below.
- Test and enable Mailbox
- Confirm the App for Outlook solution is present, or manually import
- Clear the Local Office Add-in Cache
- Modify the Registry to prevent Add-in load delays
- Verify user security rules
- Check the Exchange and Deployment policy
Let’s get started with the troubleshooting guide.
1] Test and enable Mailbox
The app needs an actively synchronised mailbox between the CRM and Exchange. A failed, inactive or misconfigured mailbox state is one of the most common causes for installation failure. To validate the connection and permission to Exchange, follow the steps mentioned below to test and enable Mailbox.
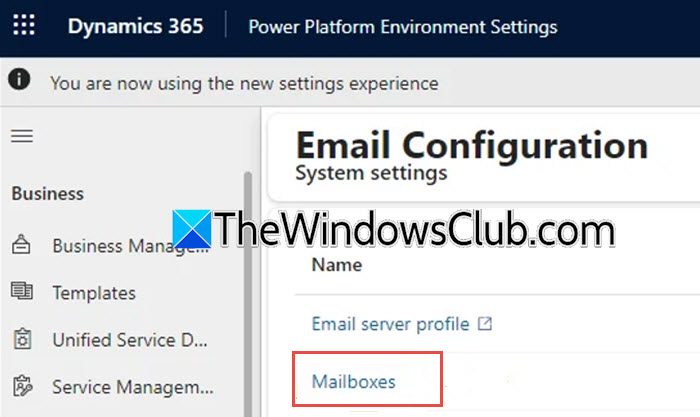
- Log in to the Dynamics 365 or Power Platform admin centre with administrative rights, and navigate to Settings.
- Click on Email, select Mailboxes, and select the mailbox for the affected user.
- Click on Approve Email, then on the Test and Enable Mailboxes option, and ensure the Sync items with Exchange from this Dynamics 365 organisation only option is checked.
Wait for the test to complete, then resolve any explicit errors shown in the alerts and wait for the mailbox status to turn to Success. Once done, check if the Dynamics 365 add-in now appears in the ribbon. If it’s still missing, see the next solution.
2] Confirm the App for Outlook is present, or manually import
The add-in’s deployment process looks for a solution package, AppForOutlookAnchorSolution, which contains the core application files. If it is missing, corrupted, or not installed, the add-in has no code to deploy to users and causes a silent or generic installation failure. Follow the steps given below to verify the presence of this required component and restore it if it is missing.
- In Dynamics 365, go to Settings, click on Solutions, and in the list, search for the AppForOutlookAnchorSolution solution.
- If it is present and installed, this is not causing the problem; however, if it is missing, download the official AppForOutlookAnchorSolution.zip package from Microsoft Download Centre or the version’s documentation.
- Next, go to the Solutions view, click on the Import option, and follow the wizard to upload the .zip file.
- Complete the import process, then go to Power Platform admin centre > Environment > Dynamics 365 App for Outlook.
After the solution is complete or imported, wait a few minutes, then reinstall the app for the user in the Power Platform admin centre. If the installation succeeds but the add-in is blank, go to the next solution.
3] Clear the Local Office Add-in Cache
Outlook cached add-in files and authentication tokens locally, which can corrupt or go stale. This leads to an add-in appearing as a blank pane, failing to load, or being stuck in a login loop. The best course of action is to delete this cache to force Outlook to download a fresh, clean copy of the add-ins manifest and assets.
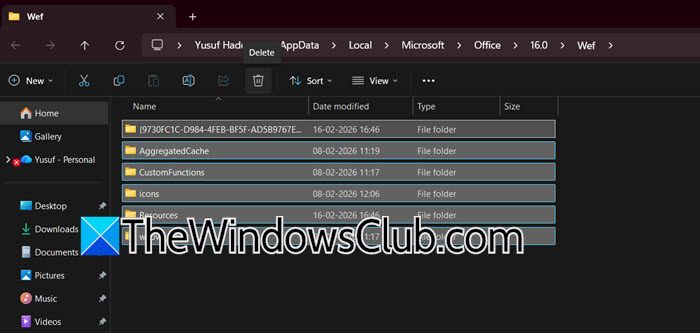
- First and foremost, close all Microsoft Office apps, and then press Win + R to open the Run dialogue box.
- Type the following command and hit Enter to open the wef folder for the user account in File Explorer:
%LOCALAPPDATA%\Microsoft\Office\16.0\Wef\
- Select all files and folders inside and delete them, and reboot the device to ensure all Office processes are terminated.
Once it reboots, open Outlook and check the add-in. If it remains blank or you see an add-in error, move to the next solution.

4] Modify the Registry to prevent Add-in load delays
The Office has a built-in timer that can mistakenly label a slow-starting add-in as unresponsive and block it from loading. To begin with, ensure that all Office apps are closed, then follow the steps mentioned below to do the same.
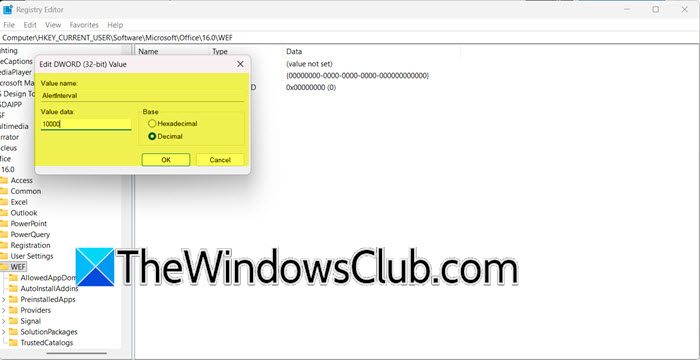
- Open the Run dialogue box by clicking Win + R, then type regedit, and hit Enter to open the Registry Editor.
- Navigate to the location given below, and right-click in the right pane.
HKEY_CURRENT_USER\SOFTWARE\Microsoft\Office\16.0\Wef
- Select New > DWORD (32-bit) Value, name it AlertInterval. Double-click on it, select Decimal, and enter a value in milliseconds.
Once done, click OK, close the Registry Editor, and restart the computer. Proceed to the next solution if the situation remains the same.
5] Verify user security rules
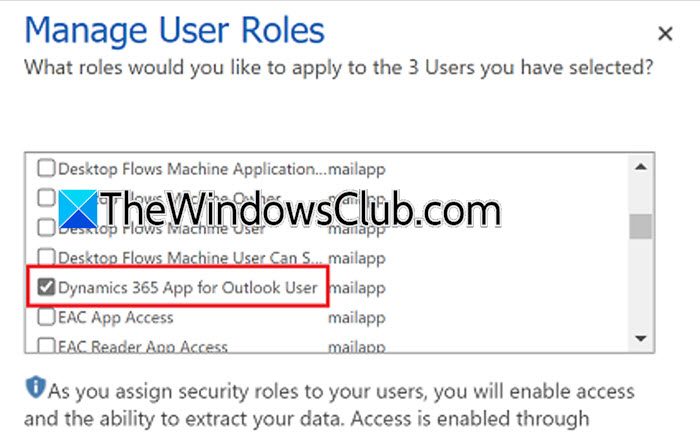
The add-in requires specific privileges to read from and write to the Dynamics 365 record. However, if the security roles are not configured correctly, the add-in may load, but its functions can fail or may not install at all for that user.
- Launch Dynamics 365, go to Settings, click on Security, and select Users.
- Find and open the affected user’s record, and click on Manage Roles.
- In the pop-up window, check the Dynamics 365 App for Outlook security role, and if you use custom roles, ensure they contain equivalent privileges.
- Lastly, click Ok, sign out completely, and sign back into both Outlook and Dynamics 365.
After logging in, try using the add-in functions. If you are unable to, then see the next solution.
6] Check the Exchange and Deployment policy
Organisation-wide policies in the Microsoft 365 admin centre, Exchange admin centre, and Teams admin centre can block add-ins deployment. Moreover, centralised deployment settings can block the manifest, or in hybrid Exchange scenarios, misconfigured Autodiscover lookups can break the modern authentication flow required by the add-in. To identify and remove these administrative barriers, ensure that the Microsoft 365 admin centre has the add-in actively deployed to the user.
- Go to Microsoft 365 admin centre, navigate to Settings and select Integrated apps or Show all > Settings > Integrated apps.
- Go to the Your apps tab, locate the Dynamics 365 add-in in the list, and check its assignment status for the affected user.
- If the status is Not Assigned, select the App, click Edit Assignment, and assign it to the User/Group.
- If the app is not listed, click Get Apps, add the Dynamics 365 app, and assign it to the required user or group.
Policy changes can take up to 24 hours, but usually take place within an hour. Hopefully, the issue will be resolved, but if not, we recommend reaching out to Microsoft Support for troubleshooting.
Read: Dynamics 365 App for Outlook is missing.
How to install Microsoft Dynamics 365 app for Outlook?
To install the Microsoft Dynamics 365 app for Outlook, first sign in to the Microsoft 365 admin center. Next, go to your account settings, choose Software, and then select Tools & add-ins. Look for the Install option under Microsoft Dynamics 365 for Outlook. After the installation, restart Outlook. This will automatically open the Configuration Wizard, where you can choose your Dynamics 365 organization and connect.
Read: You won’t be able to receive mail from current mailbox Outlook error
How to repair Outlook installation?
To repair your Outlook installation, open the Windows Control Panel, go to Programs and Features, locate your Microsoft Office installation in the list, right-click it, and select Change, then choose the Online Repair option to automatically uninstall and reinstall the entire Office suite, including Outlook.
Also Read: Advanced Diagnostics, Microsoft Support & Recovery Assistant: Outlook.