The MBOX Import/Export option can be greyed out due to several key reasons, with administrative restrictions via Group Policy being a primary cause in corporate environments. This issue also frequently stems from a corrupted Outlook profile, conflicts with installed add-ins, or a mismatch between the system’s non-Unicode language setting and your Outlook installation. It typically surfaces after a policy update, an Office installation, or when the user profile becomes damaged. In this post, we are going to see what you can do if the MBOX Import/Export Option is greyed out in Outlook.

MBOX Import/Export option greyed out in Outlook
If the MBOX Import/Export Option is greyed out in Outlook, follow the solutions mentioned below.
- Check Group Policy Restriction
- Create a new Outlook Profile
- Make sure that your System Locale is the same as your Outlook Language
- Disable Add-ins via Safe Mode
- Use a dedicated conversion tool (workaround)
Let us talk about them in detail.
1] Check Group Policy Restriction
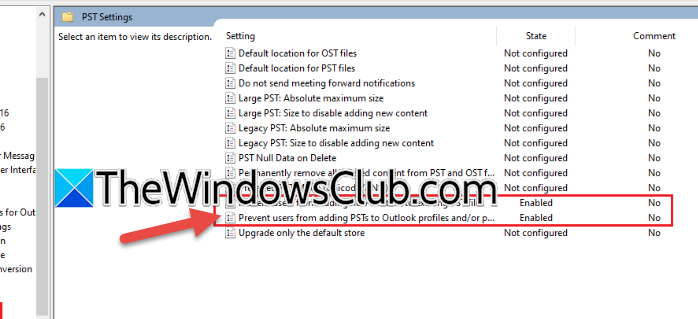
First of all, we need to check and make sure the IT admin or you place no Group Policy restrictions. If a Group Policy Object (GPO) is explicitly disabling the feature, no other fix will work until this is reversed. Identifying this saves wasted time on other troubleshooting steps. To do so, you need to open the Group Policy Editor either on the domain controller or locally (if you have access to it) and then navigate to the following location.
User Configuration > Administrative Templates > Microsoft Outlook 2016 > Miscellaneous > PST Settings
Note: Your Outlook version can be different.
Now, look for Prevent users from adding PST files to their Outlook profile or similar policies related to import/export. If the policy is set to Enabled, double-click it and change it to Not Configured or Disabled.
Finally, close the editor, open a Command Prompt as Administrator, and run gpupdate /force to refresh the policy. Finally, check if the issue is resolved.
2] Create a new Outlook Profile
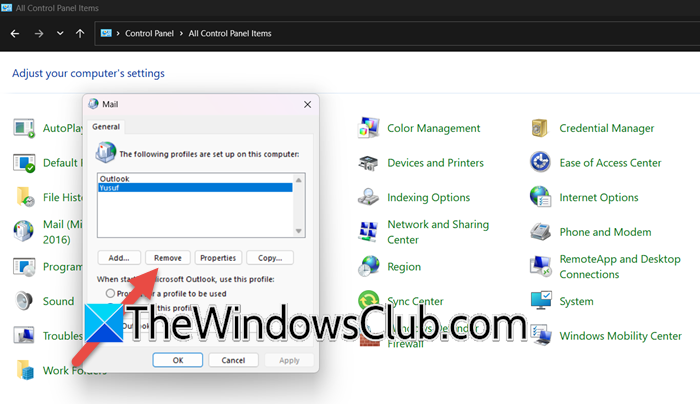
A corrupted profile can cripple specific functions like Import/Export. Creating a new, clean profile rebuilds the registry keys and settings that govern these features from scratch, eliminating corruption as the cause. Follow the steps mentioned below to do the same.

- Terminate Outlook from the Task Manager.
- Now, open Control Panel, set View by to Large icons, and click on Mail (Microsoft Outlook).
- Now, click on Show Profiles.
- Select your current profile and click on Remove.
- Click on Add, give the new profile a name (e.g., “Outlook2024”), and click OK.
- Follow the on-screen instructions and add your account.
Finally, check if the issue is resolved.
3] Make sure that System Locale is the same as your Outlook Language
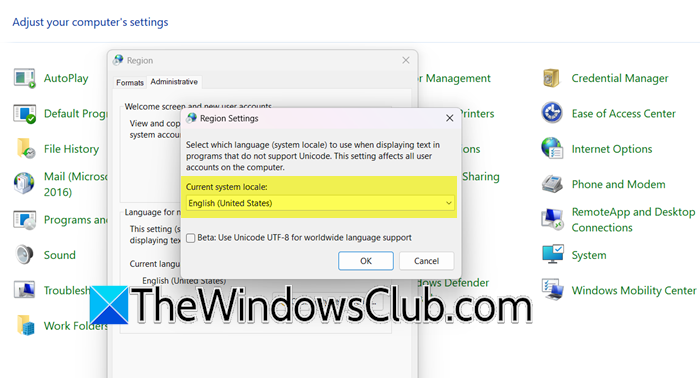
The Import/Export wizard is a legacy component sensitive to language conflicts. If the system’s non-Unicode language doesn’t match Outlook’s, the feature can fail to initialize, causing it to be disabled. This solution ensures compatibility. You can follow the steps mentioned below to ensure compatibility.
- Open Control Panel.
- Go to Clock and Region > Region.
- Now, navigate to the Administrative tab.
- Click the Change system locale… button.
- From the dropdown, select a language that matches your installed version of Outlook (e.g., English (United States)).
- Click Ok and reboot your computer.
Finally, check if the issue is resolved.
4] Disable Add-ins via Safe Mode
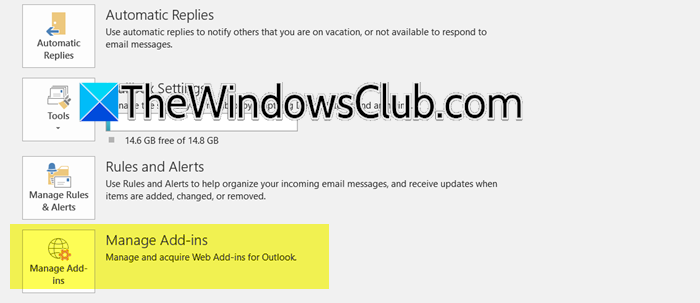
A malfunctioning or incompatible third-party add-in can interfere with Outlook’s ribbon menu, disabling buttons. Starting in Safe Mode loads Outlook without these add-ins. If the option works in Safe Mode, we know an add-in is the culprit and can isolate it. Follow the steps mentioned below to disable add-ins via Outlook Safe Mode.
- Open Run (Win + R), type outlook.exe /save, and click Ok.
- In Safe Mode, check if the Import/Export option is available.
- If it is available, the issue is due to an add-in.
- Close Outlook.
- Open Outlook normally, go to File > Options > Add-ins.
- Now, at the bottom, next to Manage, select COM Add-ins, and click Go.
- Uncheck all the boxes and click Ok.
- Restart Outlook.
If the issue is fixed, re-enable add-ins one by one, restarting each time, to identify the problematic one.
5] Use a dedicated conversion tool (workaround)
If all built-in solutions fail because of deep-seated policy or system issues, a third-party tool can bypass Outlook’s native functionality entirely. This tool directly reads the MBOX file and converts it to a PST or another format that Outlook can open natively, ensuring a reliable way to import your data. You can use tools like SysTools MBOX Converter, Stellar Converter for MBOX, or Kernel for MBOX to PST to do the same.
Hopefully, with the help of these solutions, you will be able to resolve the issue.
Read: How to add someone to Safe Senders List in Outlook
How to Import MBOX File in Outlook?
To import an MBOX file into Outlook, you must first convert it to a PST format, as Outlook cannot directly read MBOX files. Using a dedicated conversion tool is the standard method. After conversion, open Outlook, go to the File menu, select Open & Export, choose Import/Export, then select Import from another program or file, and click Next, choose Outlook Data File (.pst), browse to locate your converted PST file, and follow the prompts to complete the import process, mapping the folders to your desired location within your mailbox.
Read: Outlook Inbox Repair Tool keeps popping up
Why is the additional mailbox add button greyed out in Outlook?
The additional mailbox add button is greyed out in Outlook typically because you lack the necessary permissions to add mailboxes to your profile, which is a common restriction in corporate environments managed by IT administrators. This can also occur if you are using an account type that doesn’t support shared mailboxes, such as a POP3 account, or if Outlook is running in Cached Mode and the administrator has disabled this feature via group policy.
Also Read: Copy Outlook email folders to your Windows desktop.