
Connecting Power Automate with SharePoint Online lets you easily automate data collection and management. This integration transforms static SharePoint lists into dynamic forms, allowing users to enter information and start automated business processes. In this post, we will see how to integrate Power Automate with SharePoint to create workflows.
Integrating these tools provides important benefits for managing data and improving efficiency. One key advantage is the “write back” feature, which allows a flow button or form to automatically populate a SharePoint list. This removes the need for manual data entry and keeps information organized in one place. This integration is flexible; you can use it for anything from employee feedback surveys to complex approval processes. It’s a crucial skill for anyone wanting to use the Power Platform to improve business operations. Power Automate can easily recognize SharePoint URLs and list columns, making setup simple and reducing mistakes.
How to integrate Power Automate with SharePoint to create workflows
To integrate Power Automate with SharePoint to create workflows, follow the steps mentioned below.
- Prepare the SharePoint Environment
- Initiate the Power Automate Flow
- Connect the Flow to SharePoint Actions
- Test and Verify the Integration
Let us talk about them in detail.
1] Prepare the SharePoint Environment
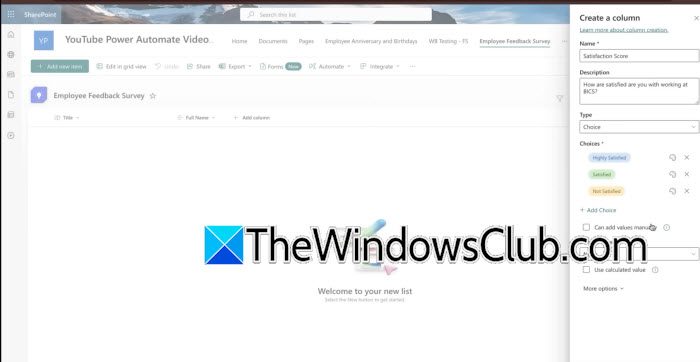
Before building the flow, you must have a destination for your data. Creating a standard Communication Site is a basic yet effective starting point for hosting your automation components
- First, create a standard Communication Site.
- Within your site, create a Blank List to serve as your form integration point. For example, you might name it Employee Feedback Survey.
- Add the necessary columns to your list that correspond to the data you wish to collect. Useful column types include Title, Full Name, Satisfactory Score, and Additional Feedback.
Now, let us go ahead and perform integration.
2] Initiate the Power Automate Flow
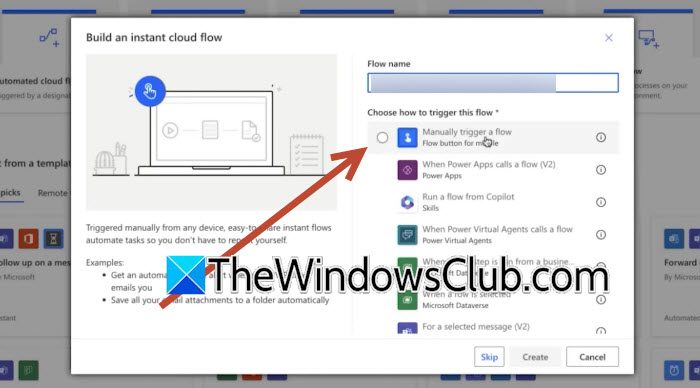
Once your SharePoint list is ready, transition to the Power Automate dashboard to build the automation logic. This process involves creating a trigger to capture real-time user input. Follow the steps given below.
- In Power Automate, select the Create option and choose Instant Cloud Flow.
- Name your flow (e.g., “Employee Feedback Survey Submittals”) and select Manually trigger a flow as the starting point.
- Within the manual trigger, and input fields that match the columns in your SharePoint list.
For a feedback survey, you would add four text inputs – Title, Full Name, Satisfaction Score, and Additional Feedback.
3] Connect the Flow to SharePoint Actions
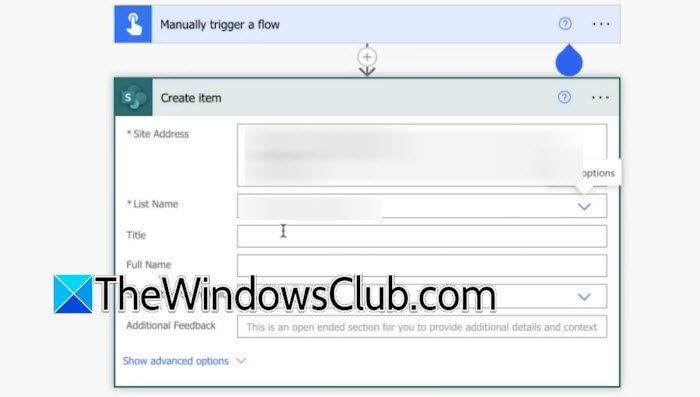
Now, you must tell the flow exactly where to send the data it has captured from the manual trigger. This step creates the write-back link between the flow and your SharePoint list. You need to follow the steps mentioned below.
- Click Next Step and search for the SharePoint “Create item” operation.
- Enter your SharePoint site URL. Power Automate is designed to dynamically recognize the URL and allow you to select the correct list from a dropdown menu.
- Once the list is selected, the Create item action will display a field for every column in your list. Click into each field and use the Dynamic Content panel to map the inputs from your manual trigger to the corresponding SharePoint columns (e.g., map the Full Name input to the Full Name column).
Now, we can go ahead and test and verify the integration.
4] Test and Verify the Integration
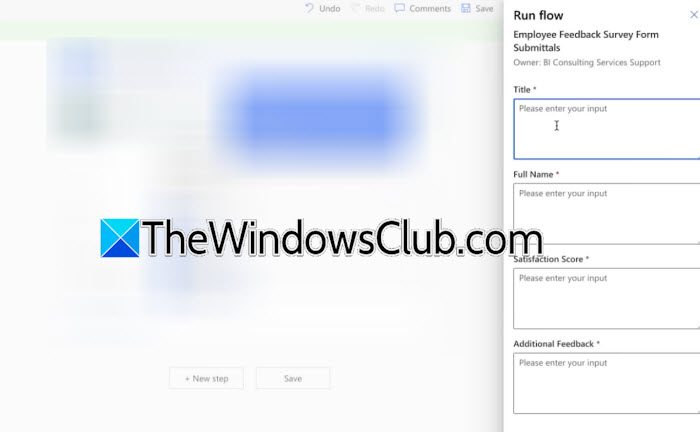
The final phase is ensuring the workflow functions as intended. To do so, follow the steps mentioned below.
- Save your flow frequently. Use the Test icon and select Manually to trigger a trial run.
- Fill out the test fields with sample information, such as a consultant’s name and a satisfaction score, then run the flow.
- Return to your SharePoint list and refresh the page.
You should see the sample data successfully input as a new item in the list, confirming the integration is active and error-free.
Hopefully, with the help of this guide, you will be able to integrate Power Automate with SharePoint.
Read: How to use Power Automate Desktop to create a UI workflow
Can you automate workflows in SharePoint?
Yes, you can automate workflows in SharePoint, but the modern method uses Power Automate instead of legacy tools. Power Automate connects directly to SharePoint lists, allowing you to create triggers for item creation, modification, or manual input. With a few clicks, you can build flows that update lists, send emails, or start approvals. This integration is fully supported by Microsoft and offers real-time execution, making automation accessible to non-developers while replacing older SharePoint Designer workflows entirely.
Read: Power Automate: Automation Tool and IFTTT alternative
What is replacing SharePoint workflows?
Power Automate is the official replacement for legacy SharePoint workflows, including those from SharePoint Designer and InfoPath. Microsoft transitioned its workflow engine to this cloud-native service, which not only replicates traditional actions like creating items and sending approvals but also offers hundreds of connectors, AI Builder, and cross-platform integration. Organizations actively migrate older workflows to Power Automate for better scalability, monitoring, and governance, making it the definitive modern and future‑proof solution.
Also Read: Top 10 Free AI Workflow Automation Tools.
