Many Mac users want to install Windows on their Macs to get the best of both worlds. Using Boot Camp Assistant, you can easily install Windows 10 on your Intel-based Mac. You will have a dual-boot system with macOS on one partition and Windows on the other.
You can install Windows 11 on Intel-based Macs using Boot Camp Assistant, but not on Apple Silicon (M1/M2/M3) Macs. Boot Camp Assistant supports dual-booting Windows only on Intel Macs, and installing Windows 11 requires a few extra steps to bypass Microsoft’s security checks (like TPM 2.0 and Secure Boot). If you have an Intel Mac, you can install Windows 11 using Boot Camp Assistant with a simple workaround. If you have an Apple Silicon Mac, Boot Camp won’t work – you’ll need virtualization software like Parallels.

Install Windows on Mac using Boot Camp Software
- On your Mac, open Safari and navigate to the Boot Camp Assistant download page to download the application. Before downloading it, check if any updates for it are available. Download them also if necessary.
- Open ‘Finder’ window, Choose ‘Applications’ > ‘Utilities’ and double-click on ‘Boot Camp Assistant’.

- Hit ‘Continue’ to initiate the setup procedure. By default, the software informs you to install the most current drivers for Windows.
- The next step is to set the partition size for Windows. Windows itself requires at least a 64GB of partition space and to accommodate more applications; you will be required to offer additional free space for the new OS. Make a rough estimate and if satisfied with the scheme, hit ‘Partition’. After this action, partitioning of the hard-drive will be initiated. The process may take some time to complete.
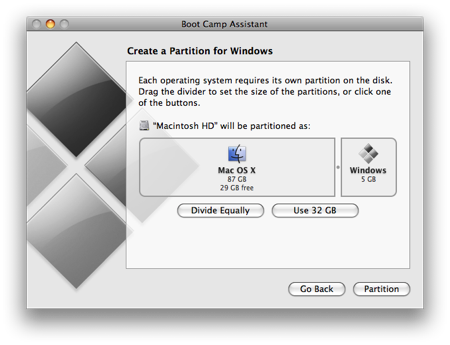
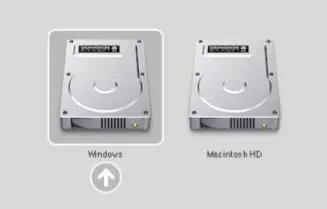
- Upon its completion, you will observe a new ‘BOOT CAMP’ drive icon on your Mac computer.
![]()
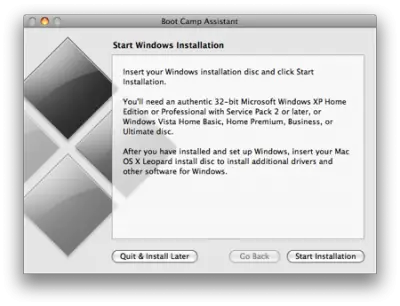
- Now, insert the Windows media and click ‘Start Installation’ button.
- In a few seconds, your Mac computer will restart and boot to the Windows DVD. Here, you’ll be prompted with a window. It will ask you which partition you want to install Windows on. Select the partitions labeled ‘BOOTCAMP’ and simply click on Drive options.
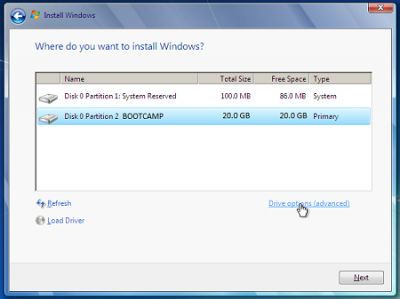
- Then, with the ‘BOOTCAMP’ volume still selected, click ‘Format’.
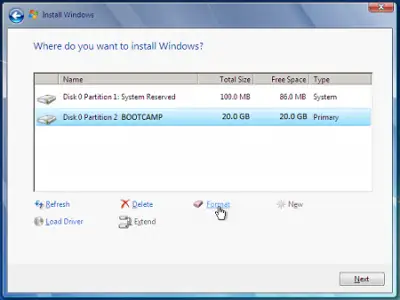
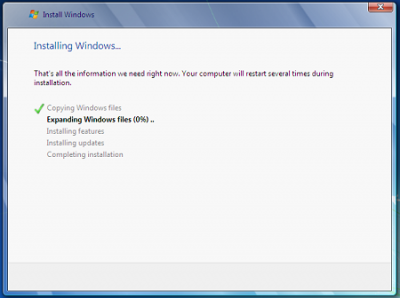
- A warning will be issued with the following message ‘files will be lost’, click ‘OK’. Soon, Windows will begin to install. Take care to remove the Windows DVD as your system will reboot during the installation. Your Mac will automatically boot back into Windows, and will continue the installation, until complete.
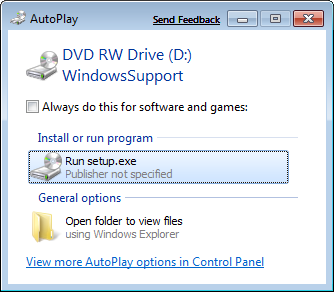
- Insert and run OS X medis by selecting RunSetup.exe after that.
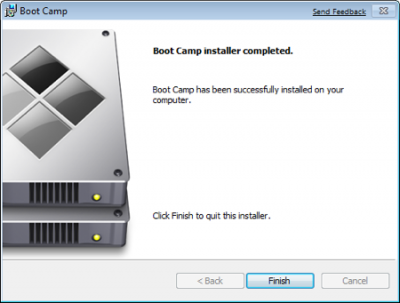
- When the Boot Camp installer is launched, click ‘Next’. Do the same after agreeing to the terms in the license agreement.

- Check the ‘Apple Software for Windows’ and only after that click ‘Install’. Click ‘Finish’ after the driver installation is completed.
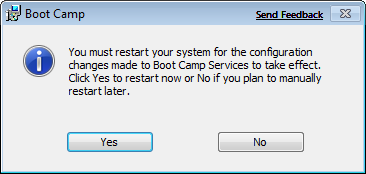
- Remove the OS X DVD from the drive and hit ‘Yes’ to restart your Mac computer.
- Shortly after installation, you can choose to run Windows or macOS, as the installer turns your Mac into a dual-boot system with macOS on one partition and Windows on another.
Requirements:
- All firmware updates installed on your Mac
- A Windows installation media with a Product ID (Full version, not an Upgrade version)
- A macOS installation media
- A copy of the latest Boot Camp.
Intel-based Mac computers can support both new and updated installations of Boot Camp Assistant.
- See this post if Boot Camp could not switch between Windows and Mac OS.
- This post shows how to install Windows on Mac OS X using VMware Fusion.
Additional details and help can be found at Apple.com. Image source: Microsoft Support.
Can I install Windows on Mac for free?
Yes, you can install Windows on Mac for free. Open a web browser on your Mac and download the Windows ISO file from Microsoft’s official website. Now, you can install Windows on Mac by using this ISO file. But you should have a Windows license key to activate it.
How do I switch to Windows in Boot Camp?
After installing Windows on your Mac, you can restart it in macOS or Windows. To do so, shut down your Mac. Now, press and hold the power button for 2 seconds, then immediately press and hold the Options button until you see the boot screen. On the boot screen, you will see two options, one to boot into macOS and the other to boot into Windows. Select Windows.
Read next: Download Boot Camp drivers for Windows without Boot Camp Assistant.