The Chromium engine powers the new Microsoft Edge browser. With the support of the Chromium engine, it also supports extensions from the Chrome Web Store. However, Microsoft has posted a list of extensions it has designated as trusted to work well with Microsoft Edge. In this post, we will share how you can add, remove, disable and manage Extensions in the new Microsoft Edge browser.
How to add or install an extension in Microsoft Edge
To add or manage a browser extension in the Microsoft Edge browser, follow these instructions:
- Launch the Edge browser.
- Click Settings and more button.
- Choose Extensions.
- Hit the Get extensions for Microsoft Edge button.
- Look for the desired extension and install it.
- Manage the extension (Uninstall or remove it).
See the steps below for more details.
Launch the Edge browser and click on the 3-dotted ‘Settings and more’ button.
From the list of options, select ‘Extensions’ item.
On the new page that opens, scroll down to the ‘Find new extensions‘ section.
Under it, you’ll find ‘Get extensions for Microsoft Edge‘ button.
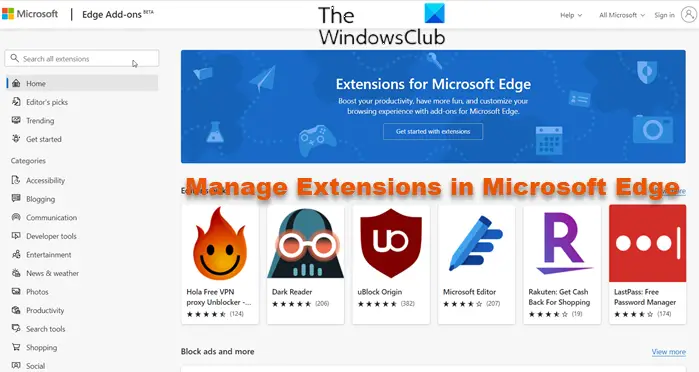
Press the button. Then, choose an extension from the desired category and install it. There’s a wide range of categories from which you can choose the desired extension like,
- Blogging
- Communications
- Developer tools
- Entertainment
- News and Weather
- Photos
- Productivity
- Search tools
- Shopping
- Social and more
You can also directly visit Microsoft’s Add-on page in the new Microsoft Edge.

Click on the image of any extension that you would like to install. It will open its product page. Select Get or Install. It will give open a pop-up alert saying:
Add <EXTENSION NAME> to Microsoft Edge?
The extension can:
- <List of Permissions of the extension>
Click on Add extension button. It will download and automatically install the extension to your new Microsoft Edge browser.
How to add Third-party extensions to Edge
We have already covered a guide on how to install extensions on Microsoft Edge from Chrome Web Store. You can refer to it to learn more about using the Chrome Web Store to get extensions for the new Microsoft Edge browser.
You can also enable extension developer features & sideload Edge extension from outside the Microsoft Store.
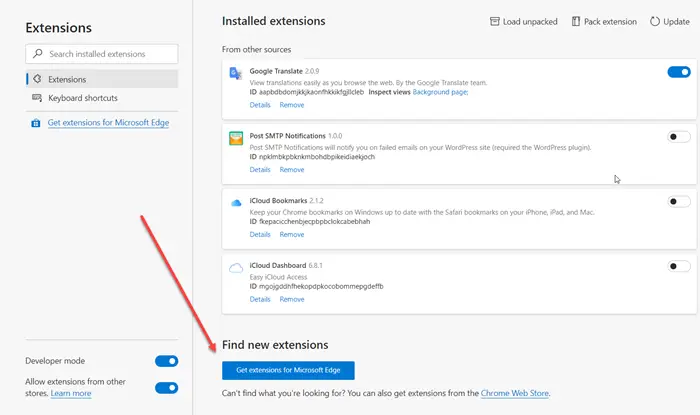
How to Manage or Disable an installed extension in Edge

All extensions can be managed under one page. To navigate to the page type edge://extensions in an empty address bar, and hit the Enter key. The alternative way to open the Extension page is to click the menu, then click the extension option.
It will open the page which will list all extensions with their enabled/disabled status. Here you can use the blue toggles for each extension to either enable or disable it individually.

If you want to dive deeper into the settings, select Details.
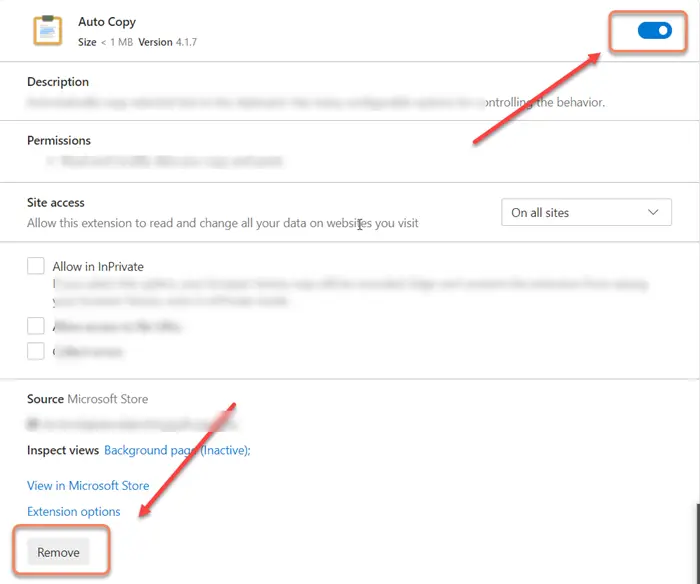
It will open Extension specific page which will give details about its permissions, site access, InPrivate permission, access to file URLs, collect errors, and so on.
How to remove an installed extension from Edge

Navigate to this location in the new Microsoft Edge browser: edge://extensions. For each extension listing, there is a Remove button. Click on the button, and Edge will ask for a confirmation. Select Remove and the extension will finally be uninstalled.
The latest version of the Edge browser has made it quite simple to add, remove, or manage extensions. It even has a dedicated Extensions icon in the toolbar for quick access to the browser’s Extension settings.
This post will show you how to manage Extensions and Add-ons in Chrome, Firefox, and Opera.
I hope this guide helps you in finding what you are looking for.
I would also like to say that you must always make sure that you update your browser plug-ins, extensions, and add-ons regularly.
How do I find extensions in Edge?
To view all the installed extensions in Microsoft Edge, click on the Extensions icon next to the address bar. Alternatively, open a new tab in Edge and type edge://extensions/ in the address bar. After that, hit Enter. Once the page gets loaded, you will see all the installed extensions.
Is it safe to install extensions?
It is usually safe to install browser extensions from their respective official download stores. If a web browser verifies an extension, it is completely safe to install. For example, in Firefox, some extensions show the Recommended tag. Firefox recommends these extensions because they meet Firefox standards for security and performance. Similarly, Chrome also verifies extensions for safety and security. The extensions recommended by Chrome have a Featured tag. Edge also supports all Chrome extensions. But if a browser does not verify an extension, read its reviews before installing it.