If the Indent option is grayed out or not working in Word documents on Windows 11, this article will help. Since it depends on several factors, we have consolidated some of the most common reasons and solutions to get rid of this problem in moments.

Why is Indent not working in Word?
If Indent is not working in Word, these could be the reasons:
- Incorrect Indent settings: It is the most common issue you might face if you set the Left-Right Indent as 0.
- Incorrect settings are set in the Word Options wizard.
- Editing is restricted by the document’s owner.
- You have a numbered or bullet-point list that is creating the mess.
- Your custom template doesn’t support indent.
Indent not working in Word
If Indent is not working in Word, follow these solutions:
- Make sure the document is not protected
- Remove the default custom template
- Decrease bullet or numbered list
- Try indent outside of table
- Check keyboard shortcut
- Set the default indent and try again
- Do not use indent on headings
To learn more about these solutions, continue reading.
1] Make sure the document is not protected
It is the very first thing you must ensure since protection prevents you from editing the document or changing the formatting in any way. Whether you want to add a new word, make text bold, or change the indentation, you must unlock the document first.
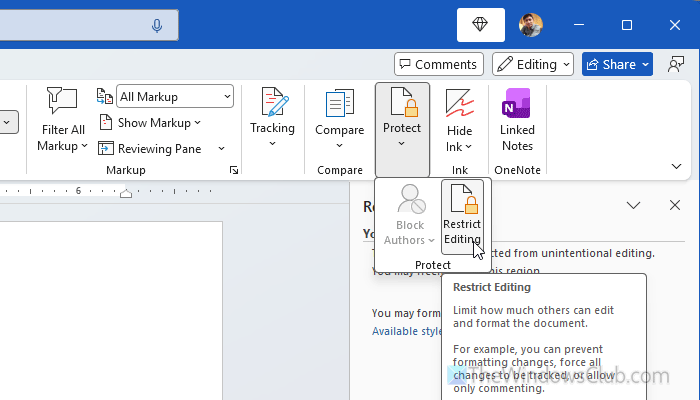
For that, open the Word document and go to the Review tab first. Head to the Protect section and click on the Restrict Editing option.
Next, click on the Stop Protection button, enter the password, and click the OK button.
Note: In case you want password protection and indentation side-by-side, you can’t have them both. All you can do is remove the protection temporarily, make all the changes, and encrypt the document again.
Read: How to protect Word document using Restrict Editing feature

2] Remove the default custom template
If you are using a custom template, it is recommended to remove it, as it may have different restrictions and default settings you might not be aware of. That is why you can follow these steps to remove the default custom template and start Word with the original template.
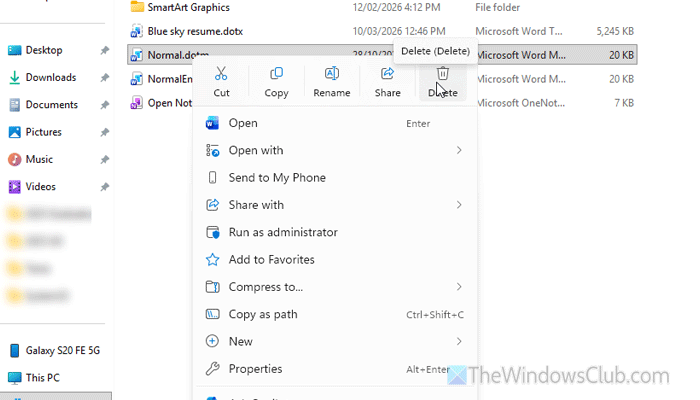
First, follow this guide to show hidden files and folders. Next, open the File Explorer and navigate to this path:
C:\Users\your-username\AppData\Roaming\Microsoft\Templates
Find the custom template. In case you don’t know, Word templates have a file extension called .dotm. Find and rename it to something else but do not change the file format.
Once done, restart Microsoft Word to create a brand new Notmal.dotm file, which is often known as the default template for Word.
Read: How to change Normal Template (Normal.dotm) in Word
3] Decrease bullet or numbered list
Indentation doesn’t fully work with bullet or numbered lists. Although it works, it creates sub-points instead of moving them towards the left or right. Whether you apply it to bullet lists or numbered lists, you will find the same result.
That is why it is suggested to decrease the number of such lists or remove them entirely (if possible).
Read: How to change the default Numbered List in Word
4] Try indent outside of table
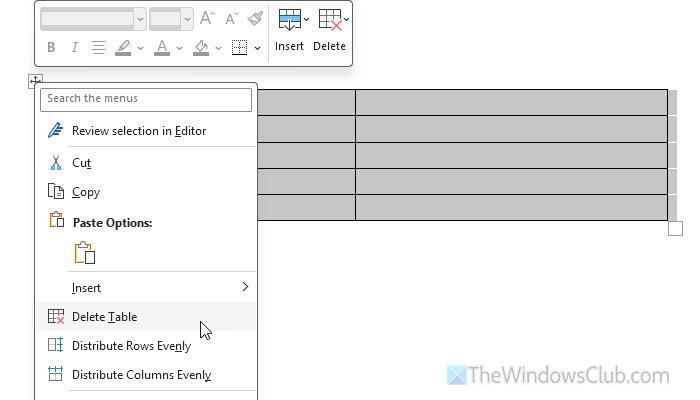
Indentation doesn’t work fluently or, rather, smartly with the tables. In other words, it doesn’t comprehend the use of the table. Instead of setting a limit, it may hide a part of the table if you use it extensively. That is why it is recommended to try indentation outside of the table.
If possible, you can remove the table since indentation doesn’t always work smoothly with it.
Read: How to format Word Tables using built-in Table Styles and Quick Tables
5] Check keyboard shortcut

These are the default keyboard shortcuts related to indent in Word:
- Entire paragraph: Ctrl+M
- Remove indent: Ctrl+Shift+M
- Hanging indent: Ctrl+T
You must check whether you haven’t set these keyboard shortcuts to execute any other task or not. If yes, it is highly recommended to remove them from there and let them perform the default task.
Note: If you use any third-party keyboard shortcut mapping software, check the settings. Also, make sure that your keyboard keys work properly or not.
Read: How to remap Keyboard Shortcuts in Windows 11
6] Set the default indent and try again
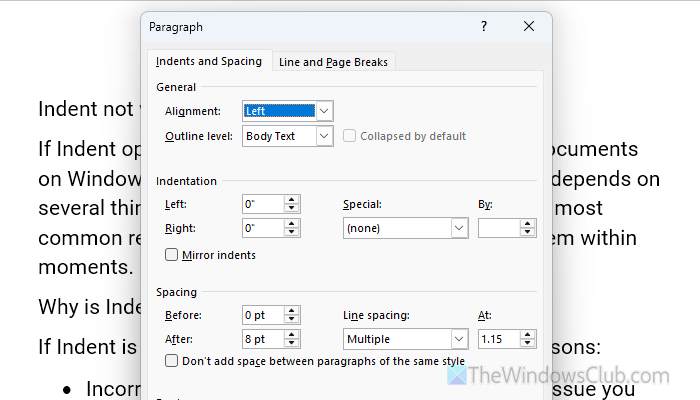
If you have changed the default indent settings, it is recommended to revert to the default settings. Having said that, open the Word document, find the Paragraph tab, and click on the arrow icon visible in the bottom-right corner. Next, set the value as displayed in the image.
In other words, choose Left as Alignment, and set the value of 0 as Indentation for both Right and Left.
Finally, click the OK button to save the change.
Also, if you have used the indent bar to change the indent values, you must set it to the default. Otherwise, the dedicated options might not work.
In other words, you can use the mouse to click on the bar and change it accordingly.
Read: How to change default Gutter Margin size and position in Word
7] Do not use indent on headings
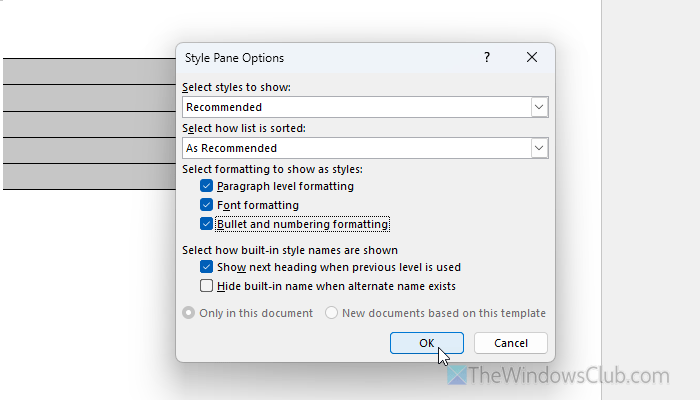
Indents might not work all the time on heading texts in Word as multiple things are involved. For example:
- If you have set default values for the headings in your template.
- If you use lists that are assigned to the heading.
In these cases, click on the arrow sign of the Styles section and click on the Options button. Then, remove the tick from these three checkboxes:
- Paragraph level formatting
- Font formatting
- Bullet and numbering formatting
Click the OK button.
Read: How to change default Heading, Quote, Title font in Word
How do I fix my Indent in Microsoft Word?
To fix the indent problem in Microsoft Word, you must check the default indent setting first. Following that, check whether you have assigned the keyboard shortcut to perform another function or not. Also, make sure you apply indent outside a table.
Why is my Indentation not working?
If you have set a default indent in your template, you won’t be able to change it further. Also, if the document is password-protected, there is no chance to edit it.
Read: How to create a Hanging Indent in Word and Google Docs.