Microsoft allows you to import a Start Menu layout from one of their Windows 11/10 computer and export it to another. This can be done to maintain uniformity and ensure that you don’t always have to customize your Start Menu from scratch. In this post, we will discuss how you can import and export Start Menu layout in Windows 11/10 using PowerShell.

Export Start Menu layout using PowerShell in Windows 11/10
Open the ‘System32’ folder located in the ‘Windows’ directory. Now click on ‘File’, then click on ‘Open Windows PowerShell as Administrator’.
To export, you need to run the following commands for exporting the Start Menu layout:
export-startlayout –path <path><file name>.xml
example:
export-startlayout –path C:\layout.xml

The layout will be exported to an XML file and will be saved at the specified path.
We will use this file again while importing this start menu layout so that you may preserve the file for future use.
Import Start Menu layout using PowerShell in Windows 11/10
To import the customized layout into the system, run the following command in an elevated PowerShell window:
Import-StartLayout –LayoutPath <path><file name>.xml –MountPath %systemdrive%
You can import a Start Menu layout using Group Policy Editor (gpedit). After importing the layout, it will be fixed; that is, you will not be able to change that layout by moving the tiles around. However, you can easily undo changes and make the Start Menu customizable again by following the steps outlined below.
To apply the Start layout to users in a domain, create a Group Policy Object. Press ‘Win + R’ on your keyboard and then type ‘gpedit’ and hit enter.

Once the Group Policy Editor is up and running, navigate to ‘User Configuration’ then to ‘Administrative Templates’, and then to ‘Start Menu and Taskbar’.
Now locate ‘Start Layout’ in the right pane and open the setting.
Click on the ‘Enable’ radio button and then in the Start Layout File textbox, type in the path to the file that we exported earlier. (C:\layout.xml)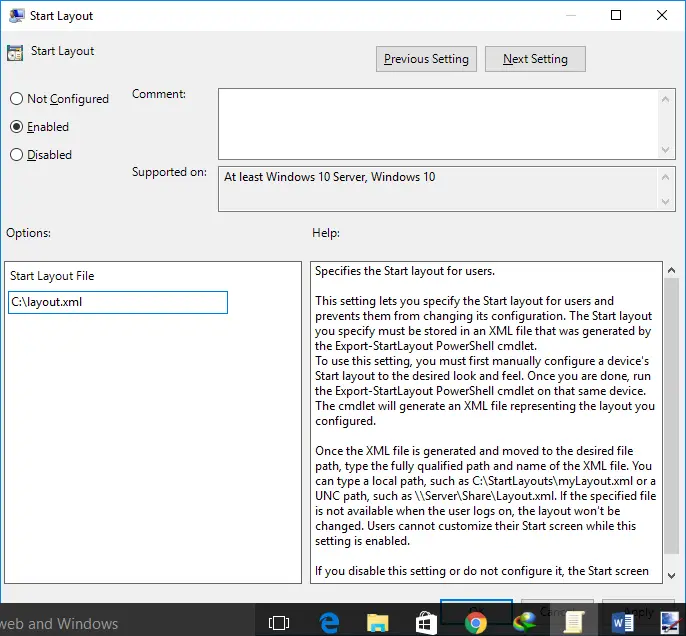
Click ‘Apply’ and close everything. Sign Out of your account and then Sign In again.
You will no longer be able to edit the start menu layout, as it will be fixed and will not allow any changes. You can make the start menu editable once again by disabling the ‘Start Layout’ setting that we’ve enabled in Step 4.
To apply these changes to all users on a computer, you need to repeat all the steps but in Step 2, navigate to ‘Computer Configuration’ instead of ‘User Configuration’.
To update the fixed Start Menu layout, simply update the XML file that we exported earlier. You can replace it with another XML file, but make sure the file name and path remain the same.
You might also want to learn how to Backup, Restore, and Reset the Start Menu Layout in Windows 11/10.
How to Import Start layout Windows 11?
To import Start Layout in Windows 11, you need to run Import-StartLayout –LayoutPath <path><file name>.xml –MountPath %systemdrive%. If you want to know how to run it and want to after running it, check out the Import section mentioned earlier.
Read: How to pin Windows Update to Start Menu or Taskbar in Windows
How do I change the layout of Windows 11?
To change the Start Menu layout in Windows 11 or make any other customization to your Start Menu, you need to visit Settings > Personalization > Start. Here, you can make all sorts of changes as per your will.
Also Read: Best free Start Menu Alternatives for Windows 11.