Todoist is one of the best apps for your company or personal use. Some new users might not know how to use the Todoist Chrome extension on their computers. This extension helps keep track of your personal and professional projects, collaborate at work, track kids’ tasks, make lists, and much more. Using Todoist chrome is quite simple, especially when you know how to start. So if you downloaded the Todoist app or want to, this is the best guide before you start.
Simply put, Todoist is a task management software and a To-do list app for small businesses, professionals, and individuals. Each user in Todoist gets control of their productivity by utilizing features like labels, sorting their work, stages, scheduling, and filters. Todoist is available and integrable in all devices like mobile, web, computers, and email platforms like Gmail. You can also integrate it with Dropbox, Zapier, Google calendars, and many more. Most importantly, it is available as a web browser extension for Chrome, Safari, Opera, Edge, and Firefox. In this post, we will learn how to use Todoist for Chrome.
How to use Todoist Chrome extension
To optimize and integrate your workflow between Todoist and Chrome, you need to use the Todoist extension on Google Chrome. You can use Todoist for free, business or pro – it all depends on your needs and the size of your enterprise. Here are the ways you can use the Todoist extension on Chrome:
- View your task list
- Add website as a task
- Use Quick Add to add tasks
- Use PC keyboard shortcuts
- Set the due date to Today
We assume you downloaded and installed Todoist for Chrome from the Chrome web store.
1] View your task list

To view the task list, Click the Todoist icon on the top right, on the Chrome extension bar. A close view of your tasks will appear. You can access any other extension features without leaving your current web page. The Todoist Chrome extension stores your completed projects so you can search, find and view them easily. You can remove these tasks from your active tasks list.
2] Add website as a task
You can add a website in two ways – By right-clicking or by using Quick Add. Adding a website to your tasks is a quick way to name a task if you are working on certain web pages or a client’s website. Here is how:
To add a website as a task by right-clicking, use the following steps:
- Head to the website that you want to add as a task.
- Here, you can right-click on any part of the page, and from the list, select Add to Todoist.
- Alternatively, you can highlight particular texts on the web page, right-click on them and select Add to Todoist from the list of options. The selected words will be the title name of the task in the Todoist lists.
To add a website as a task by using Quick Add, use the following steps:
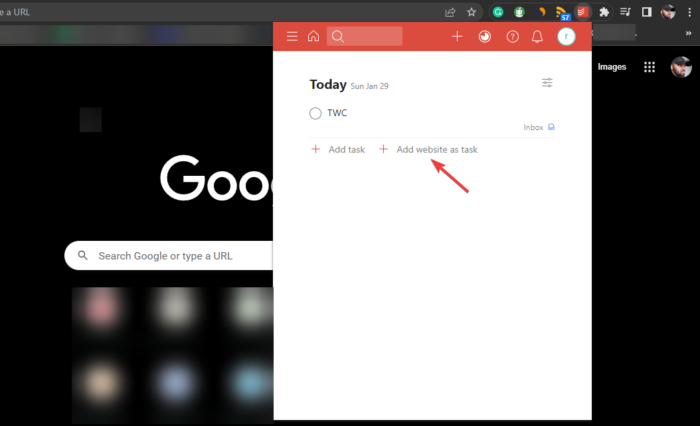
- On the top right, select the Todoist icon on the Chrome extension bar.
- Select the + icon that is on the top bar to launch Quick Add.
- At the bottom of the page, Click on the Add website as task option, and type the site URL as the name of the task.
- Save the task by clicking Add task.
Read: Best apps for Freelancers and Professionals for Windows PC
3] Use Quick Add to add tasks

The Todoist Quick Add feature allows users to add more information to their tasks. You can add a label, a due date, a task to a certain project, set task priority, and much more. The feature has a smart way to recognize and highlight every detail and add them to your task information. Here is how to use Quick Add on the Chrome extension:
- Head to the website that you would like to add as a task on Chrome.
- Here, right-click on any space and choose Add to Todoist from the list of options.
- You can highlight any text on the web page, right-click on it and click on Add to Todoist.
- In the pop-up panel, you will see the Quick Add feature.
- This will enable you to edit and add more information about the task such as adding due dates, priority level, comments, adding a task to a project, etc.
- When satisfied with your edits, click Add task to save it.
4] Use PC keyboard shortcuts
Using keyboard shortcuts is the greatest and fastest way to execute tasks on the Todoist chrome extension. The Todoist extension allows users to create and customize their keyboard shortcuts. Here is how to create and use PC keyboard shortcuts on Todoist:
- Open your Google Chrome browser and click on the Chrome extension bar in the top right corner.
- At the bottom of the pop-up window, click Manage Extensions.
- Select the menu on the top left corner (Three horizontal lines) and choose Keyboard shortcuts.
- All your extensions will appear. Navigate to where Todoist is and set the two keyboard shortcut options – Activate the extension and Add to Todoist.
- Customize your shortcuts are you prefer.
5] Set the due date to Today

Due dates are crucial for any tasks or projects. Many times we forget. Todoist allows users to set their tasks’ due dates or even recurring due dates for specific projects. Here is how to set the due date to Today on the Todoist Chrome extension:
- Open the Google Chrome browser on your computer.
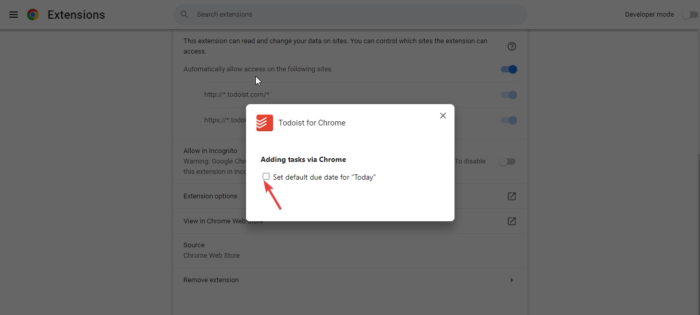
- Right-click on the Todoist icon and click on the Manage Extensions option
- Select Extension options from the list.
- A new pop-up will appear. Check the box next to the Set Default due date for “Today”.
We hope this guide helped you to get with the Todoist Chrome extension.
Why do people use Todoist?
People use Todoist because it helps them organize their projects and tasks in their enterprises, homes, or at the individual levels. It’s a great tool for collaboration, setting up tasks, prioritization, labels, sub-tasks, and much more. People can use Todoist to manage their projects, which enhances productivity.
How do I track my progress on Todoist?
You can track your progress on Todoist by viewing the task you have accomplished daily or weekly. You can also check the projects or tasks in the pipeline or those that need your priority. Todoist can help you achieve your goals by settings targets and managing your time doing what you need to do. You won’t forget to do a task because you can use the reminder feature to keep time.
Read next: Best Free Trello alternatives for Project Management.
Leave a Reply