Windows 11 is gaining popularity due to its innovative UI and new features for PCs. Microsoft has changed some aspects of the Photos app too. In this guide, we show you how to use the new Windows 11 Photos app.
The Photos app is a good one that lets you view pictures, apply basic edits to them, and create or edit videos. It can play videos. Generally, we use third-party software to view pictures and do various things with them. The Photos app is well-equipped to manage them and perform various tasks using a single app. Let’s explore the various tasks and features available in the Photos app on Windows 11.
How to use Windows 11 Photos app
Here are some things you can do with the new Microsoft Photos app on Windows 11.
- Watch a slideshow
- View the info of a picture
- Compare pictures
- Edit Pictures
- Create an album
- Import pictures into the Photos app
- Change the date of an image
- Organize pictures by people
- Add picture to favorites
- Change the appearance of the photos app
- Enhance your images
- Use the Filter feature
- Rotate and crop images
- Include other folders in the Photos app
- Find images you want fast
- Use the Photos app to create a video
- Share, delete, and copy multiple images
Let’s see how we can do them.
1] Watch a slideshow
This is a neat feature, and chances are, you may not have heard of it. Based on our testing, we can confirm that it works quite well.
- To begin, you must close the Photos app.
- Go to the folder containing your images.
- Open a photo from within the folder using the Photos app.
- From there, press F5 to activate the slideshow.
Alternatively, to watch the slideshow of the pictures on the Photos app, click on the three-dot button at the top-right of the window. Then, select Slideshow from the options you see.

It will play a slideshow with all the images by the order of their dates.
2] View the info of a picture
Each image or picture we see has a name and some information about it which we cannot see directly. On the Photos app, you can see their info. Click on an image in the Photos app to view it. You will see some controls on the top of the image. Then click on the info icon that shows opens a panel on the right side with the info of the selected image.

3] Compare pictures
When viewing pictures and you want to compare two or more images, you can do so easily in the new Photos app in Windows 11. While viewing pictures, you can see the thumbnails of images at the bottom of the screen. Just move the cursor to the corner of the tile of the image you want to compare with. Then, you will see a checkbox at the corner. Check the box to view the picture on the side of the current picture.


4] Edit pictures
You see some options while viewing a picture including an option to edit it. You have to click on the edit button to open editing options.

On the editing screen, you can crop, rotate, flip, change aspect ratios, adjust brightness, contrast, and apply filters to the images. After doing the necessary edits, you can click on Save a copy to save the edited one.

5] Create an album
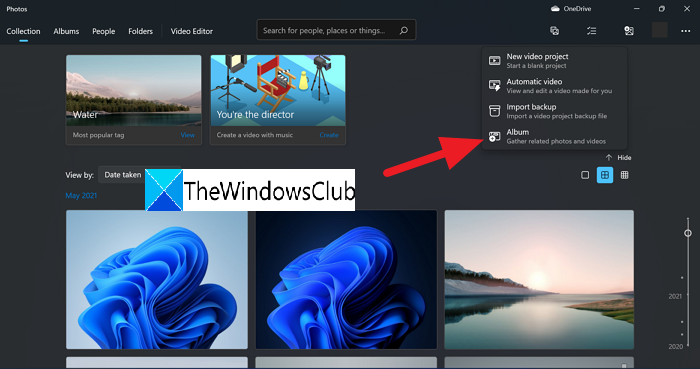
To create an album, click on the double image icon on the top bar of the Photos app. You will see options such as New Video Project, Automatic Video, Import Backup, and Album. Click on Album.
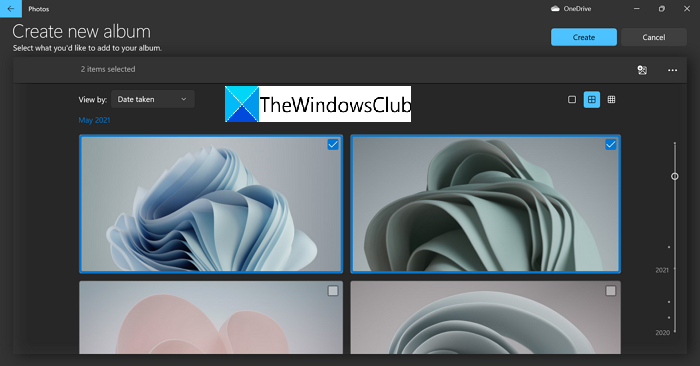
Then, select the images you want to add to the album by checking the boxes on the corner of each image and click on Create at the top of the Photos app.
6] Import pictures into the Photos app
Photos app detects the pictures on your computer by default. If any folder or images are not seen in the Photos app, you can import them easily.

- Plug the drive into the computer.
- From the top-right section, click the Import icon.
- Right away the Photos app will detect your drive.
- All images within will be ticked by default.
- Select the Continue button to import them.
You can import pictures from a folder or a connected device.
There will also be an option to delete all photos from the drive. Ignore that if you’re not interested in going down that route.
7] Change the date of an image
Photos app gives an option to change the date of an image easily. To change the date, right-click on the picture you want to change the date of. Then select Change date from the context menu.

It will show you the dates. Adjust them as per your requirement and click on the tick button to save the date.

8] Organize pictures by people
The group images of a person are easily available; the Photos app provides a feature for that too. People feature is the one that groups images of a person by detecting the faces in every picture. To organize or group pictures by people click on People on the top bar of the Photos app.

You have to give permission to Turn on the People setting. Click on the Yes button to turn it on.

It takes a few minutes for the Photos app to read and detect people in every picture and group them.
9] Add pictures to favorites
You liked a few pictures of the collection and don’t want to waste time searching for them again, you can add them to your favorites. By adding them to favorites, you can easily access them anytime by going to the Favorites section in the Photos app.
To add a picture to favorites, click on the heart icon on the top of the image you are viewing.

Alternatively, you can right-click on an image and select Add to favorites from the options.
10] Change the appearance of the Photos app
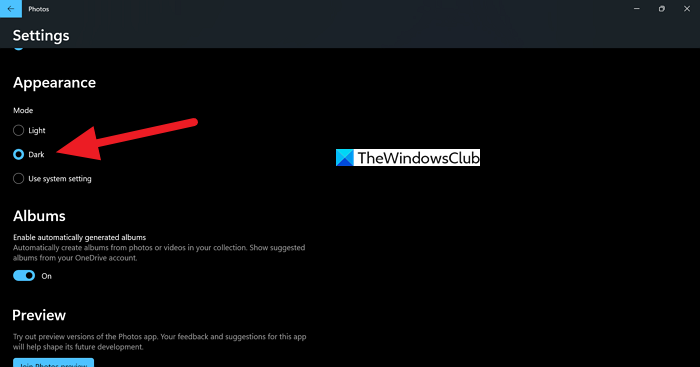
You can also change the look of the Photos app like Light, Dark, or Use System Setting. To do that, click on the three-dot button on the top-right of the Photos app and then select Settings.

It will open the Settings of the Photos app. Scroll down to the Appearance section and check the button beside the look you want to apply.
These are the different options that the new Photos app on Windows 11 offers.
11] Enhance your images
Like most photo editing tools, the Photos app is capable of enhancing images, but do not expect a lot of advanced features. If you want to enhance your favorite images, you need to follow the steps below.
- Launch the Photos app.
- Open the photo you want to enhance.
- You must now click on the Filters option.
- Select the section that reads, Enhance your photo.
- Drag the line to enhance your image in a way that makes sense.
- Finally, save the image, and that’s it.
The enhancement feature is automatic so what you see is what you get. If you want more freedom, then look to PhotoShop or GIMP.
12] Use the Filter feature
Users can easily add filters to their images. Again, one should not expect anything impressive here, as the Photos app is not intended for professionals.
- In order to add filters, you must open the Photos app.
- Add the image you want to edit.
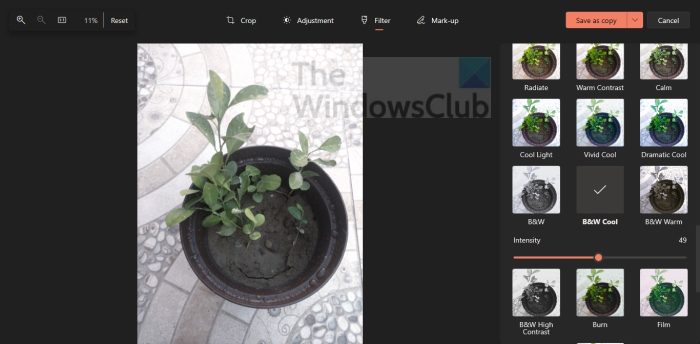
- Click on the Filter section.
- From the dropdown menu, select the preferred filter.
- Click the Save button below to complete the task.
Bear in mind there are limited filters available here, so it probably won’t be enough for Instagram enthusiasts.
13] Rotate and crop images
Yes, the Photos app offers the ability to crop and rotate images. Once an image is opened in the app, users can click a single button to rotate it. To crop, simply click on the Edit icon and perform the action from there.
14] Include other folders in the Photos app

You’ll realize how the Photos app can easily pick up images from your default Photos folder. This is by design, but you can choose for the app to have a look in other folders as well. So, how do we get this done? Let’s take a look.
- Launch the Windows Photos app.
- Click on the button with the three dots.
- Choose the Settings button.
- Next, you must click Add a Folder.
- Select the preferred folder, and that’s it, you’re good to go.
15] Find images you want fast
One of the features we appreciate in the Windows Photos app is its ability to save images based on the date they were taken. But bear in mind, that the information is taken from the EXIF data, so if you set your camera to not save such data, then the Photos app saving by date feature will not work accordingly.
To find photos quickly, you must click on Albums, then select Last Import.
16] Use the Photos app to create a video

For those who aren’t aware, the Photos app is capable of editing videos. This is not something Microsoft often discusses, but the feature is available.
- Open the Photos app.
- Look to the top and select Video Editor.
- Use the options to create your unique video.
Now, we should note that Microsoft is transitioning to Clipchamp, a video editing tool it acquired. When attempts are made to use the Photos app’s video editor feature, it suggests installing Microsoft Clipchamp, but this is not necessary.
TIP: You can also make a Slideshow with Music using it.
17] Share, delete, and copy multiple images
The Microsoft Photos app comes equipped with a batch feature that allows users to delete, copy, and share multiple photos simultaneously. From our point of view, this feature is quite impressive, but limited at the same time, because there aren’t many apps that support file sharing.
Read: Pictures turning black in Photos app of Windows 11
How to use artificial light sources in your photograph?
You can use the Relight feature in Microsoft Photos in Copilot+ PCs. This feature allows you to adjust the appearance of lighting in your photo by modifying its direction, color, position, and intensity. To use this feature, open the Photos app, select the image you want to relight, then tap Edit and choose Relight from the available options.
What is the Windows Photo app?
The Photos app located in Windows 11/10 is designed to collect photos from your computer and other external devices. Once images are collected, they will be placed in the default Photos folder or any other folder the user has chosen.
Related: Windows Photos app is slow to open or not working.
Is Windows Photos App good?
Yes. Microsoft has developed the Photos app with a great feature that you can get rid of apps that are related to images and videos. The Photos app has good UI and fantastic options related to both images and videos.
Read: How to Repair or Reset the Photos app.
Is the Windows 11 photo app free?
Yes. The Photos app on Windows 11 is absolutely free. It comes along with Windows 11 and you don’t have to install it separately. With the Photos app on your PC, there will be no need to install third-party image viewers.
Related Read: How to Make a Video from Photos in Windows 11.