AI is here to stay, and it’s high time we leverage it for our advantage with the help of AI agents. Microsoft Agent Store is a den that has all the AI agents by Microsoft, trusted partners, and customers. You can upload your agent there and use agents created by other resources. In this post, we are going to see what you can do to use Agent Store in Azure.
What is Agent Store?
The Microsoft Agent Store is a new feature within Microsoft 365 Copilot designed to boost productivity by connecting users with specialized AI-powered tools. This platform allows users to explore, install, and test custom agents created by Microsoft, its partners, or even other customers. These agents act like smart assistants tailored to specific tasks, such as organizing data, managing projects, or simplifying daily workflows.
The platform suggests tools based on your work habits, role, and preferences, making it easier to find what you need. It works smoothly across Microsoft 365 apps like Teams and the Copilot website, letting you access these tools wherever you work. Both licensed Copilot users and those without a paid license can try the Agent Store, though some features may vary.
It is a centralized platform for discovering tools tailored to your needs. It integrates seamlessly into your workflow, supporting tasks like drafting emails and analyzing reports while learning from your working style to improve suggestions over time. If you are running a team, you can collaborate with shared access to agents, discuss with them, or create a new one.
How to use Agent Store in Azure
To use Agent Store, you can follow the steps mentioned below.
- Create an AI agent
- Access Agent Store
- Integrate your agent
- Check your agent
Let us talk about them.
1] Create an AI agent
If you are looking to upload your agent to the Microsoft Agent Store, your first job should be to create one. You can go through our guide on how to create an AI agent for yourself. You can also create an AI agent using LLMs Claude, Copilot, ChatGPT, and Gemini. Additionally, you can also create Copilot agents using Microsoft AI. After creating the agent, make sure it is trustworthy before uploading.
2] Access Agent Store
Before we go ahead and access the Microsoft Agent Store, it’s worth noting that one needs to enroll in the Microsoft 365 and Copilot program. You can go to Microsoft Partner Center > Microsoft 365 and the Copilot Program Agreement.
Now, if you want to add an agent, you need to go to the Marketplace offers. Then, click on +New Offers > Apps agents for Microsoft 365.
You will then see a streamlined process for app validation and approval.
3] Integrate your agent

When trying to publish your agents, there are a few things to keep in mind. Microsoft provides you with an option to monetize your agents. In the Partner Center, when trying to publish your agent, go to Office setup, and then in the Microsoft 365 Integration, you need to tick the following two options.
- Yes, my Saas offer integrates with Microsoft Graph
- Yes, I have published Teams apps, Office add-ins, or SharePoint Framework solutions that I would like to link to this SaaS offer.
The main aim is to link to SaaS.
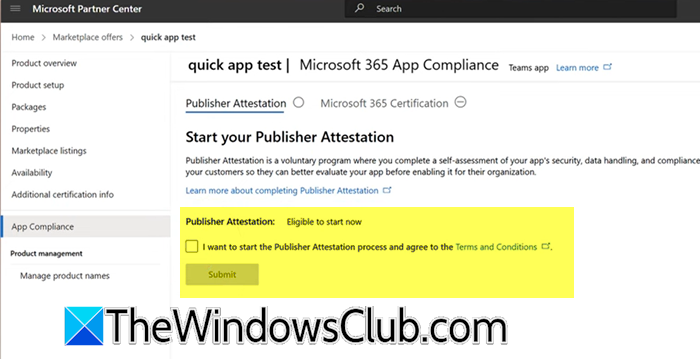
To build trust and drive adoption, you can even go to App Compliance > I want to start the Publisher Attestation process and agree to the Terms and Conditions. Make sure to upload evidence of Microsoft 365 certification (if you have one).
4] Check your agent

Once the agents are published, you can access them from the Microsoft Agent Store. Just go to the platform and click on All agents. If your agent is published, it will be available on Microsoft AppSource and Microsoft 365 Admin Center.
Additionally, you can download agents published by other developers from the Microsoft Agent Store. Once installed, launch the agent directly within apps like Outlook, Teams, or Word. For example, a writing assistant could pop up while drafting an email, or a project tracker might auto-generate updates in Teams chats. Test it in real tasks to see how it fits your workflow.
Hopefully, with the help of this post, you will be able to use Microsoft Store Agents.
Read: How to configure MCP server on Windows using Claude?
How do I use Azure agent?
To use an Azure agent (like Azure DevOps agent or security agents), first deploy it in your Azure environment via the Azure Portal or CLI. You can configure the agent to connect to your target service (e.g., pipelines, VMs, or apps) by setting permissions and defining tasks. Once active, it automates workflows, monitors resources, or manages deployments based on your setup.
Read: How to use Browser Use WebUI on Windows
How to use agent pool in Azure DevOps?
To use Agent Pool in Azure DevOps, you need to follow the steps mentioned below.
- In Azure DevOps, go to Project Settings > Agent Pools.
- Now, create a new pool or use the default one.
- From learn.microsoft.com, install the Azure Pipelines agent on your machine or VM.
- Now, register it to your pool using a PAT (Personal Access Token).
- In the YAML or Classic editor, specify the pool name under pool: to route jobs to agents in that pool.
With the help of this post, your agent pools, you can organize, scale, build, and deploy tasks.
Also Read: Build and sell AI-powered apps.