
ShellBags are the little-known features of Windows. We rarely come across ShellBags, not only as a feature but also as a word. The ShellBags on a Windows PC contain a lot of information about the folder and its usage for a particular user account. In this guide, we explain to you what ShellBags are and how to remove or disable ShellBags on Windows 11/10.
What are ShellBags in Windows?
ShellBags is a Windows feature that stores data related to folders. Whatever folders we see on the File Explorer, open them, arrange them, or delete them forever, the entire data is stored in the ShellBags. ShellBags remembers the folder options you chose and implements them accordingly.
ShellBags in Windows store the following data:
- Folder layout and icons
- User preferences to sort or view folders
- View mode preferences related to every folder
- File Explorer window size and position
ShellBags are stored separately for each user account on a PC. ShellBags not only work to auto-implement our folder options. They can also be used for forensics, as they can reveal the folders a user opened on a computer, the structures of deleted or moved folders, and folders opened from a USB drive or external storage devices, and the timestamps of each folder created, opened, or interacted with. ShellBags store metadata related to folders on a user account on a Windows PC. They are user-specific, and each user has different ShellBags created separately.
Let’s see how we can clear them or disable them entirely.
How to remove or disable ShellBags on Windows 11/10
As said already, ShellBags and its data are responsible for how any folder is displayed, how folders are sorted and grouped, etc. You can easily reset them for your user account entirely by removing ShellBags.
- Manually remove ShellBags
- Remove ShellBags using system cleaning programs
Let’s move on to implementing each method to remove ShellBags on your Windows PC.
1] Manually remove ShellBags
Manually removing ShellBags is easier but complicated. You need to manually open each path in the Registry Editor where ShellBags are stored, remove the entries, and then re-create them so you don’t break your PC. If you do not know or have never used Registry Editor, it is recommended to back up the registry before getting into the method. Or else skip to the next method.
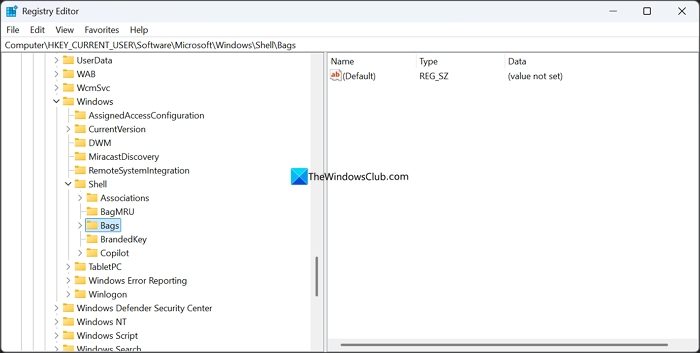
To remove ShellBags on Windows 11, open Registry Editor on your PC and navigate to the following paths. You can just copy and paste the following path in the Registry Editor and press Enter.
HKEY_CURRENT_USER\Software\Microsoft\Windows\Shell\Bags

HKEY_CURRENT_USER\Software\Microsoft\Windows\Shell\BagMRU

HKEY_CURRENT_USER\Software\Classes\Local Settings\Software\Microsoft\Windows\Shell\Bags

HKEY_CURRENT_USER\Software\Classes\Local Settings\Software\Microsoft\Windows\Shell\BagMRU
You need to go to one path at a time and delete the keys. Select the folder/key and right-click on it. Then select Delete from the context menu, and confirm the deletion.
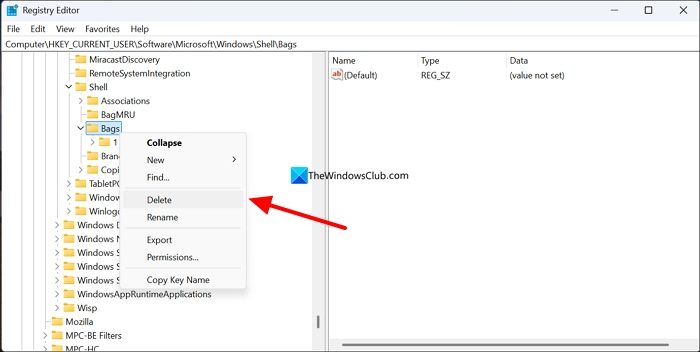
Repeat this process until you delete the keys in all four paths. Now, you need to create new keys in the following path.
HKEY_CURRENT_USER\Software\Classes\Local Settings\Software\Microsoft\Windows\Shell
After navigating to the path, right-click on the Shell and select New > Key and name it BagMRU.
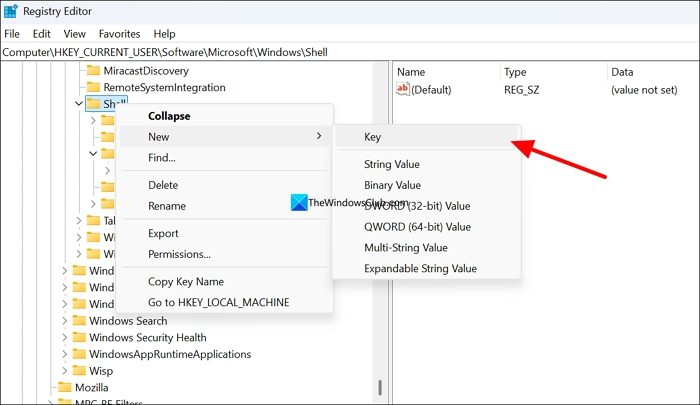
Create another Key and name it Bags. After creating the Keys successfully, you need to create a new DWORD file in the following path.
Computer\HKEY_CURRENT_USER\Software\Classes\Local Settings\Software\Microsoft\Windows\Shell
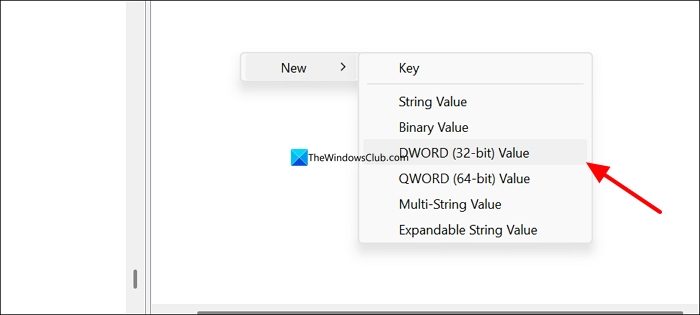
Then, create a new DWORD (32-bit) Value by right-clicking on the details pane.
Name it BagMRU Size. Now, double-click on it to open it. Now, enter 1 in the Value data box and click OK to save changes.
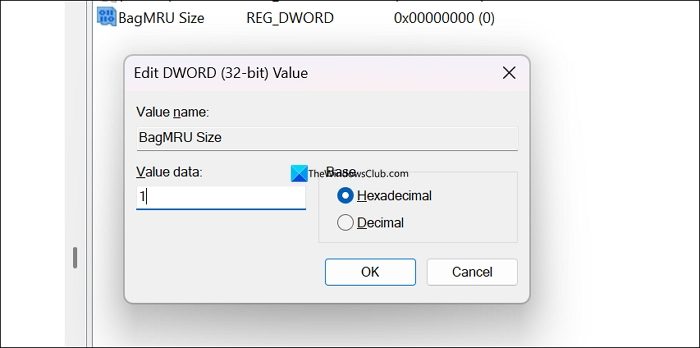
This will successfully disable ShellBags on your PC.
2] Remove ShellBags using system cleaning programs
There are some third-party cleaning programs that can help you remove ShellBags on your PC without you doing anything manually. They will automatically clear them for you when you run them.
BleachBit and ShellBag AnalyZer + Cleaner are very useful to remove ShellBags without paying for any subscription. You can download either program and install it on your PC.
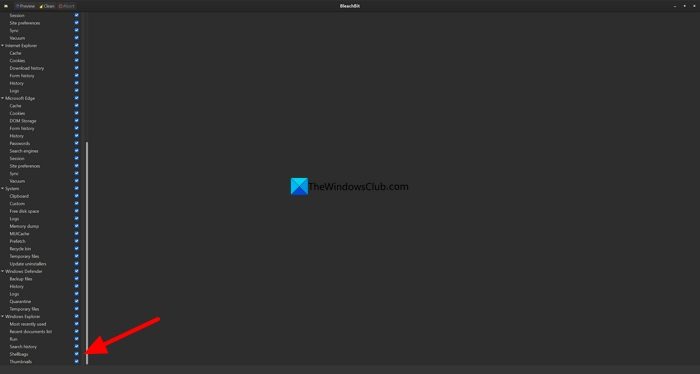
If you opt for BleachBit, you need to manually select ShellBags under Windows Explorer for the first time. It would automatically be selected for the next use. When you click Clean in BleachBit, it will run for a few minutes and clean junk files on your PC, including ShellBags.
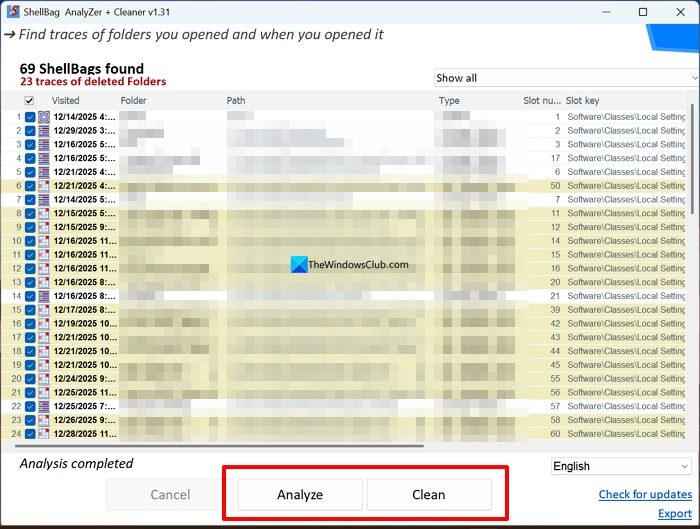
If you opt for ShellBag AnalyZer + Cleaner, download it and open.
Then, click Analyze at the bottom. It will show you all the ShellBag entries.
Select all of them, then click Clean to remove them.
You have to run them every time to clear the ShellBags. If you opt for the first method, you can disable them.
Read: How to reset File History in Windows 11
Where can I download Shellbags Explorer?
Shellbags Explorer is a forensic tool for analyzing Windows Shellbag data, which records user interactions with folders in File Explorer. It is a GUI for browsing shellbags data and can handle locked files. SBECmd command line tool, for exporting shellbag data, is also available. You can download it from ericzimmerman.github.io.
Can I delete ShellBags?
Yes, you can delete ShellBags on your Windows PC to remove all metadata related to the folders you have created, opened, deleted, modified, and their timestamps. You can simply use cleaning programs or remove them manually in the Registry Editor.
Related read: How to back up and restore Folder View settings in Windows 11.
