Backing up virtual machines in VMware Workstation protects you from data loss caused by configuration mistakes, software failures, or host system problems. You have several built-in options, ranging from quick, temporary save points to fully independent copies. In this guide, we will see how to back up and restore VMware Workstation VMs.
Backup and restore VMware Workstation VMs
To back up and restore your VMware Virtual Machines, follow the methods mentioned below.
- Using Snapshot
- Using full clones
- Manually copying files
Let us talk about them in detail.
1] Using Snapshot
Snapshots capture the exact state of a VM, disk contents, memory, and power status, at a specific moment. They are ideal for short-term rollbacks during testing, but are not a replacement for proper backups. You can follow the steps mentioned below to do the same.
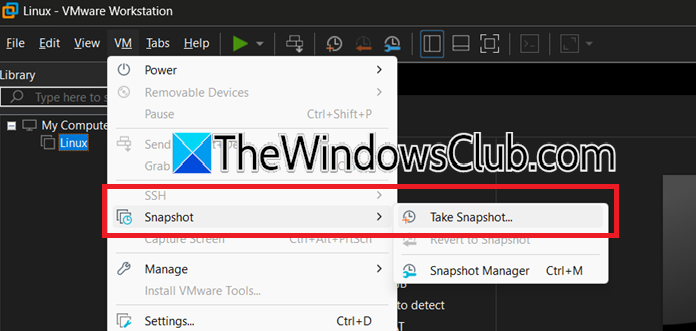
To take the backup using Snapshot, follow the steps mentioned below.
- In VMware Workstation, select your machine.
- Then, click on the VM option from the top menu bar.
- Now, click on Snapshot > Take Snapshot.
- Type a descriptive name in the dialog box.
- Click OK (or Take Snapshot, depending on the build).
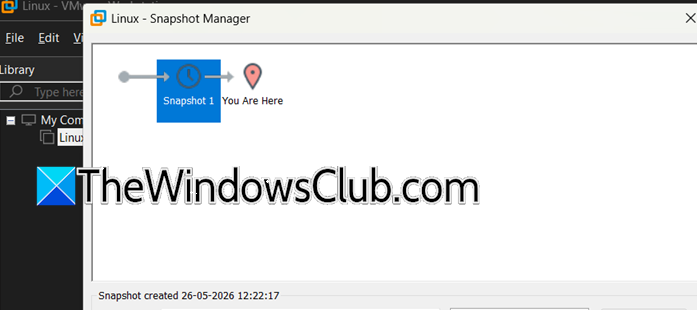
Now, to restore using a Snapshot backup, follow the steps mentioned below.
- Right-click on your VM and select Snapshot.
- Now, go to Snapshot Manager.
- Select the snapshot you want to restore.
- Click on the Go To button.
- Click Yes in the confirmation dialog box.
That is how you can restore using Snapshot.
2] Using full clones
A full clone creates an independent duplicate of a VM. The clone shares nothing with the original after creation and can run on its own. You can follow the steps mentioned below to do the same.
Backup

- Power off the machine.
- Right-click on the VM in the library.
- Point to Manage > Clone.
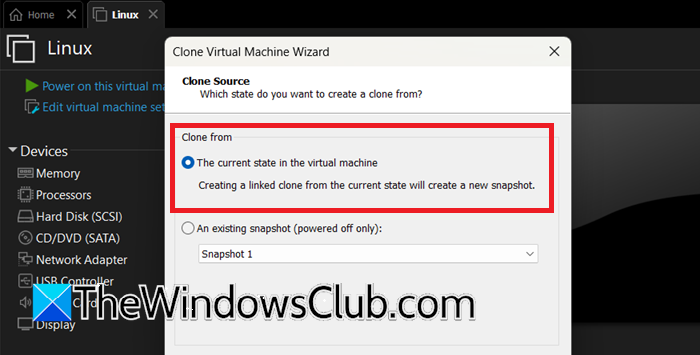
- In the Clone Virtual Machine Wizard, click Next on the Welcome page.
- Select From current state and click Next.
- Select Create a full clone and click Next.
- Enter a name for the clone, choose a destination folder, then click Finish (or Done after completion).
Recovery
- Locate the clone’s folder.
- Double-click the .vmx file or click File > Open and browse to the .vmx file.
- Select the clone in the library and click Power on this virtual machine (green play button).
- If prompted, select I Copied it to generate a new unique identifier.
Hopefully, this will do the job for you.
3] Manually copying files
Copying the entire VM folder while the VM is powered off creates a portable, self-contained backup with no special export process.
To take the backup, shut down the VM completely, locate the VM folder containing the .vmx, .vmdk, .nvram, and log files. You can get the location of the folder from Virtual Machine Settings > Hardware > Hard Disk > Disk file. Copy the folder, navigate to the backup destination and paste it there.
Now, to restore the VM, click on File > Open > Browse to the folder and select the .vmx file. Click Open. When prompted, select I Copied It to avoid network MAC address conflicts. Finally, power on your machine.
Hopefully, with the help of these methods, you will be able to back up and restore your VM.
You can also try exporting and importing a VM to OVF for cross-platform compatibility.
How to take a backup of a VMware workstation?
To back up a VMware Workstation virtual machine, you can choose from several built-in methods depending on your needs. A snapshot, taken via VM > Snapshot > Take Snapshot, quickly captures the VM’s current state for short-term rollbacks. For an independent, long-term duplicate, power off the VM and create a full clone via Manage > Clone, selecting “Create a full clone”. A manual file copy is also effective: shut down the VM, then copy its entire folder, including the .vmx and .vmdk files, to another drive for a portable, self-contained backup. Finally, you can export the VM to the standard OVF format via File > Export to OVF for cross-platform compatibility and archival, which packages the current disk state into an .ovf file and its associated .vmdk files.
Read: How to use Host Configured Printer on VMware Workstation VM
Can I recover a deleted VM?
You can often recover a deleted virtual machine (VM) in VMware Workstation, but the success depends on how you deleted it. If you only removed it from the library using the right-click “Remove” option, the actual VM files, like the .vmx configuration file and .vmdk virtual disks, are still on your hard drive. In this case, recovery is easy. Just right-click in the empty library space, select “Open,” find the VM’s original storage folder, and choose its .vmx file. The VM will then appear back in your library with all your data intact.
If you delete the VM from the disk, it permanently erases the folder, making recovery harder. You’ll need to rely on any full clones, OVF exports, or manual backups, or you may use specialized data recovery software to find deleted .vmdk files on your disk.
Read: VMware Workstation failed to power off virtual machine.