Microsoft Paint is unquestionably one of the easiest and most popular applications preloaded on Windows. One of the most interesting and lesser-known features of this tool is the Transparent Selection in MS Paint.
What is Transparent Selection in MS Paint?
Microsoft Paint is commonly used for basic editing like cropping, rotating, and resizing images and sometimes even for creating new drawings. Its simple interface makes it the go-to software for any simple editing tasks and sometimes even complex ones.
There are many situations where a user may want to use images with transparent backgrounds. Images with a transparent background can be easily stacked on top of each other. In such a case, Transparent Selection in MS Paint works well. Transparent selection can be used for minor edits, but again, it does not work very well with high-quality pictures. With this feature, a user can select a part of the image and a specific color, and make that color transparent.
The features of MS Paint are quite limited; hence, there is no option to save the images with a transparent background in MS Paint; basically, while keeping an image, the altered transparent background turns white.
How to make Background Transparent in Paint
Microsoft Paint can filter out the background color of any image with a solid-color background. Once filtered, the image should be instantly pasted onto the other picture. We will explain how to separate an image from its background in MS Paint on Windows 11/10; follow these steps:
- From the ‘Start Menu’ open ‘Microsoft Paint’
- Now, open the image you want to edit. Click on ‘File’ and hit ‘Open’ to browse open your image or simply right-click your image file and hover over the ‘Open with’ option and select ‘Paint’ on the application list.
- The image you select should be with a solid background color or white background.
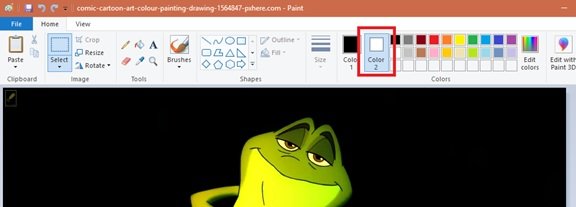
- Select ‘Color 2’ on the toolbar.
Here you will have to select the background color for the image i.e. Color 2 here. For e.g. if your background color is white, you will need to set ‘color 2’ to a similar shade of white here.
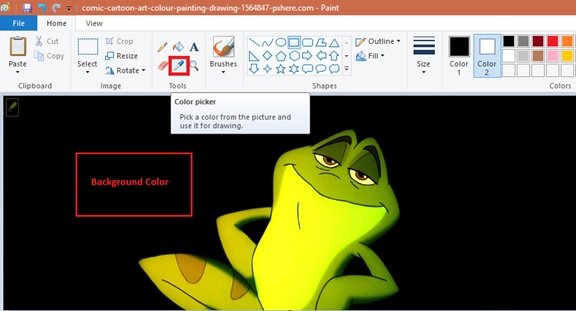
Hit on the ‘Eyedropper Tool’ on the toolbar.
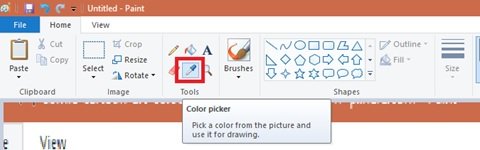
After selecting the eyedropper tool click on your image background to select the background color. This action will select ‘Color 2’ to your image background.
Further, you will need to separate the image from its background color. So, hit on the ‘Select Menu’ on the toolbar appearing in the top-left corner. This will open a drop-down menu as shown below.

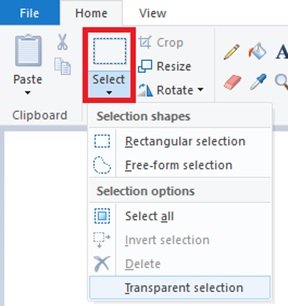
Select ‘Transparent selection’ from the menu. This will enable a transparent selection option for all your selections, with a checkmark next to the same menu appearing here.
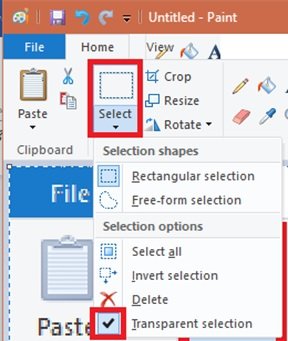
Now, depending on the area you want to select, choose ‘Rectangular selection’ or ‘Free-form selection’ from the same ‘Select Menu’ under ‘Selection Shapes’. Both these tools can be used when the transparent selection mode is active.
![]()
Select the image you want to cut out from the background. Hold down the left mouse button and slowly trace around the image. A black outline will appear while tracing, but once you release the mouse button, the outline disappears.
![]()
Once the selection is complete, right-click on the selection area.
On the right-click menu, hit ‘Cut’ or ‘Copy’. This will copy your selection to the clipboard.
Read: How to add a Transparent Image over Screenshot with Paint
Now open the new picture where you want to paste the copied image in MS Paint.
Right-click on your new image and paste the copied image with the previous background as transparent.

Note: In this example, we pasted the edited image with a transparent background onto the original image.
That is it! The image will fill the transparent area, and you can resize and rotate it to adjust.
Read: How to make Background Transparent in Paint 3D
We hope you enjoyed exploring Transparent Selection in MS Paint with us!
Read: How to remove Image Background using Paint app in Windows 11
Can you save the cut images in Paint app?
Unfortunately, saving images with a transparent background is not possible in Microsoft Paint. When you try to save such an image, the background area of the image will no longer be transparent and turns into a solid color; in most cases, white, i.e., Color 2. But again, there is a hack available for this, which allows you to use images with transparent backgrounds. In this case, you will need to use Microsoft PowerPoint.
Read next: Microsoft Paint tips and tricks.