Netcat is a flexible network security tool used by administrators for various network tasks, including checking open ports, transferring data over connections, and conducting security assessments. Since Netcat is not preinstalled, we will see in this post how to install and use Netcat on Windows 11/10.
How do I install Netcat?
You can install Netcat either by running the executable file that you can download from their official website or by using Winget or Chocolatey. We have mentioned both methods in this post, and you will be able to install Netcat.
Install and use Netcat on Windows 11/10
Netcat lets you read from and write to network connections using TCP or UDP, enabling simple tasks like checking if a specific port on a computer is open and reachable (port scanning), transferring files directly between machines, creating a basic chat session between two computers, setting up a temporary connection for remote access, or even acting as a very simple web server for testing purposes. Therefore, making it incredibly useful for both network troubleshooting, diagnostics, and security testing due to its fundamental ability to move raw data across a network.
To install Netcat on Windows 11, follow one of the steps mentioned below.
- From the Netcat website
- From Winget and Chocolatey Package Manager
Let’s discuss them in detail.
1] From the Netcat website
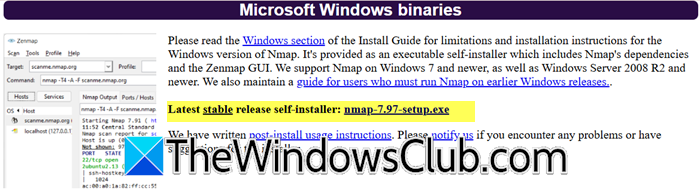
First of all, let us go ahead and download the Netcat installer from nmap.org. You need to download the .exe file that would be linked after “Latest stable release self-installer”.
After downloading the executable file, right-click on it and select Run as administrator. Click “Yes” when the UAC prompt appears.
Once the installer appears, you need to follow the on-screen instructions to complete the installation process. Wait for NCAP to be installed, and once it’s installed, let’s proceed with verifying the installation.
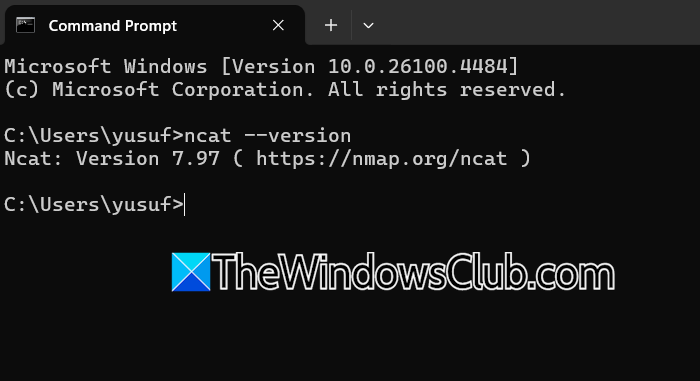
ncat --version
You will see the version of Ncat as shown in the screenshot.

2] From Winget and Chocolatey Package Manager

Winget is a command-line package manager for Windows that’s used to automate installing and managing applications. To install Netcat using Winget, run the command below.
winget install Insecure.Nmap
Chocolatey is a community-driven package manager for Windows that automates software deployments using NuGet infrastructure and CLI commands. Run the following command to install Netcat using Chocolatey.
choco install nmap -y
If you have installed it already, the commands can be used to update the utility as well.
Read: Free Packet Sniffing Tools for Windows computer
Use Netcap

After installing Netcap, let’s proceed with using it.
You can open the Nmap Zenmap GUI and start using it. If you want to test any website, just write the URL in the Target field and click on Scan.
Alternatively, you can use the Ncat command to do the same.
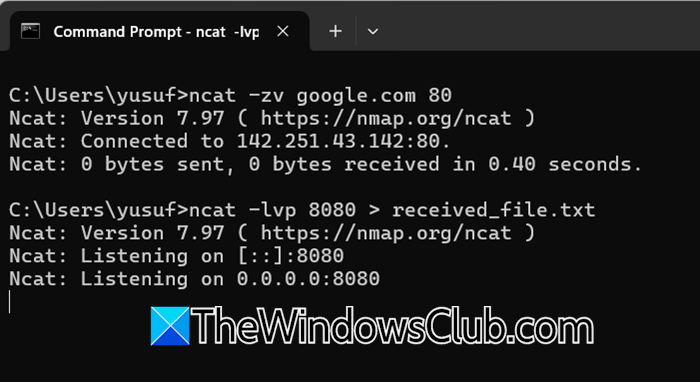
You can test if Google’s port 80 is open using the following command.
ncat -zv google.com 80
You can use Ncat to transfer files (e.g., send report.txt from PC-A to PC-B):
## On receiving PC-B
ncat -lvp 8080 > received_file.txt
## On sending PC-A
ncat -nv PC-B_IP 8080 < report.txt
If you want to manually interact with a web server, you can try the following command.
ncat -Cv example.com 80

GET / HTTP/1.1

Host: example.com
Hopefully, with the help of this post, you can start using Netcat.
Read: NETworkManager: Manage and Troubleshoot Network problems
Can I use Netcat on Windows?
Yes, you can use Netcat on Windows, but it doesn’t come preinstalled. You need to manually install it either by downloading the official ncat installer from the Nmap project’s website or via package managers like Winget (winget install Insecure.Nmap) or Chocolatey (choco install nmap -y). Once installed, run ncat.exe from Command Prompt or PowerShell to perform network tasks like Port scanning, file transfers, or debugging connections.
Also Read: Free Network & Internet Traffic Monitor Tools for Windows PC.