
Microsoft Graph is a method by which developers can access data and services from Microsoft’s cloud, including Microsoft 365, Windows, and Enterprise Mobility + Security. It offers a simple REST API and a set of SDKs, which let you work with various services. You can manage users in Microsoft Entra ID, handle files in OneDrive, or interact with channels in Microsoft Teams, all through one easy interface. In this post, we are going to learn how you can easily install and use Microsoft Graph.
Install and use Microsoft Graph
Before installation, it’s crucial to understand that Microsoft Graph is a RESTful web API that integrates various Microsoft services. You only need to authenticate once to access data across these services. A key step is setting up an Azure Active Directory (Azure AD) application registration, which serves as your identity in Azure AD and allows you to obtain authentication tokens for the Graph API. During registration, you’ll also configure permissions (scopes) to define the data your application can access.
To use Microsoft Graph on Windows 11, follow the steps below.
- Install Microsoft Graph
- Choose your API
- Authenticate and connect
- Make your first API call
Let us talk about them in detail.
1] Install Microsoft Graph

The SDK is published on the PowerShell Gallery. The recommended method is to use the Install-Module cmdlet.
First of all, launch PowerShell as an administrator.
By executing the following command, we will set the Execution Policy. On Windows systems, you may need to set the script execution policy to allow module installation:
Set-ExecutionPolicy -ExecutionPolicy RemoteSigned -Scope CurrentUser
Run the following command to install the SDK for the current user.
Install-Module Microsoft.Graph -Scope CurrentUser -Repository PSGallery -Force
To also experiment with preview features, you can install the beta module separately.
Install-Module Microsoft.Graph.Beta -Scope CurrentUser
Note: The SDK comprises over 47 sub-modules. Installing the main Microsoft.Graph module installs them all. For a lighter installation, you can install only the specific service modules you need, but always include Microsoft.Graph.Authentication.
2] Choose your API
When working with the Microsoft Graph SDK, you will primarily interact with two different API endpoints: the stable v1.0 endpoint and the beta endpoint. The v1.0 endpoint contains Generally Available (GA) APIs that are fully supported for production use. Microsoft applies strict change control to this version to ensure backward compatibility, making it the reliable and mandatory choice for all production applications and scripts.
In contrast, the beta endpoint provides access to preview APIs that often include new or upcoming features. This version is ideal for testing, development, and early exploration of future capabilities. However, because the beta endpoint is subject to changes without notice, including potential breaking modifications, it must be used for experimentation only and never in a live production environment.
3] Authenticate and connect
Authentication is your first step to making API calls. Microsoft Graph supports two primary authorization models.
- Delegated (User) Authentication: Your app acts on behalf of a signed-in user. The app can only access data that the user themselves has permission to access.
- App-only Authentication: Your app accesses data in its own right, without a user context. This is common for background services or daemon applications.
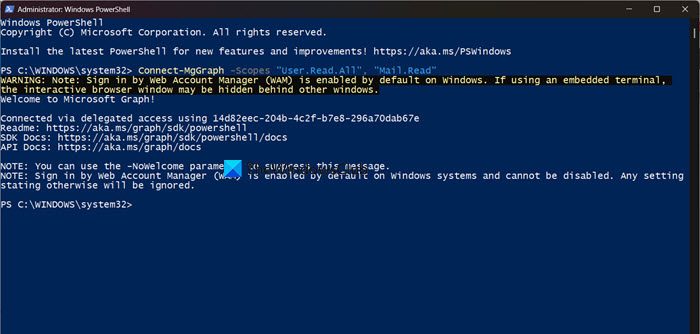
To connect using the PowerShell SDK with delegated permissions, you use the Connect-MgGraph cmdlet and specify the required permission scopes.
Connect-MgGraph -Scopes "User.Read.All", "Mail.Read"
This command opens a browser window for you to sign in and grant consent to the specified permissions. Finding the correct permissions (scopes) for a task can be done using tools such as the Microsoft Graph Explorer or the Find-MgGraphCommand cmdlet in PowerShell.
Read: What is Microsoft Graph Explorer and how to access it?
4] Make your first API call
Once authenticated, you can start interacting with data.
You can use the REST API directly. Every call to the Graph REST API follows a similar pattern.
{HTTP method} https://graph.microsoft.com/{version}/{resource}?{query-parameters}
For example, to GET the profile of the signed-in user using the stable v1.0 endpoint, the request would be.
GET https://graph.microsoft.com/v1.0/me
You can even use PowerShell SDK Cmdlets.
Get-MgUser -UserId 'me'
To perform more complex operations, like sending an email, you would use a cmdlet that maps to the POST method.
That’s it!
What are the main differences between Microsoft Graph v1.0 and beta APIs?
The main difference is stability versus early access. The v1.0 API offers dependable, production-ready features with a clear lifecycle. In contrast, the beta API shows new features that are still being developed. With the beta, you can try out the latest capabilities, but these features may change or be removed without warning since they don’t have the same compatibility guarantees as the v1.0 version.
Can I test new Microsoft Graph features before they are released?
Yes, you can test upcoming features by using the Microsoft Graph beta endpoint in a dedicated development or testing environment. This allows developers to explore new APIs, provide feedback to Microsoft, and prepare for future integrations. It is critical to only use the beta endpoint for non-production purposes, such as proof-of-concept projects or sandbox testing, and to plan for migrating your code to the stable v1.0 endpoint once the features become generally available.
