
If you have ever created an automated Excel report or a data entry tool using VBA, you might have seen the annoying yellow security bar warning that says your macros are disabled. Many users may choose not to open your file because of this warning. Digitally signing your macros can help solve this problem. It tells Excel, This code comes from a trusted creator. In this guide, we will see how to digitally sign Excel Macros.
How to digitally sign Excel Macros
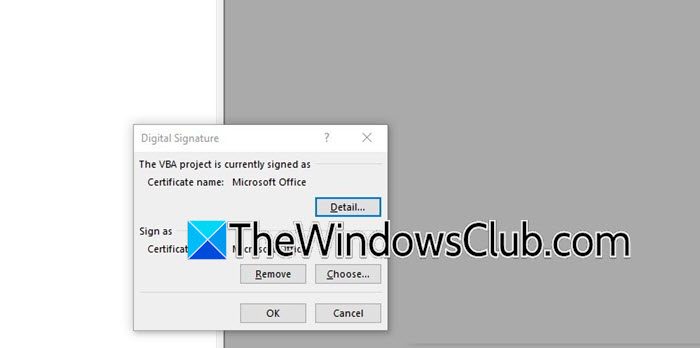
When you digitally sign an Excel macro, you add a unique, encrypted signature to your VBA project. This signature works like a tamper-evident seal on a medicine bottle; it shows that no one has changed the code since you last edited it. The signature uses a code-signing certificate, which is a digital ID that computers check against a list of trusted authorities. Without a valid signature, Excel sees every macro as potentially dangerous. However, with a signature, your macros are treated as trusted and safe.
To digitally sign Excel Macros, follow the steps below.
When a code‑signing certificate is stored on a USB hardware token, the signing process is done directly inside Excel’s Visual Basic editor. The steps below assume the token is already inserted and its certificate has been loaded into Windows. Follow them carefully to apply a durable signature to your VBA project.
- Open the Excel workbook that contains the VBA macro you intend to sign. Ensure the file is saved with a macro‑enabled extension (.xlsm or .xlsb) before proceeding.
- Insert your secure USB hardware token into an available USB port on your computer. This token stores the private key of your code‑signing certificate. Leave it connected throughout the entire signing process.
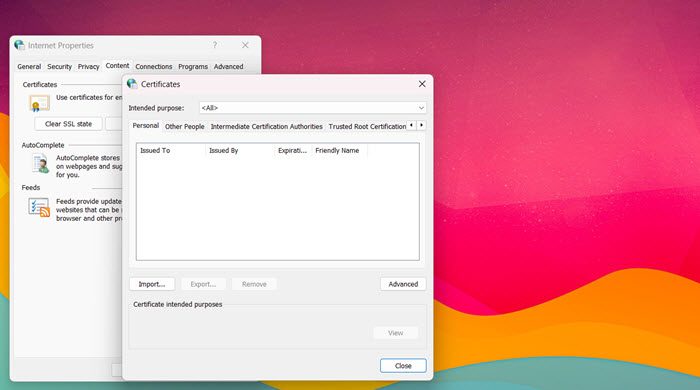
- Before opening the Visual Basic Editor, verify that the certificate from your USB token is recognized by Windows. Open Internet Options (search for “Internet Options” in Windows, or open Internet Explorer and go to Tools > Internet Options). Click the Content tab, then the Certificates button.
- Under the Personal tab, your code‑signing certificate should appear. If it is missing, use the software provided by your Certificate Authority (CA) to load the certificate from the token into Windows. Only after this step will Excel be able to see the certificate.
- In Excel, click the Developer tab on the ribbon. In the Code section, click the Visual Basic icon. Alternatively, the editor can be opened by pressing Alt + F11. If the Developer tab is not visible, right‑click anywhere on the ribbon, select Customize the Ribbon, tick the Developer checkbox in the right panel, and click OK.
- Start the digital signature process inside the Visual Basic Editor. From the top menu bar, click Tools, then select Digital Signature from the dropdown menu. A small dialog box will appear, indicating that the project is currently not signed.
- Choose your code‑signing certificate. In the Digital Signature dialog, click the Choose… button. A new window titled Select Certificate will open, listing all digital certificates available on your computer; including the one that corresponds to the private key stored on your USB token. Select the correct certificate from the list and click OK.
- The Digital Signature dialog will now display the name of the certificate you just selected. Click OK again to attach the digital signature to your VBA project.
- Close the Visual Basic Editor and return to Excel. Immediately save the file by pressing Ctrl + S or by going to File > Save. When the save operation is performed, a password prompt may appear; enter the password for your code‑signing certificate (the password associated with your USB token or .PFX file). After entering the password, the save completes and the signature is embedded.
- No official confirmation message is shown by Excel after a successful signature. To confirm, close the workbook completely, reopen it, and check that no yellow security warning bar appears (or that the warning shows your publisher name as trusted). You can also reopen the Visual Basic Editor, go again to Tools > Digital Signature, and see that your certificate is now listed as the active signature.
- Add a timestamp to preserve signature validity after certificate expiry.
- Open Command Prompt (Admin) or Windows Terminal (Admin).
- Navigate to the SignTool folder (e.g.,
C:\Program Files (x86)\Windows Kits\10\bin\10.0.xxxxx.0\x86). - Run: signtool sign /tr http://timestamp.url /td SHA256 /fd SHA256 /a “path\to\yourfile.exe”
A trusted timestamp server URL (such as http://timestamp.digicert.com or http://timestamp.comodoca.com/authenticode) should be used. After running the command, a confirmation message will appear if the timestamp was successfully added.
Read: How to add, remove and change Digital Signatures in Word files
How to digitally sign a macro in Excel?
Open your macro‑enabled workbook and press Alt + F11 to launch the Visual Basic Editor. From the top menu, click Tools → Digital Signature, then press Choose to select your code‑signing certificate (either self‑created via SelfCert.exe or a commercial one stored on a USB token). Click OK twice, close the editor, and save the workbook immediately. The signature is now attached to your VBA project, and any future modification to the code will break it.
Read: How to create a Certificate using Microsoft Publisher
How to digitally sign in Excel?
Digitally signing in Excel usually refers to signing the entire workbook (not just macros) using a visible digital signature line or an invisible signature. Insert a signature line via Insert > Text > Signature Line, then fill it out. For an invisible digital signature (proof of authenticity without a visible line), go to File > Info > Protect Workbook > Add a Digital Signature. Both methods require a valid digital certificate and confirm that the workbook hasn’t been altered after signing.
Also Read: Create a Digital Signature in Excel.
