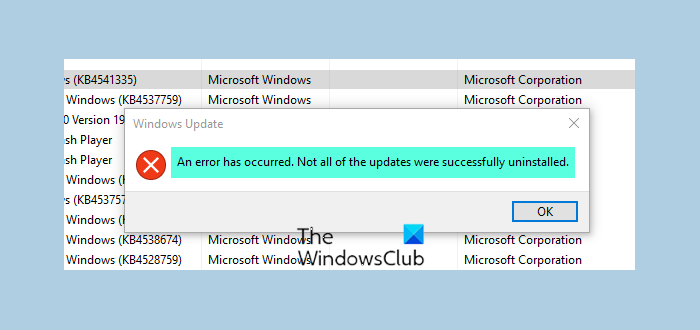
Although Windows Update generally improves the performance and functionality of Windows computers, there may be instances when some updates are not as they are supposed to be. When it happens, you might want to remove the updates. In a similar scenario, when users try to uninstall a Windows update from their PC, they are prompted with an error message that looks similar to:
An error has occurred, Not all of the updates were successfully uninstalled

If you see this error message, it means that the uninstall process failed, so you’ll need to take action manually. In this article, we have provided you with some simple and quick fixes that will help you resolve this problem.
An error has occurred, Not all of the updates were successfully uninstalled
If you’re dealing with this problem on your Windows PC, you can follow the below suggestions:
- Uninstall Windows Update using DISM tool
- Uninstall Windows Update using Command Prompt
- Modify the Registry Editor
Let’s now see each of the solutions in detail:
1] Uninstall Windows Update using DISM tool
In Windows 11/10, the Inbox Corruption Repair brings the functionality of CheckSUR into Windows. You need to simply Run DISM Tool.
To remove uninstallable updates using the DISM tool, use these steps:
Type CMD in the search box and hit ‘Enter’. Then, right-click Command Prompt, and choose the ‘Run as administrator’ option.
Now execute the following command:
dism /online /get-packages | clip
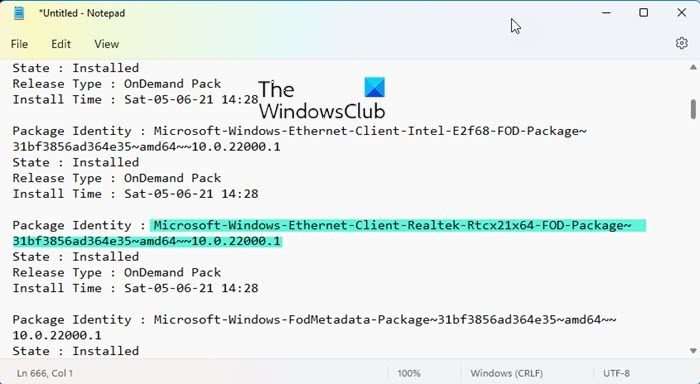
The output will be created and automatically copied to your clipboard
Open Notepad and press CTRL+V

Now from the output, identify and copy the package identity.
Now run the following command to remove the update using DISM:
dism /Online /Remove-Package /PackageName:PACKAGE_ID
Here replace PACKAGE_ID with the actual Update ID eg. Microsoft-Windows-Ethernet-Client-Realtek-Rtcx21x64-FOD-Package~31bf3856ad364e35~amd64~~10.0.22000.1
When done, type Exit and press Enter. Run Windows Update again.
2] Uninstall Windows Update using Command Prompt
You can also try running a simple command in an elevated terminal window. Here is how you can do this:
- Open Command Prompt as an administrator.
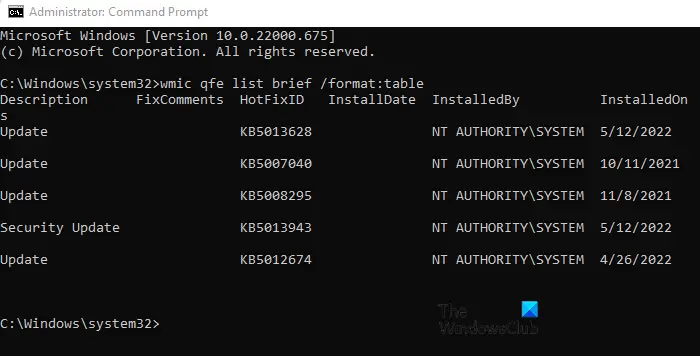
- Run the command – wmic qfe list brief /format:table.
- Locate the update you wish to uninstall and note its KB number.
- Now in the command prompt, run – WUSA /UNINSTALL /KB:NUMBER.
- A prompt will appear to ask you if you want to uninstall the update, click Yes.
- Restart the system after the process is finished.
If you want a detailed explanation, you can refer to the below section:
To get it started, you first need to open an elevated command prompt. For this, you can open the Run dialog box using the Windows key + R keyboard shortcut. After that, type cmd and press the Ctrl+Shift+Enter key. When UAC appears on the screen and asks for permission, click on the Yes button.
Once the command prompt is opened, copy and paste the below command line:
wmic qfe list brief /format:table
Now press the Enter key to execute the command to list all installed updates.

There have been several updates to your system that you can see here under the HotFixID column. You will see here a detailed description that displays the update number and the date when the update was installed on your computer.
Once you find it, note its KB Number and copy and paste the following command line:
WUSA /UNINSTALL /KB:NUMBER
Note: You must replace the “KB NUMBER” in the above command with the update number you noted earlier. As an example, I am going to uninstall KB5013628, which is the most recent update on my PC.
WUSA /UNINSTALL /KB:5013628

When you are asked to uninstall the update from your system, click Yes. Right after you click Yes, Windows will begin uninstalling the update.
After the entire process is complete, the system will need to be restarted. Click on the “Restart Now” button to initiate the restart.
Once the system is successfully restarted, Windows should uninstall the update package.
Now try running Windows Update again.
3] Modify the Registry Editor
In case the problem persists, you need to open the Registry Editor and make some necessary changes. Before you proceed, please note that the registry is a very sensitive part of your system, so you must edit it carefully. In order to maintain the safety of your device, you should back up your Windows Registry before modifying it so that if something goes wrong, you can easily restore it.
- Open the Registry Editor.
- Navigate to –
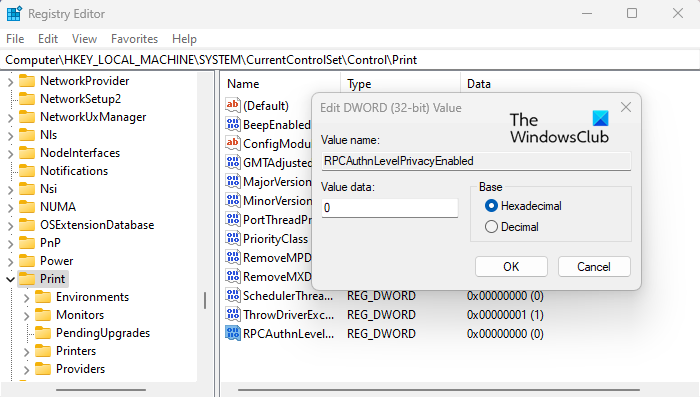
HKEY_LOCAL_MACHINE\System\CurrentControlSet\Control\Print. - Create a DWORD (32-bit) value and name it RPCAuthnLevelPrivacyEnabled.
- Set the Value data 0 and save the changes.
- Now try to uninstall the update package.
For a more detailed explanation of the steps above, please refer to the below section:

To get it started, open the Registry Editor first. For this, press the Windows key + R keyboard shortcut to open the Run command.
Now type Regedit in the search box and click the OK button. If UAC appears on your screen, select Yes to approve the request.
When the Registry Editor window opens, navigate to the following location. If you prefer, you can simply copy and paste the following path into Registry Editor’s address bar and hit Enter. It will take you directly to the location.
HKEY_LOCAL_MACHINE\System\CurrentControlSet\Control\Print
The following location requires a new value to be created. To do this, simply right-click on an empty space and select New > DWORD (32-bit) Value.
Then name the new value RPCAuthnLevelPrivacyEnabled. After creating a DWORD value, click twice on that value to change its data.
Set the Value data to 0 and click the OK button to save it. After this, restart your computer to apply the changes. Once the system has been restarted, try to uninstall the update package.
To do this, you first need to open the Settings menu using the Windows key + I keyboard shortcut. On the left side of the Settings window, click on Windows Update. Next, select Update history on the right-hand side of the screen.
Here you will find a list of all the updates installed on your computer. On the next page, scroll down to the Related settings and click on Uninstall updates. Then click on the Uninstall option next to the update you want to remove.
When a popup window appears on the screen, click on the Uninstall button and this will remove the update and its related info from your computer. For some update packages, the Uninstall button is greyed out, so you won’t be able to uninstall them. This is how you can easily uninstall any Windows update package.
Related: How to uninstall Windows Updates marked as Permanent without Uninstall option.
What happens if I don’t update Windows?
You may find updating software frustrating, especially when it occurs more frequently than you would like. But if you don’t update Windows on a regular basis, your system becomes more susceptible to security threats. This means that you won’t get the full Windows experience and cannot take advantage of the latest features. If your computer hasn’t been updated, it will not function properly, so don’t wait too long to update it.
Does it make sense to uninstall Windows Update?
Having the latest Windows updates installed on your devices and computers will always be beneficial for you. However, updating your computer can sometimes cause problems or crash your system. When this happens, you may need to uninstall the newly installed Windows updates.
What causes Windows updates to fail?
There are several reasons why you might experience failed Windows updates. Let’s look at a few:
- Operating systems rely on a number of system files to function properly. When any of these files become corrupt, it will have severe effects on the entire operating system. It includes problems with updates.
- The next most common failure point in Windows updates is the Windows Update Service. This service checks, downloads, and installs updates automatically. When the update service doesn’t function properly, updates may slow down or fail altogether.
Related Post: How to delete Downloaded, Failed & Pending Windows Updates.