Upgrading all computers in an organization can be a complicated task that takes time. The Extended Security Update (ESU) program helps in this situation by protecting your systems while you plan and move to a modern operating system like Windows 11. In this post, we will explain how to enable Windows 10 Extended Security Updates (ESU) for physical machines.
 for physical machines")
What are Extended Security Updates (ESU)?
Extended Security Updates (ESU) are a program that provides critical and important security updates for software after its official support end date. It is a temporary solution to help protect systems while transitioning to a newer, supported version. ESU does not include new features or non-security fixes.
Enable Windows 10 Extended Security Updates (ESU) for physical machines
Enrolling in the Extended Security Updates (ESU) program ensures that devices running Windows 10, version 22H2, continue to receive vital security patches even after mainstream support has ended. These updates, categorized as critical and important by the Microsoft Security Response Center (MSRC), help safeguard systems against emerging vulnerabilities and cyber threats, maintaining a baseline of protection for organizations that need more time to transition.
However, it’s important to recognize the limitations of ESU. The program does not include any new operating system features or enhancements, nor does it offer fixes for non-security-related issues, even if requested by customers. Additionally, general technical support for Windows 10 is not part of the package; Microsoft only assists with problems specifically related to ESU activation and installation.
If you enable Windows 10 Extended Security Updates (ESU) for physical machines, follow the steps mentioned below.
- Meet the prerequisites
- Locate your ESU MAK
- Install and Activate the ESU Key
- Verify Activation
Let us talk about them in detail.
1] Meet the prerequisites
Before enabling Extended Security Updates (ESU), your device must meet a few conditions. It should be running Windows 10, version 22H2, with update KB5066791 or later installed. After that, the ESU Licensing Preparation Package (KB5072653) needs to be applied. You’ll also need administrative rights to proceed. For commercial users, ESU offers coverage for up to three years, ending in October 2028. The cost increases annually; starting at $61 per device in the first year, doubling in the second, and reaching $244 in the third. Activation is handled through Volume Licensing using a Multiple Activation Key, and the program supports both physical machines and certain virtual setups. It’s worth noting that Windows 10 LTSC editions follow a separate lifecycle and aren’t part of this ESU offering.
For individual consumers, the ESU program is more limited. It lasts just one year, until October 2026, and can be accessed for free by syncing settings, redeeming Microsoft Rewards points, or making a one-time payment of $30. Activation is simple and can be done through Windows Settings with a Microsoft Account. This version is designed for personal devices running Windows 10 Home or Pro and doesn’t support systems that are domain-joined or managed through mobile device management tools.
2] Locate your ESU MAK
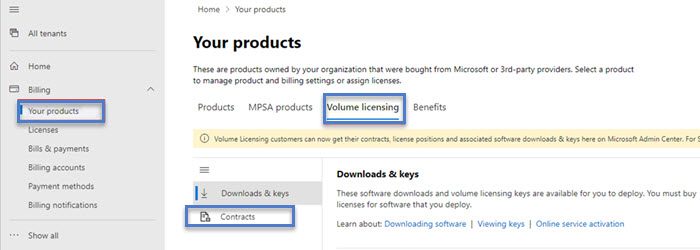
You can find your MAK in the Microsoft 365 admin center. You must have the Product Key Reader or VL Administrator role assigned to your account. Once done, you need to follow the steps mentioned below.

- First of all, go to Billing > Your products.
- Go to the Volume licensing tab.
- In the Contracts section, click on View contracts.
- Find the License ID under which the ESU licenses were purchased, select the More actions (three dots) menu, and then choose View product keys.
Once you have the product key, store it somewhere.
Read: Windows 10 End of Support and Life – What you need to know
3] Install and Activate the ESU Key
Use the Windows Script Host (slmgr.vbs) to install and activate the key. The device needs internet access to connect to Microsoft’s activation servers. You can follow the steps mentioned below to do the same.
- Open Command Prompt as an administrator.
- Then, install the ESU key by running the following command, replacing <ESU MAK> with your actual key.
slmgr.vbs /ipk <ESU MAK>

You should see a dialog box confirming successful installation.
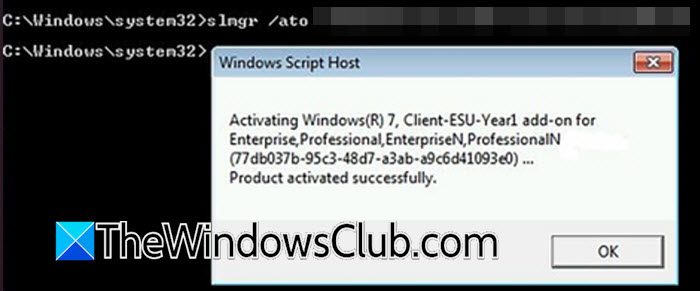
- Activate the key using the specific Activation ID for your ESU year. Use this command, replacing <Activation ID> with the correct ID.
slmgr.vbs /ato <Activation ID>
Once you get a confirmation message, you are good to go.
Check Activation ID from the table given below.
| ESU Program | Activation ID |
| Win10 ESU Year 1 |
f520e45e-7413-4a34-a497-d2765967d094
|
| Win10 ESU Year 2 |
1043add5-23b1-4afb-9a0f-64343c8f3f8d
|
| Win10 ESU Year 3 |
83d49986-add3-41d7-ba33-87c7bfb5c0fb
|
4] Verify Activation
To confirm that the ESU key is installed and activated, run the following command from the elevated Command Prompt.
slmgr.vbs /dlv
The output should list the corresponding ESU program and show its License Status as Licensed.
That’s it!
Read: How to get Extended Security Updates (ESU) for Windows Server
How to get Extended Security Updates ESU for Windows 10?
For consumers, you can get Windows 10 Extended Security Updates (ESU) for free until October 2026 by enabling Windows Backup to OneDrive, redeeming 1,000 Microsoft Rewards points, or paying a one-time fee of $30 via Settings > Update & Security > Windows Update. Commercial users need to purchase a license and activate it with a Multiple Activation Key (MAK) obtained from the Microsoft 365 admin center. UPDATE: Microsoft has extended Windows 10 Extended Security Updates program by one more year It will now end in October 2027 for consumers.
Also Read: Secure and use Windows 10 after End of Support.