If you want to enable or disable Access Point Isolation, Client Isolation, or Station Isolation on Windows 11/10 computers, here is how you can do that. It is a security feature found in many modern Wi-Fi routers. This guide explains AP Isolation and how to turn it on or off.

What is Access Point Isolation?
If two devices are connected to the same Wi-Fi network, they can communicate with each other by adjusting a few settings. It is possible because they are using the same SSID or network name. If you enable Access Point Isolation or Client Isolation, it will create a virtual SSID for each device that connects to your Wi-Fi network.
The host router will be the same, but SSID will be virtual. That being said, it won’t be possible for one device to communicate with others even after using the same router. It is very handy when you do not want any device to establish a connection with another device in your office or any other public place.
AP Isolation is pretty similar to Guest mode or Guest network, which is available in almost all routers. However, there is a thin line between these two security features. AP Isolation, or Client Isolation, is mainly used in LANs, public places, etc. However, the other one is primarily intended for guests or for those to whom you want to grant temporary access to your Wi-Fi router.
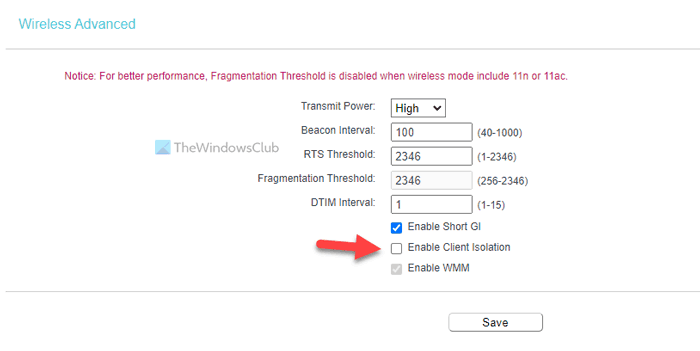
Some routers have Access Point Isolation, while some of them call it Client Isolation. It depends on the manufacturer, firmware version, etc. However, they are all the same. That said, we have provided screenshots showing Client Isolation on a TP-Link router. Nonetheless, you can follow the same guide for your router to find the AP Isolation as well.
Enable or Disable Access Point Isolation on Router on Windows computers
To enable or disable Access Point Isolation in Windows 11/10, follow these steps:
- Log in to your router’s control panel.
- Click on Wireless 2.4GHz or Wireless 5GHz.
- Click on the Wireless Advanced option.
- Tick the Enable Client Isolation/AP Isolation checkbox.
- Click the Save button.
To learn more about these steps, continue reading.
To get started, you need to log into your Wi-Fi router’s control panel. To do that, your computer must be connected to the same Wi-Fi network, and you must know the username and password.
Once you are logged in, you need to decide whether you want to turn it on for 2.4GHz or 5GHz, or both. According to that, click on the Wireless 2.4GHZ or Wireless 5GHz option and switch to the Wireless Advanced section.
If you want to enable AP Isolation for both, you need to do that one after the other. Here, you can find an option called Enable Client Isolation.
As said earlier, you can find the AP Isolation or Station Isolation as well. It all depends on the router.
You need to tick the corresponding checkbox and click the Save button.
That’s all! Hope this guide helped.
Should I enable or disable AP isolation?
AP Isolation is a security feature included in various Wi-Fi routers. As mentioned earlier, it prevents a device from communicating with other devices on the same network. If you want this enabled on your network, you can turn on Access Point Isolation. However, if you are a home computer user and only your devices are connected to the network, enabling this feature won’t make much difference.
How do I disable AP isolation in Windows 11?
This is not a feature you can enable or disable on your Windows computer. It must be included in your Wi-Fi router. If so, you can follow the aforementioned guides to enable or disable AP Isolation or Client Isolation for your router.
Read: