
Does your WiFi driver vanish or uninstall itself on Windows 11 without any warning? This frustrating issue suddenly disconnects you from the internet and hides your wireless adapter from Device Manager. In this post, we will see what to do if the WiFi drivers get uninstalled automatically.
Fix WiFi drivers uninstalled automatically
Windows 11 often updates or replaces drivers automatically, but a bug or misconfiguration can sometimes cause the system to uninstall your Wi-Fi driver entirely. Power management settings may tell Windows to turn off the adapter to save energy, and the driver fails to reload. Corrupted driver files or conflicting third‑party antivirus software can also trigger an automatic removal. Additionally, a pending Windows Update or a faulty driver version from the manufacturer might mark the driver as incompatible, leading Windows to delete it automatically.
If your Wi-Fi drivers are automatically uninstalled, follow the solutions below.
- Recover your WiFi driver
- Reset BIOS
- Stop automatic device installation
- Prevent Power Management from turning off the WiFi Adapter
Let us talk about them in detail.
1] Recover your WiFi driver
You cannot prevent further uninstalls if the driver is already missing. This solution restores your WiFi adapter so you can get back online before applying any permanent fix.
There are a few things that we can do to recover your WiFi driver.
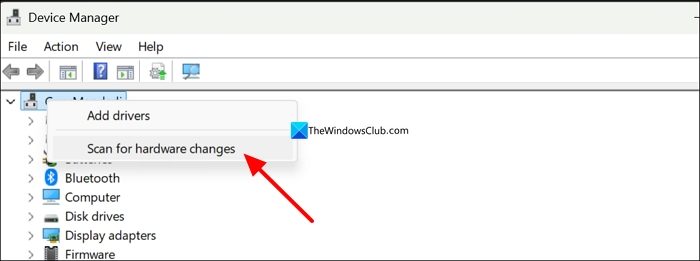
First, open the Device Manager, right-click on Network adapters or PC, and click on Scan for hardware changes. If your WiFi gets installed, go to the next solution to prevent it from happening again, but if it stays absent, use an Ethernet cable to connect your PC directly to your router (if available). Windows may automatically install a basic driver for Ethernet.
If Ethernet is not an option, use another computer or smartphone to download the correct WiFi driver for your PC model from the manufacturer’s website (e.g., Dell, HP, Lenovo, or your motherboard brand). After transferring the driver installer to your affected PC using a USB flash drive, open Device Manager by right-clicking the Start button and selecting Device Manager. Look under Network adapters. If your WiFi adapter appears with a yellow exclamation mark or does not appear at all, right-click any unknown device or your adapter, choose Update driver, then select Browse my computer for drivers, and point to the USB drive. Alternatively, you can run the downloaded installer file directly and follow the on-screen steps to complete the recovery.
2] Reset BIOS
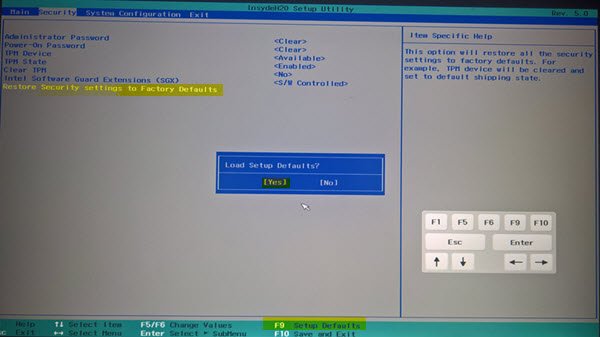
In some cases, WiFi gets disabled due to misconfigured BIOS settings and the quickest way to get it back is by resetting it to its default values. After resetting the BIOS, open your computer and check whether your Wi-Fi is enabled. If not, try installing it from the manufacturer’s website as mentioned earlier.
3] Stop automatic device installation
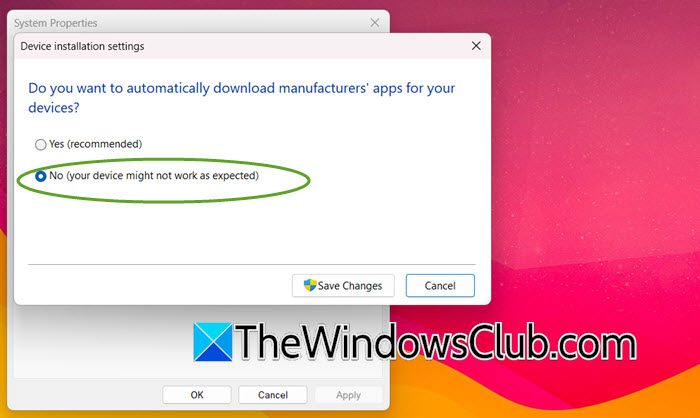
We will stop your device from automatically downloading and applying driver updates, including the one that mistakenly removes your WiFi driver. You retain full manual control over driver changes. To do the smae, follow the steps mentioned below.
- Hit Win + I to open Settings.
- Go to System > About.
- Click on Advnaced system settings hyperlink.
- Go to the Hardware tab and click on Device installation settings.
- Finally, select No (your device might not work as expected)and click Save Changes.
Restart your computer and see if that helps.
4] Prevent Power Management from turning off the WiFi Adapter
Windows 11’s power-saving feature can put the WiFi adapter to sleep and, in some cases, unload its driver. Disabling this option keeps the driver active at all times. To do the same, follow the steps given below.
- Open the Device Manager.
- Expand Network adapters.
- Right-click on your WiFi adapter and select Properties.
- Now, go to the Power Management tab and uncheck Allow the computer to turn off this device to save power.
- Click OK.
Restart your system and put it to sleep to check whether your WiFi gets disabled.
Hopefully, these solutions will resolve your issue.
Read: Ethernet or WiFi not working after BIOS update in Windows 11
How do I bring back an uninstalled WiFi driver?
You can use another device to download the correct WiFi driver from your PC or the manufacturer’s website. Save the installer to a USB flash drive, then plug it into your affected Windows 11 computer. Open Device Manager by right-clicking the Start button, locate your wireless adapter or any unknown network device, right-click it, and select Update driver. Choose Browse my computer for drivers and point to the USB drive. Alternatively, run the downloaded installer file directly and follow the on-screen steps, then restart your PC to restore the driver.
Read: No Internet after fresh Windows install [Fix]
How to fix Wi-Fi driver issue?
First, reconnect to the internet using an Ethernet cable or USB tethering from your phone. Open Device Manager, expand Network adapters, right-click your WiFi adapter, and select Uninstall device. Restart your computer so Windows automatically reinstalls the driver. If the problem continues, download the latest WiFi driver from your manufacturer’s website and install it manually. Finally, disable automatic driver updates by going to System Properties > Hardware> Device Installation Settings and choosing No.
Read: WiFi disappeared or does not work after installing Windows Update.
WiFi drivers gets uninstalled every time I disable WiFi
If your WiFi drivers keep uninstalling when you disable WiFi, first update your drivers from the manufacturer’s site. Next, check Device Manager settings and disable any “Allow the computer to turn off this device” option under Power Management. If the issue persists, reinstall the driver, reset network settings and update BIOS/firmware.
Windows 11 removes Bluetooth devices automatically
If Windows 11 keeps removing Bluetooth devices automatically, update your Bluetooth drivers via Device Manager, and then run the Bluetooth Troubleshooter. You could also disable any power-saving options under Bluetooth adapter settings to prevent disconnections. If nothing helps, remove the device completely and re-pair it to refresh the connection.
