To safeguard the personal and organizational data, Enhanced Phishing Protection in Microsoft Defender adds a critical layer of security. It identifies and blocks malicious sites, suspicious links, and phishing attempts in real-time. Cyber threats are growing more sophisticated, and enabling this feature is a smart move to ensure safe browsing and secure credential handling. In this article, we will explore how to enable Enhanced Phishing Protection in Microsoft Defender.
Enable Enhanced Phishing Protection in Microsoft Defender
Enhanced phishing protection in Microsoft Defender is a security feature designed to guard against phishing attacks that attempt to steal users’ personal or login information. It works by actively monitoring apps, websites, and password entries in real-time to detect suspicious behavior, links, or credential reuse.
You can follow the methods mentioned below to enable Enhanced Phishing Protection in Microsoft Defender.
Let us talk about them in detail.
1] Using Windows Security
To enable Enhanced Phishing Protection using the Windows Security app, follow the steps mentioned below.
- Open the Windows Security by searching for it from the Start Menu.
- Go to the App & browser tab, and in the Reputation-based protection section, select the Reputation-based protection settings link.
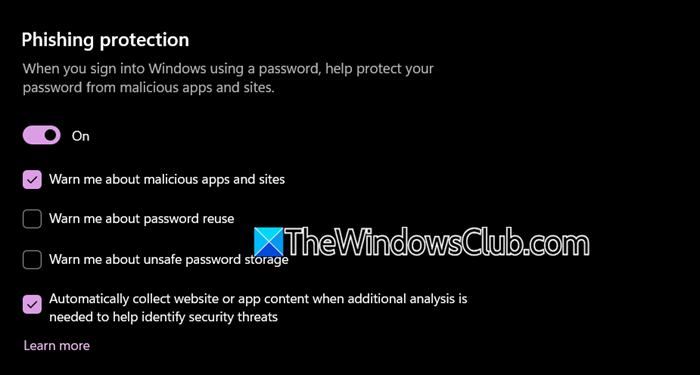
- Once it opens up, scroll down to the Phishing protection section, and turn it on.
- Users can tick all the options available or decide not to enable them. However, it’s recommended to turn on the Warn me about malicious apps and sites and Automatically collect website or app content when additional analysis is needed to help identify security threats options. Once done, quit Windows Security.
The steps mentioned earlier can only work for individual devices. If you are a part of an organization or want to enable the feature for other users on your computer, you will have to either of the next two methods.
2] Using Group Policy Editor
Apart from enabling it from Windows Settings, users can also enable enhanced Phishing protection using the Group Policy Editor. Here’s how to do the same.
- Click Win + R to open the Run dialog box, type gpedit.msc, and hit Enter to open Local Group Policy Editor.
- Next, navigate to the following location:
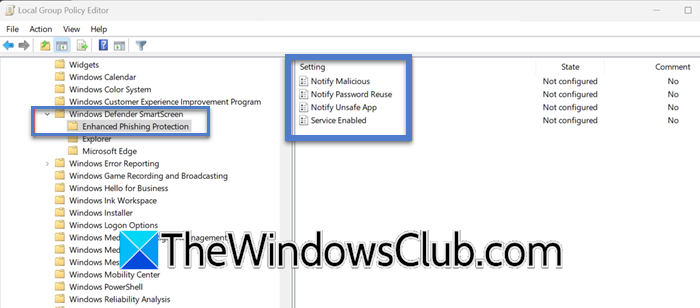
Computer Configuration > Administrative Templates > Windows Components. - Now, expand Windows Defender SmartScreen, and click on Enhanced Phishing Protection.
- There are five options available, mentioned below; double-click on any of the following to configure it.
- Automatic Data Collection
- Notify Malicious
- Notify Password Reuse
- Notify Unsafe App
- Service Enabled
- In each setting, choose Enabled, and then click the OK button.
Note: If you see any of the options unavailable under Enhanced Phishing Protection, don’t worry, as maybe your version of Windows doesn’t have that ability.
Since Gpedit is not present in Windows Home editions, you can use the next method.

3] Using Registry Editor

In this method, we will use the Registry Editor as it works for Windows Home or Education editions as well. However, since modifying the Registry is not recommended, we advise you to create a backup of it first. To do so, open the Registry Editor, go to File > Import, and save the file somewhere on your computer.
Now, open Notepad, paste the following lines of code, and save the file with any name, just give it a .reg extension.
Enable Automatic Data Collection for the current user
Windows Registry Editor Version 5.00

[HKEY_LOCAL_MACHINE\SOFTWARE\Policies\Microsoft\Windows\WTDS\Components]
"CaptureThreatWindow"=-
Force Enable Automatic Data Collection
Windows Registry Editor Version 5.00

[HKEY_LOCAL_MACHINE\SOFTWARE\Policies\Microsoft\Windows\WTDS\Components]
"CaptureThreatWindow"=dword:00000001
Disable Automatic Data Collection
Windows Registry Editor Version 5.00

[HKEY_LOCAL_MACHINE\SOFTWARE\Policies\Microsoft\Windows\WTDS\Components]
"CaptureThreatWindow"=dword:00000000
Enable Notify Malicious for the current user
Windows Registry Editor Version 5.00

[HKEY_LOCAL_MACHINE\SOFTWARE\Policies\Microsoft\Windows\WTDS\Components]
"NotifyMalicious"=-
Force enable Notify Malicious
Windows Registry Editor Version 5.00

[HKEY_LOCAL_MACHINE\SOFTWARE\Policies\Microsoft\Windows\WTDS\Components]
"NotifyMalicious"=dword:00000001
Disable Notify Malicious
Windows Registry Editor Version 5.00

[HKEY_LOCAL_MACHINE\SOFTWARE\Policies\Microsoft\Windows\WTDS\Components]
"NotifyMalicious"=dword:00000000
Enable Notify Password Reuse for the current user
Windows Registry Editor Version 5.00

[HKEY_LOCAL_MACHINE\SOFTWARE\Policies\Microsoft\Windows\WTDS\Components]
"NotifyPasswordReuse"=-
Force Enable Notify Password Reuse
Windows Registry Editor Version 5.00

[HKEY_LOCAL_MACHINE\SOFTWARE\Policies\Microsoft\Windows\WTDS\Components]
"NotifyPasswordReuse"=dword:00000001
Disable Notify Password Reuse
Windows Registry Editor Version 5.00
[HKEY_LOCAL_MACHINE\SOFTWARE\Policies\Microsoft\Windows\WTDS\Components]
“NotifyPasswordReuse”=dword:00000000
Enable Notify Unsafe App for the current user
Windows Registry Editor Version 5.00

[HKEY_LOCAL_MACHINE\SOFTWARE\Policies\Microsoft\Windows\WTDS\Components]
"NotifyUnsafeApp"=-
Enable Notify Unsafe App
Windows Registry Editor Version 5.00

[HKEY_LOCAL_MACHINE\SOFTWARE\Policies\Microsoft\Windows\WTDS\Components]
"NotifyUnsafeApp"=dword:00000001
Disable Notify Unsafe App
Windows Registry Editor Version 5.00

[HKEY_LOCAL_MACHINE\SOFTWARE\Policies\Microsoft\Windows\WTDS\Components]
"NotifyUnsafeApp"=dword:00000000
Enable Phishing Protection for the current user
Windows Registry Editor Version 5.00

[HKEY_LOCAL_MACHINE\SOFTWARE\Policies\Microsoft\Windows\WTDS\Components]
"ServiceEnabled"=-
Enable Phishing Protection
Windows Registry Editor Version 5.00

[HKEY_LOCAL_MACHINE\SOFTWARE\Policies\Microsoft\Windows\WTDS\Components]
"ServiceEnabled"=dword:00000001
Disable Phishing Protection
Windows Registry Editor Version 5.00

[HKEY_LOCAL_MACHINE\SOFTWARE\Policies\Microsoft\Windows\WTDS\Components]
"ServiceEnabled"=dword:00000000
Once done, you need to double-click on the newly created .reg file and then click on Yes when the UAC appears.

You will get a warning. When it does, click on Yes.
To fully apply the new settings, restart the device, and that’s how to enable enhanced phishing protection in Windows Defender. However, if you want to disable phishing protection in Windows Defender, here’s how to do it.
- Click on the Windows Defender icon from the taskbar, and navigate to the App & browser tab.
- In the Reputation-based protection section, select the Reputation-based protection settings link.
- Scroll down and go to the Phishing protection section, and turn off the toggle key.
It was as simple as enabling or disabling the settings. However, disabling it is not advisable.
Read: What is Phishing and how to identify Phishing Attacks?
How to enable Microsoft Defender Advanced Threat Protection?
To enable Microsoft Defender Advanced Threat Protection (ATP), navigate to the Microsoft 365 Defender portal and in the navigation pane, go to Settings. Click on Endpoints, then select the Advanced Features option. Now, select the feature you want to enable, and toggle it on, such as Endpoint Detection and Response (EDR), Network Protection, and automatic investigation. Once done, click on Save Preferences to enable them.
Read: What are Whaling scams & how to protect your Enterprise
Does Microsoft Defender protect against hackers?
Yes, Microsoft Defender, specifically Microsoft Defender Antivirus and Microsoft Defender for Endpoint, does protect against hackers to a significant extent. It uses real-time threat detection, cloud-delivered protection, behavioral analysis, and AI-driven intelligence to identify and block malware. However, for stronger security, it’s recommended to pair it with tools like MalwareBytes for Zero-day threats, Bitdefender for AI-based defense, and Norton 360 for all-in-one protection. Moreover, enabling two-factor authentication, updating software, avoiding suspicious links, and backing up data regularly are some good habits to ensure data protection.
Also Read: Enable Potentially Unwanted Applications protection in Windows 11.