If you are using Windows 11/10 and you want to delete or forget the WiFi network profile, then you can do so using the PowerShell, Command Prompt, Registry, Settings, or System Tray icon on your Windows 11/10 computer.
Windows doesn’t provide you the native options to delete a WiFi network from the profiles list. In Windows 11/10, you have the option to Forget Network. However, forgetting the network does not completely remove the entries of the network profile. If you connect using this network in the future, you might face trouble while connecting. In such a case, you may need to erase the unusable WiFi networks manually
How to delete WiFi Network Profile from Windows 11/10
To delete or forget the WiFi network profile from Windows 11/10, follow these methods-
- Forget WiFi profile from the system tray.
- Forget WiFi network profile from Windows Settings
- Remove WiFi network using Command Prompt
- Delete WiFi network profile using PowerShell.
To know more about these steps, keep reading.
1] Forget WiFi profile from the system tray

It is probably the easiest way to remove the WiFi network profile from Windows 10. You can make your system forget one network profile or multiple ones.
To get started, ensure the WiFi SSID is visible when you click the network or internet icon in the system tray. If so, right-click on the desired network name and select the Forget option.
Now, it should be visible in the ‘not connected’ WiFi network list.
2] Forget WiFi network profile from Windows Settings
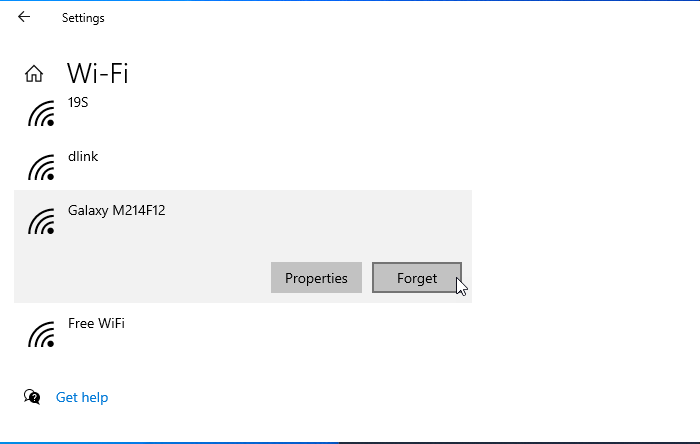
It is possible to forget the WiFi network profile using Windows Settings.
Open Windows Settings on your computer and go to the Network & Internet section. Here you will find a tab named WiFi. After switching to this tab, click on the Manage known networks option. Following that, click on the network name that you want to delete and click on the Forget button.

The WiFi network should not be visible in the ‘known network’ list.
3] Remove WiFi network using Command Prompt
Another way to remove the WiFi network profile from a Windows computer is to use the Command Prompt and Registry. For your information, you can also use the same method on an older version of Windows.
To get started, you need to open Command Prompt with administrator privilege, and enter this command-
netsh wlan show profiles
It shows all the previously connected WiFi network profiles on your screen. From here, you need to find the name of the WiFi network that you want to delete from your computer. If you have already noted, enter the following command-
netsh wlan delete profile name="network-name"
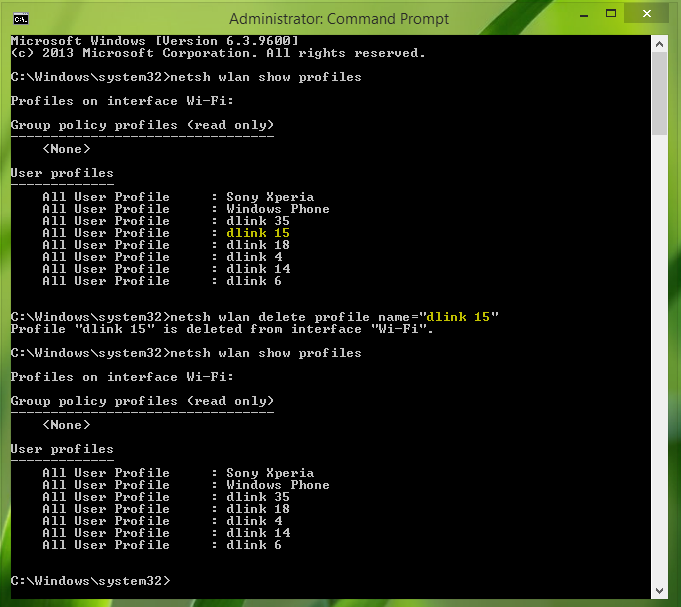
For example, let us consider dlink 15.
After that, you need to open the Registry Editor and navigate to this path-
HKEY_LOCAL_MACHINE\SOFTWARE\Microsoft\Windows NT\CurrentVersion\NetworkList\Profiles
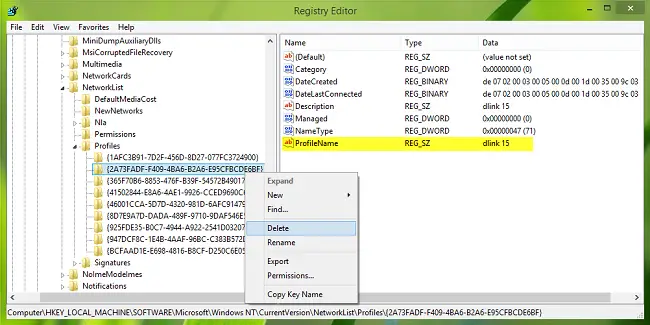
The Profiles should have some sub-keys. You need to click on each key to find out the correct ProfileName. Once you see the proper String Value, you need to right-click on it and select the Delete button.
Now the WiFi network profile should be deleted completely.
Related: How to add a new Wi-Fi Network Profile in Windows 11/10.
4] Delete WiFi network profile using PowerShell
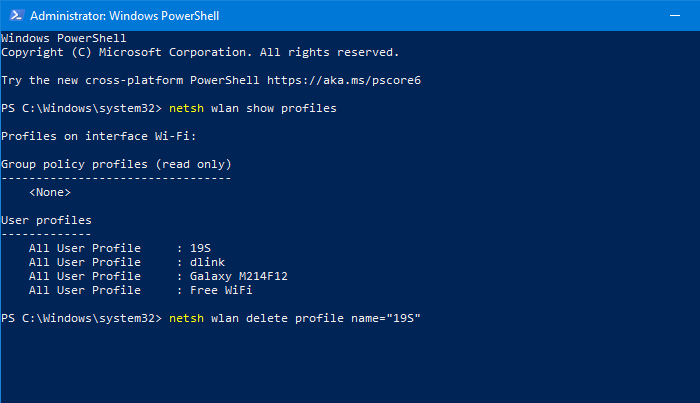
Like Command Prompt, you can use PowerShell to delete the WiFi network profile from Windows. The best thing is that you can use the name commands to find and delete profiles. Therefore, open the Windows PowerShell with administrator privilege, and enter the following command-
netsh wlan show profiles
Once you note the network name, you can enter this command-
netsh wlan delete profile name="network-name"
Before hitting the Enter button, you must replace network-name with the original WiFi network name. After entering the command, you should see a success message saying things about the deletion.
These methods can help you delete the WiFi network profile from a Windows 11/10 computer.
Let us know if this helped.