Hyper-V can make your computer run hotter because it allows multiple virtual machines (VMs) to run simultaneously on a single physical machine. This requires significant CPU and memory resources, and the hypervisor must manage resources between the main system and the virtual systems, resulting in a high workload. However, we’ve noticed that the system heats up even when Hyper-V is not using many resources, but is still running. In this post, we will discuss this issue and what you can do if your computer is heating up while using Hyper-V.

Windows computer heating up when using Hyper-V
Your computer is overheating because Hyper-V is constantly managing hardware requests. This keeps the CPU and memory controller active, unlike regular desktop use. As a result, the processor can’t enter power-saving modes, and the system can’t switch to low power. With Hyper-V on, your computer is more active, which raises its temperature. Your cooling system may not be equipped to handle this high level of heat.
If your computer is overheating while using Hyper-V, follow the solutions below.
- Disable VMQ on Network Adapters
- Modify Core Parking Settings
- Adjust NUMA
- Use High Performance Plan
Let us talk about them in detail.
1] Disable VMQ on Network Adapters
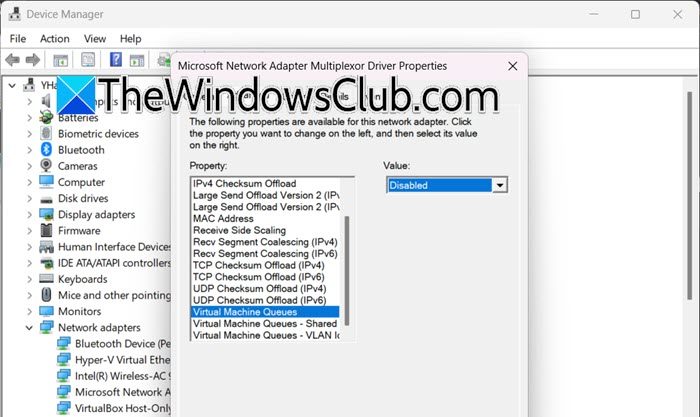
Virtual Machine Queue (VMQ) is a hardware feature that can have bugs or flaws in its drivers. When it malfunctions, it overwhelms the CPU with unnecessary network interrupts, even when virtual machines are idle. This constant load prevents the processor from entering power-saving states, leading to excess heat. Therefore, disabling VMQ returns network processing to a more stable method. Follow the steps below to do the same.
- Hit Win + X to open the Device Manager.
- Expand the Network adapters section.
- Right-click on your primary network adapter (e.g., Intel(R) Ethernet Connection, Killer Networking Controller) and select Properties.
- Go to the Advanced tab.
- In the list of properties, locate and select Virtual Machine Queues (it might be called “VMQ” or “VMQ Enable”).
- On the right, set the value to Disabled.
- Click OK and restart your computer.
Finally, check if the issue is resolved.
2] Modify Core Parking Settings

Core parking is a power-saving feature in Windows that turns off idle CPU cores. On a Hyper-V host, the hypervisor keeps running low-level tasks, which leads to frequent and inefficient parking and unparking of these cores. This can cause workloads to focus on fewer active cores, leading to higher core temperatures than if the load were evenly spread across all cores.
Open the Registry Editor and take a backup of your registry.
Now navigate to the following location.

HKEY_LOCAL_MACHINE\SYSTEM\CurrentControlSet\Control\Power\PowerSettings\54533251-82be-4824-96c1-47b60b740d00\0cc5b647-c1df-4637-891a-dec35c318583
Double-click the Attributes value in the right pane. Change the value data from 1 to 2, then click OK.
Now open Power Options in Control Panel, click Change plan settings for your active plan, then Change advanced power settings. In the Processor power management section, you will now see Processor performance core parking. Set both Minimum processor state and Core parking percentage to 0% for both On battery and Plugged in. Click Apply and OK, then restart your computer.
3] Adjust NUMA
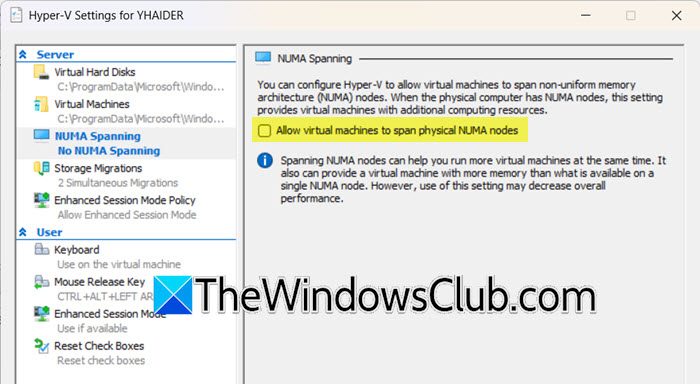
NUMA spanning allows a single virtual machine (VM) to access processors and memory across multiple NUMA nodes. While this enables larger VMs, it creates overhead due to the need for inter-node memory coordination, leading to increased CPU and memory controller activity and heat generation, even when VMs are idle. Disabling NUMA spanning confines each VM to a single NUMA node, reducing this overhead. You can follow the steps mentioned below to do the same.
- Launch Hyper-V Manager.
- Click on Actions > Hyper-V Settings.
- In the left navigation pane, click on NUMA Spanning.
- Disable Allow virtual machines to span physical NUMA nodes.
- Click on Apply > OK.
Finally, start your virtual machine and see if your system is heating up.
Read: How to improve and optimize Hyper-V VM Performance
4] Use High Performance Plan
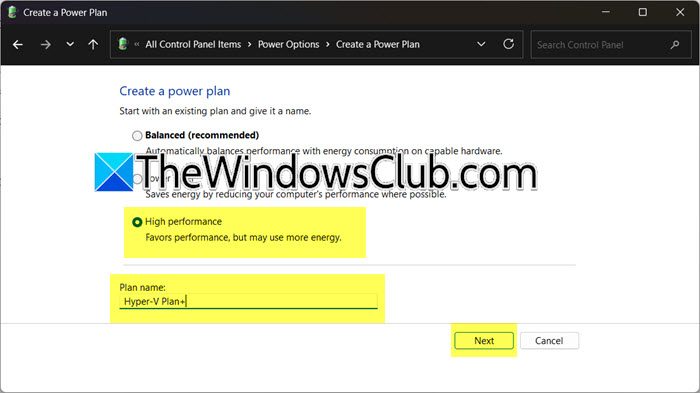
The High Performance power plan keeps your CPU at a consistent performance level by preventing downclocking and deep power-saving states. When using Hyper-V, this can reduce heat generation by eliminating frequent power-state transitions. It offers stable voltage and clock speeds, making it more thermally efficient than frequent performance scaling.
Follow the steps below to do the same.
- Open the Control Panel.
- Go to Power Options (View by > Large icons).
- If you see High Performance, select it; if it is not visible, click on Create a power plan.
- Select High Performance, give it a name, and click Next.
- Finally, choose the plan we just created
- For finer control, click Change plan settings next to High performance plan name, then Change advanced power settings.
- In the Processor power management section, ensure Minimum processor state is set to 100% when plugged in.
Once you set the plan, check if your system is still heating up.
That’s it!
Read: Can’t Connect to Hyper-V Virtual Machine on Windows.
Does Hyper-V slow down your PC?
Hyper-V can slow down your host PC, especially if it is a Type 1 hypervisor, as it runs directly on the hardware. It reserves CPU, RAM, and I/O resources for itself and its virtual machines (VMs), potentially reducing performance for other applications, especially on systems with limited resources. This slowdown is particularly evident in devices with minimal RAM or fewer CPU cores, where the host competes with VMs for resources.
How much RAM does Hyper-V need?
Hyper-V requires about 1 to 2 GB of RAM for its management operating system, but the total RAM needed depends on your virtual machines (VMs). You should allocate at least 2 to 4 GB for lightweight VMs and 8 GB or more for server VMs. A good starting point is 16 GB of total RAM to run a host OS and one or two basic VMs without performance issues.
Also Read: Fix Hyper-V Network Dropouts on Broadcom Adapter.