Using a webcam in a VMware virtual machine from a Windows 11 host can be problematic because the VM doesn’t have direct access to your physical hardware. Windows 11 and modern webcams can introduce specific driver and resource-sharing conflicts. By default, VMware often uses a “virtual USB camera,” but this method is often incompatible and requires a more direct connection known as USB passthrough. In this post, we are going to see what to do when the camera is not working in VMware and how to enable it.
Camera not working in VMware
If you are using Windows 11 and have trouble with your webcam in a virtual machine (VM), here’s what you should know. The webcam may work well in apps like Camera or Teams on your main computer, but may not be detected in the VM. You might see errors such as No device found, a black screen in the guest operating system’s camera app, or a VMware message saying, The connection for the USB device ‘USB x.x Camera’ was unsuccessful, along with a Driver error. These issues often happen because the host operating system is using the camera, there is a problem with the virtual camera feature, or there are compatibility issues with the USB controller between Windows 11 and the VM.
How to enable Camera in VMware?
If the Camera is not working in VMware and you need to enable it, follow the methods below.
- Manually connect the Webcam via VMware’s USB menu
- Disable Virtual Camera & enable Passthrough
- Check the VMware USB Arbitration Service
- Change the VM’s USB Compatibility Mode
- Disable Hyper-V
Let us talk about them in detail.
1] Manually connect the Webcam via VMware’s USB Menu

We will bypass VMware’s problematic “virtual USB camera” feature and instead use direct USB passthrough. When you manually connect the webcam through the USB menu, you’re telling VMware to disconnect the webcam from Windows 11 and release it from any host applications, assign exclusive control to the guest OS, treating it like a physical USB device plugged directly into the VM, to avoid driver conflicts that occur when both the host and guest try to access the camera simultaneously.
Follow the steps mentioned below to do the same.
- Launch VMware and start your virtual machine.
- Wait for the VM to boot up to the login screen, but don’t log in yet.
- Look at the top VMware menu bar and click on VM.
- From the dropdown, hover over Removable Devices
- Go to your camera and click on Connect (Disconnect with Host).
You should hear the Windows USB disconnect sound from your host computer. The menu item should now show Disconnect (Connect to Host), indicating it’s connected to the VM. Go ahead and start using the camera inside your VM.
2] Disable Virtual Camera & enable Passthrough
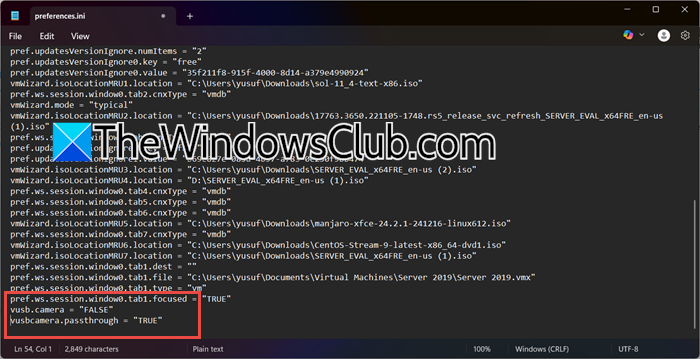
To fix webcam issues in VMware on Windows 11, we are going to disable the virtual camera (vusb.camera = "FALSE") and enable direct passthrough (vusbcamera.passthrough = "TRUE"). This treats the webcam as a standard USB device, avoiding conflicts from Windows managing camera access for features like Windows Hello.
Follow the steps below to do the same.
- First, ensure your virtual machine is fully powered off (not suspended or hibernating).
- Exit VMware Workstation or Player completely. You can check your system tray or Task Manager to make sure no VMware processes are running in the background
- Now, open Run by Win + R.
- Type %APPDATA%\VMware and press Enter.
- In the VMware folder, locate the file named preferences.ini
- You need to open it with Notepad.
- Scroll to the bottom of the file to find an empty section
- Add these two new lines:
vusb.camera = "FALSE"
vusbcamera.passthrough = "TRUE"
- Ensure there are no spaces before the text and that the quotes are straight.
- Save the file and start your virtual machine normally.
- Once the VM is running, go to VM > Removable Devices.
- Your webcam should now appear as a standard USB device.
- Select it and choose Connect (Disconnect from Host).
Now, check if the issue is resolved.
3] Check the VMware USB Arbitration Service
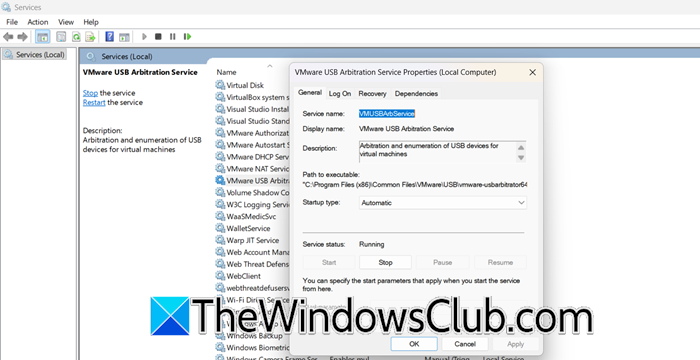
This critical Windows service manages USB device sharing between the host and VMs. If it’s stopped, USB devices won’t connect properly. So, if the solutions above did not work for you, open Services.msc from Run, and look for VMware USB Arbitration Service. Ensure its status is Running. If it is not, right-click on it, select Start. If it is stopped, also set its Startup type to Automatic.
4] Change the VM’s USB Compatibility Mode
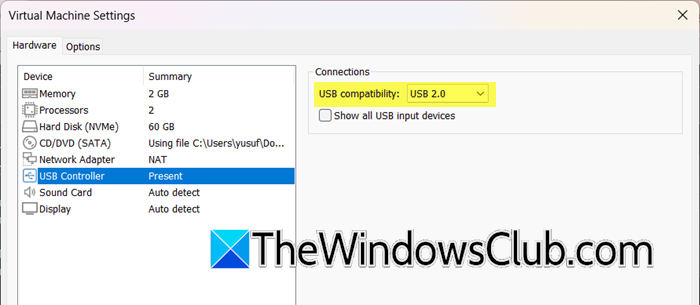
If you are using modern USB 3.0/3.1 cameras can sometimes have issues with VM controllers. Therefore, forcing an older, more stable standard can help. Follow the steps below to do the same.
- Power off the machine.
- Right-click on the virtual machine and select Settings.
- Go to USB Controller.
- Under USB compatibility, change the setting from USB 3.1 to USB 2.0 or USB 3.0.
- Click OK, start the VM, and try connecting the webcam again manually (as in the first solution).
Finally, check if the issue is resolved.
5] Disable Hyper-V
If you have Windows features like Virtual Machine Platform or Windows Hypervisor Platform enabled for WSL2 or other containers, they can interfere with VMware’s direct hardware access. You need to go ahead and disable Hyper-V on your computer.
Hopefully, with these solutions, you will be able to resolve the issue.
Read: VMware network adapter not showing up in Windows 11
How do I fix my camera not working?
If your camera isn’t working in VMware, you’re not alone. This common problem is usually caused by incorrect configuration settings that prevent the virtual machine from accessing your physical webcam. The good news is that it can typically be resolved by manually connecting the device through VMware’s USB menu or adjusting a few key settings. With a few simple steps, you can quickly enable your camera and get back to seamless video communication.
Read: Fix VMware operating system not found Boot error
How do I use a webcam in a VM?
To use a webcam in a VM, you typically need to manually connect the camera to the Virtual Machine via your virtualization software’s USB settings. This process allows the guest operating system to take direct control of the webcam. Once properly connected, your VM will recognize the camera as a standard USB device.
Also Read: VMware Player USB device greyed out.