We have talked about the BitLocker feature, where we’ve mentioned the BitLocker Drive Preparation Tool. This tool is currently not available for download on Windows 11/10/Server. However, if you still wish to utilize the capabilities of this tool, you can use the command-line tool instead. In this article, we will talk about using the BitLocker Drive Preparation Tool using Command Prompt in Windows 11/10.

The BitLocker Drive Preparation Tool helps configure your system drive with the required partitions before enabling BitLocker encryption. It automates the creation of a separate system partition, the move of boot files, and the activation of the new partition so BitLocker can work properly. Basically, BitLocker Drive Preparation tool prepares a hard drive with the partitions necessary for BitLocker Drive Encryption. Here is how you can use it.
How to use BitLocker Drive Preparation Tool
Here is a step-by-step guide to using the BitLocker Drive Preparation Tool:
1] Check Windows Edition
BitLocker is only available on Windows 11/10: Professional, Enterprise, Education
2] Open BitLocker Drive Preparation Tool
Click on Start > All Programs > Accessories > System Tools > BitLocker Drive Preparation Tool and open it. Run it as Administrator to ensure it has permission to modify partitions.
3] Prepare the Drive
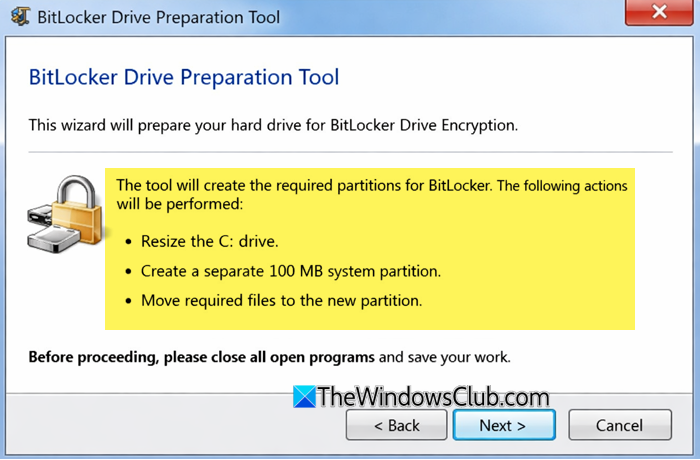
The wizard explains that it will prepare your drive for BitLocker encryption. It lists the actions it will perform, such as resizing your main drive and creating a small system partition.
Click “Next” and the tool checks your drive configuration.If your drive already meets BitLocker requirements, it will notify you and skip unnecessary steps.
It automatically creates a 100 MB system partition (used for boot files). To make space for this, your main partition (C:) is resized slightly.
After this, the System files are moved to the new partition. This ensures BitLocker can encrypt your main drive without affecting boot operations.

Once finished, you’ll see a confirmation message and you will have to restart your computer.
The system partition will now be active.
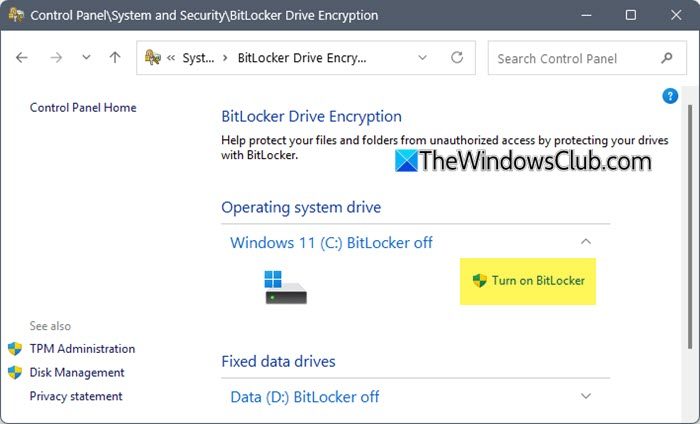
After doing this, you have to open Control Panel > Security and turn on BitLocker encryption. Select the drive you want to encrypt and follow the wizard to set up encryption and a recovery key.
That’s all!
Read: How to install and enable BitLocker on Windows Server
Using BitLocker Drive Preparation Tool via Command Prompt in Windows
1. In order to use BitLocker Drive Preparation command-line tool, open the administrative Command Prompt.
2. Next, you can use the following command with suitable descriptors mentioned below and press Enter:
bdehdcfg [–driveinfo <DriveLetter>] [-target {default|unallocated|<DriveLetter> shrink|<DriveLetter> merge}] [–newdriveletter] [–size <SizeinMB>] [-quiet]
The above-mentioned command is in general form and its variable parameters can be altered using the following descriptors:
This displays the drive letter, total size, maximum free space, and partition characteristics. Only valid partitions are listed. Unallocated space is not listed if four primary or extended partitions already exist-
-driveinfo <DriveLetter>:
Example: To display information for C: drive, use bdehdcfg –driveinfo C: command.
Prepares a partition for use as a system drive by BitLocker and Windows Recovery. By default, this partition is created without a drive letter-
-target {default|unallocated|<DriveLetter> shrink|<DriveLetter> merge}
Example: In order to use this command to designate an existing drive (K) as the system drive, use bdehdcfg -target K: merge at Command Prompt.
Assigns a new drive letter to the portion of a drive used as the system drive. As a best practice, it is recommended that you do not assign a drive letter to your system drive-
-newdriveletter
Example: Using command bdehdcfg -target default -newdriveletter K: illustrates that default drive is being assigned the drive letter K.
Specifies the size of the system partition when creating a new system drive. The default is 300 MB in minimum size is 100 MB.
-size <SizeinMB>
Example: Use command bdehdcfg -target default -size 500 to allocate 500 MB to the default system drive.
Informs the BitLocker Drive Preparation Tool that all actions and errors are not to be displayed in the command-line interface-
-quite
Example : bdehdcfg -target default -quiet
Use this to restart BitLocker Drive Preparation Tool after an operation is completed-
-restart
Example: BdeHdCfg.exe -target d: merge -quiet -restart
In this way, you can use the BitLocker Drive Preparation command-line tool.
Interested readers may visit Microsoft to find out further possibilities.
TIP: This post will show you how to manually prepare a drive for BitLocker.
See this post if you receive BitLocker Drive Encryption cannot be used because critical BitLocker system files are missing or corrupted (0x8031004A) error.
Related reads:
- You have chosen to back up drive C which is encrypted
- Recover files & data from inaccessible BitLocker encrypted drive
- Encrypt USB Flash Drives with BitLocker To Go
- BitLocker Setup could not find a target system drive to prepare
- BitLocker Setup failed to export the BCD (Boot Configuration Data) store
- Your Recovery Key Couldn’t Be Saved To This Location error for BitLocker.