
This article suggests solutions if you find that Autocomplete or Autofill is not working in Outlook. Autocomplete is an important feature in Outlook that suggests email addresses as soon as you type the initials. However, many users have reported that Autocomplete doesn’t work properly in Outlook. This may occur due to a corrupted Autocomplete cache, an add-in, or something else. If you are also facing the same issue, we got you covered. Here, we will cover several methods you can use to fix the issue.
Outlook Autocomplete Contacts List not working
Autocomplete is not working in Outlook
These are the methods to try if Autocomplete or Autofill is not working correctly in Outlook:
- Ensure that the Autocomplete setting is enabled.
- Rename the RoamCache folder.
- Disable Outlook Change Notifier add-in installed by iTunes.
- Run Outlook in Safe Mode.
- Create a new profile.
Let’s discuss these solutions in detail!
1] Ensure that the Autocomplete setting is enabled
The first thing you should try is to make sure the Autocomplete option is turned on. For that, you can follow below steps:
- Start Outlook application and go to File > Options.
- In the Outlook Options wizard, navigate to the Mail tab.
- Now, scroll down to the Send Messages section and make sure that the checkbox called Use AutoComplete List to suggest names when typing in the To, Cc, and Bcc lines is enabled. If not, enable it.
- Click on the OK button.
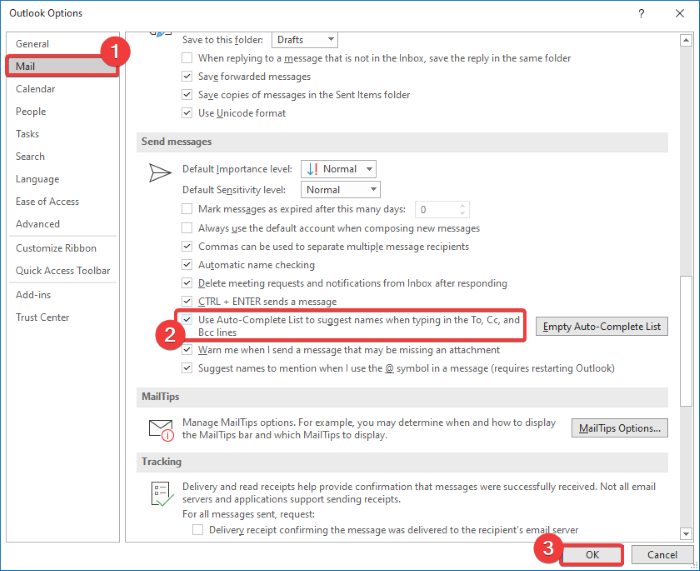
Now, if the autocomplete option is already enabled and still not working, you should try clearing out the Autocomplete list using the below steps:
Go to the autocomplete option using the above-mentioned steps and then select the Empty AutoComplete List button present beside it. Next, confirm the autocomplete list clearing process by clicking the Yes button.
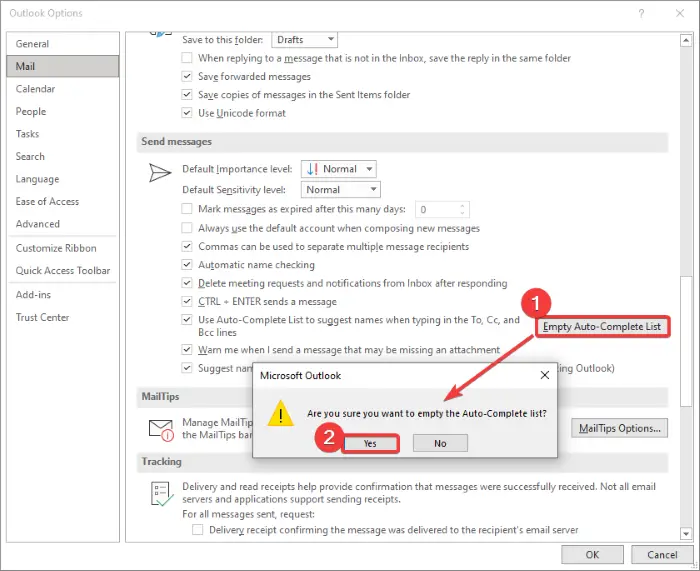
After that, send test emails to the same recipient and see whether Autocomplete starts working. If not, consider using another method from this list to troubleshoot the problem.
2] Rename the RoamCache folder
Another method that you can try is renaming the RoamCache folder. It will reset autocomplete, so you will lose all saved addresses in autocomplete list.
Before using this method, check if you are using a Microsoft Exchange Server account or some other one. For that, open Outlook and go to the File > Info and click on the Accounts Settings option. In the new dialog window, check if the Type is Microsoft Exchange or something else.
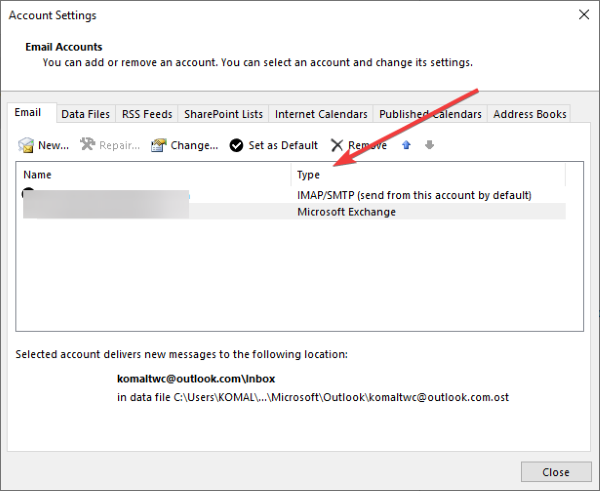
If the type is Microsoft Exchange, try the below steps:
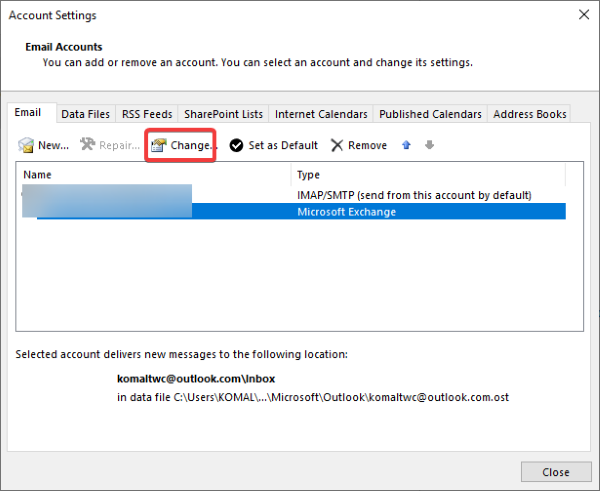
Step 1: Go to File > Info > Accounts Settings and select the Microsoft Exchange Server account. Then, click on the Change button.
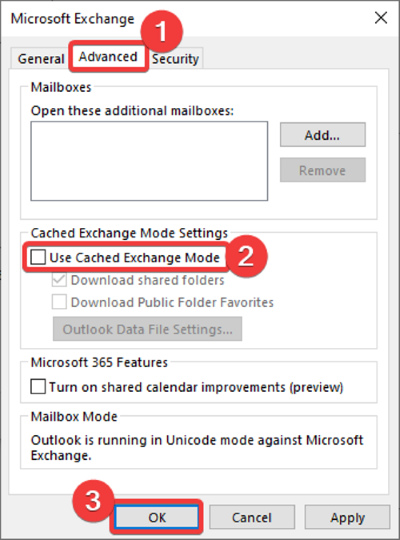
Step 2: In the next prompt, click on the More Settings button and then disable the Use Cached Exchange Mode checkbox. After that, press the OK button and exit the Outlook application.
Step 3: Now, press Windows + R hotkey to open the Run dialog box and enter the below address in it:
%LOCALAPPDATA%\Microsoft\Outlook
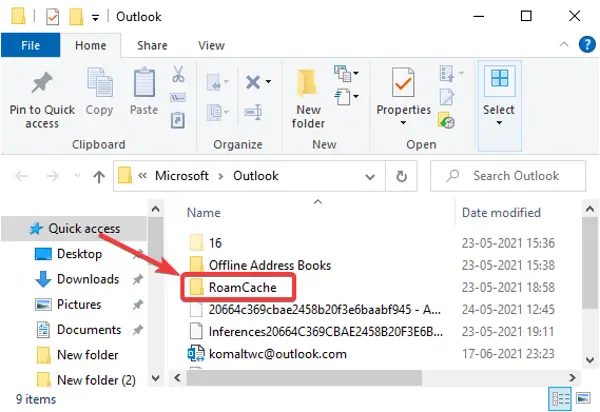
Step 4: In the opened directory, you will see a folder named RoamCache. Rename this folder as old_RoamCache.
Step 5: Restart Outlook.
Step 6: Now, you have to enable the Use Cached Exchange Mode checkbox that you previously disabled. Refer to the above Step (1) and Step (2) to do that.
Step 7: Finally, again restart Outlook and see if the autocomplete starts working again.
Note: In the case of a home email account, you can skip Step (1), Step (2), Step (6), and Step (7) and follow other steps to rename the RoamCache folder and reset Autocomplete.
3] Disable Outlook Change Notifier add-in installed by iTunes
The autocomplete issue may also be caused by the Outlook Change Notifier add-in installed by iTunes. Try disabling it using the below steps and then check if the problem still persists:
- Start Outlook and go to File > Options and navigate to the Add-Ins tab.
- Press the Go button present beside the Manage COM add-ins option.
- In the Add-ins dialog window, locate the Outlook Change Notifier add-in and then uncheck it.
- Next, click the OK button to confirm and then return to the main window.
4] Run Outlook in Safe Mode
If another add-in is causing this problem, check Outlook in safe mode to see whether the autocomplete feature works. Simply press Windows + R hotkey to open Run, write outlook.exe/safe in it, and press the Enter button. It will start the Outlook application in safe mode without any add-in.
If autocomplete works in safe mode, you may have issues with installed add-ins. Disable all of them using the steps mentioned in Method (3). Then, restart Outlook and see if the issue is gone.
5] Create a new profile
If no other solution works, try creating a new Outlook profile to see whether Autocomplete starts working again. This fixes up issues in Outlook generally also.
That’s it! Hope you can resolve the Autocomplete not working in Outlook issue using the methods above.
