Windows 11/10 comes with several useful features, and the ribbon menu of File Explorer is one of them, which helps users to carry out various tasks including Select, Cut-Copy-Paste, Share, etc. Among the included features, you will find an option called “New Item” in the Home tab of File Explorer’s ribbon.
This New Item option allows users to create a new file in a particular folder. If you use this option, there is no need to create the file in some other location and then move it to your desired folder. By using this option, you would be able to create the file directly in any folder. It makes the task easier to perform. But it may happen that you do not find your desired file type in that place. For example, you may have Photoshop installed on your PC, but you will not see any option to create a .psd file in the “New Item” section.
Add new file type in New Item of Explorer Ribbon menu
We have seen how to add new file type in the right-click context menu’s “New” option. It is even easier to do the same with the New Item of File Explorer’s ribbon. Before you begin, make sure you backup your Registry files. This trick has been tested on Windows 10 Pro but works on Windows 11 too.
Now decide which file type you want to add. It could be a Photoshop .psd file extension or it could be any other one. If you want to build a new PSD file, the extension would be .psd. Similarly the XML file extension is .xml and so on. This will work if you have the software which creates these file extensions installed on your computer.
Now open Registry Editor on your computer. To do so, press Win + R, type regedit, and hit Enter.
Navigate to the following key: COMPUTER > HKEY_CLASSES_ROOT.
Here, you will find all the extensions you want. Find your desired extension. Right-click on the extension > select New > Key. Name it as ShellNew.
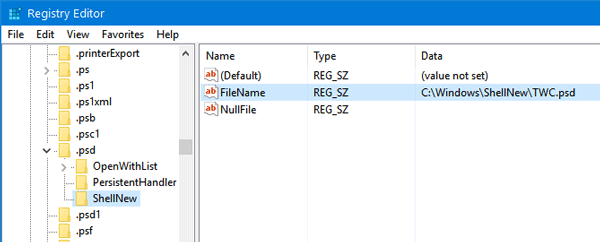
Select ShellNew key and create a new String Value on the right-hand side. To do so, right-click on the space > select New > String Value and name it as NullFile.
Now create a demo file in the app. For example, in this case, you need to open Photoshop software, make a new layer of your desired size and save the template with any name with a .psd extension.
Next, go to C:\Windows\ShellNew and paste the .psd file in that folder. In case you do not find the ShellNew folder, create it manually.
Finally, in the Registry Editor go to COMPUTER > HKEY_CLASSES_ROOT > file_extension > ShellNew. Right-click on the right-hand side > select New > String Value and name it as FileName. Double-click on the String Value and enter the file path that you pasted in the ShellNew folder in the prior step.

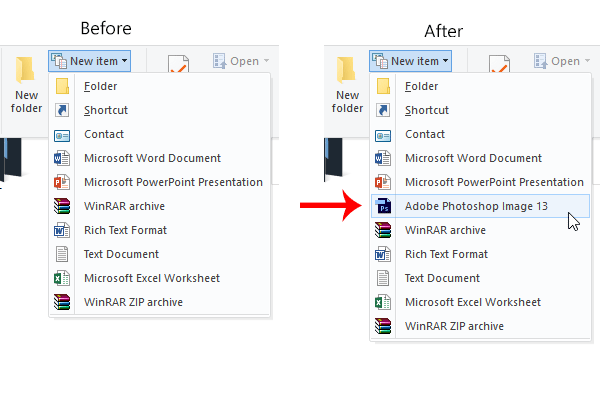
Now, you can find the option to create a PSD file in New Item of Windows 10 File Explorer.

Sometimes, you may not need to create a demo file to get it done. However, if your File Explorer does not show the option, you need to create a demo file as described above.
How do I add a new file type to the Windows 11/10 context menu?
To add a new file type to the Windows 11 and Windows 10 context menu, you can use the Registry Editor. For that, you can go through the aforementioned steps minutely. In other words, you need to create a key named ShellNew. Following that, it is required to create the above-mentioned String Value.
How do I add a ribbon in File Explorer?
In Windows 10, you can click on the expand button to add a ribbon in File Explorer. As Windows 10 comes with this functionality by default, you do not need to do anything else. However, Windows 11 doesn’t have a ribbon like Windows 10, and that is why you cannot enable or disable it on your PC.
Hope it works for you.
Hi,
I followed all the Steps but it didnt work. Im using windows 10. The MSWord shortcut was available in the menu and it suddenly disappeared. I tried to add it following your suggestions but it didnt work. What can I do?
Nothing works! Not even on 1607 Build 14393.479.
Thanks man ,works perfectly !