When uninstalling a network client on Windows 11, we encountered error 0x80071779, which says that it could not uninstall the client for the Microsoft Network feature. This error will be encountered when trying to uninstall any network component, like Client for Microsoft Networks, Hyper-V Extensible Virtual Switch, QoS Packet Scheduler, or Link-Layer Topology Responder. In this post, we will discuss this issue and how to uninstall network clients.
Could not uninstall the Client for Microsoft Networks feature. The error is 0x80071779.

Post Windows 10 version 1803, Microsoft removed the feature to uninstall a network client using the GUI (from the Control Panel) or netcfg command as uninstalling them previously caused issues during OS updates, as Windows Servicing Stack would automatically reinstall them during security updates or version upgrade However, there are other methods to uninstall the network client that we are going to discover hereafter. We will also discuss alternative options to consider if those methods fail.
Fix 0x80071779, Could not uninstall the Client for Microsoft Networks
If you encounter error 0x80071779 and are unable to uninstall any network component, like Client for Microsoft Networks, Hyper-V Extensible Virtual Switch, QoS Packet Scheduler, or Link-Layer Topology Responder, follow the workarounds, solutions, and tips mentioned below.
- Unbind Components
- Disable via Network Adapter GUI
- Permanently disable the client from the Registry Editor
Let us discuss them in detail.
1] Unbind Components

One of the workarounds we can try is to unbind the network component, which is not exactly the same as deleting a network card, but has the same effect as it permanently disables it. To do so, you first need to open PowerShell as an administrator and then run the following command to list all the installed network cards.
Get-NetAdapterBinding
Now, you need to identify your adapter name (e.g., “vEthernet (Default Switch)”) and component IDs like ms_msclient (Client for Microsoft Networks), vms_pp (Hyper-V Extensible Virtual Switch), or ms_pacer (QoS).
Once done, run the following command to disable that component.
Disable-NetAdapterBinding -Name "vEthernet (Default Switch)" -ComponentID vms_pp
Make sure to make the necessary changes to the command before executing it.
Due to this, traffic stops using the component, mimicking uninstallation. You can re-enable it with the Enable-NetAdapterBinding command.

2] Disable via Network Adapter GUI
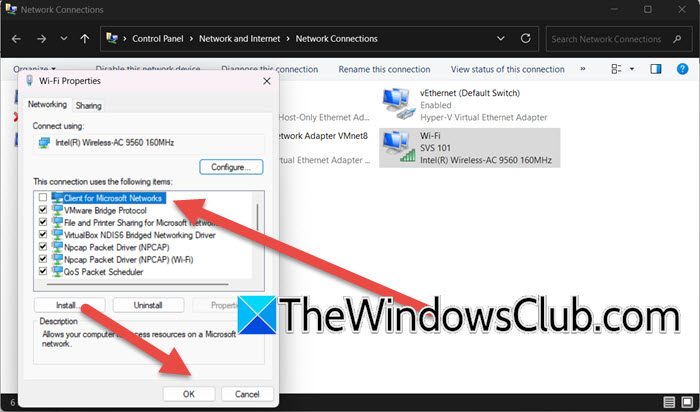
This method temporarily disables the feature for a specific network adapter without removing system files. It’s safe, reversible, and ideal for users uncomfortable with command-line tools. It prevents the adapter from using the feature for SMB file/printer sharing, network logins, or domain authentication. You can follow the steps mentioned below to disable the client via the Network Adapter GUI. To do this, follow the steps you took when trying to uninstall it (when you encountered this error). Instead of uninstalling it, untick the option and click OK.
Read: A connection to remote computer could not be established
3] Permanently disable the client from Registry Editor
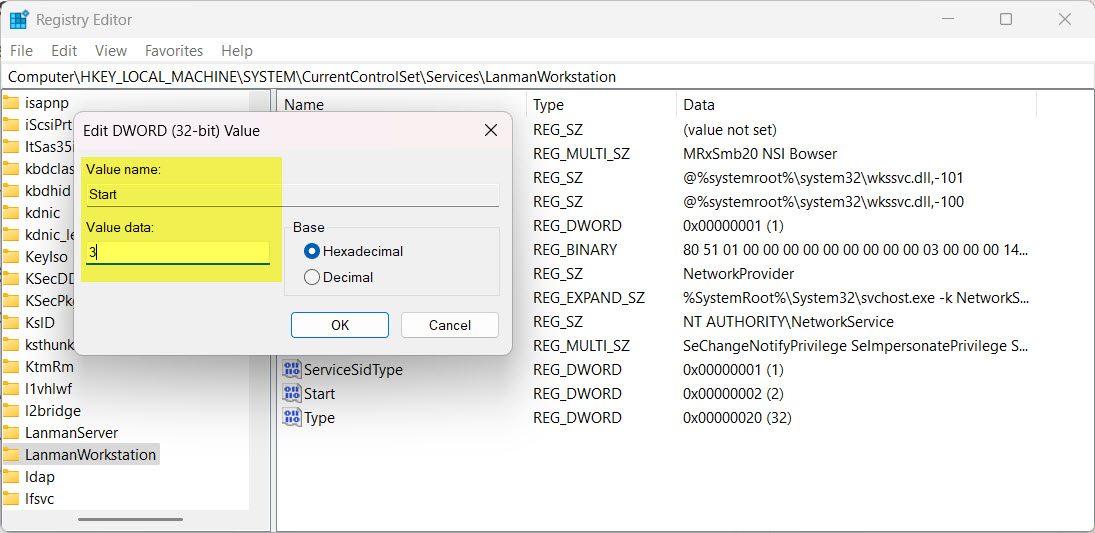
This solution permanently disables the underlying service (LanmanWorkstation) for Client for Microsoft Networks by modifying the Windows Registry. Use this only if standard methods fail, as incorrect edits can cause system instability; therefore, we recommend you create a backup of the registry beforehand.
Once done, open the Registry Editor, and navigate to the following location.
Computer\HKEY_LOCAL_MACHINE\SYSTEM\CurrentControlSet\Services
For the Client for Microsoft Network, we need to look for LanmanWorkstation. Click on it, and then double-click on Start and set its value data from 2 (Automatic) or 3 (Manual) to 4 (Disabled).
Finally, reboot your computer.
Hopefully, with the help of these solutions, your issue will be resolved.
Read: Fix VPN not working problems and issues in Windows 11
What is error code 0x80071779?
Error code 0x80071779 is a Windows system protection error that occurs when attempting to uninstall core network features like Client for Microsoft Networks. It signifies that the operating system actively blocks removal because these components are treated as essential, read-only system files. This safeguard exists to prevent instability, as Microsoft intentionally locked their removal starting with Windows 10 version 1803 to ensure critical network functionality survives updates and upgrades.
What happens if I uninstall Client for Microsoft Networks?
Uninstalling Client for Microsoft Networks would disrupt access to shared resources on Windows networks, including file/print servers, domain logins, and Microsoft accounts. However, this is virtually impossible on modern Windows versions (1803+) due to error 0x80071779. Instead, disabling it via network settings or PowerShell only suspends its functionality locally, which breaks SMB-dependent tasks but leaves system files intact for security updates.
Also Read: You’ll need the Internet for this, Error 0x800704CF.