
The VMware Workstation unrecoverable error: (mks) ISBRendererComm: Lost connection to mksSandbox is a disruptive crash caused by a failure in the MKS (Mouse-Keyboard-Screen) subsystem, specifically when the connection to the secure mksSandbox process responsible for graphical rendering is lost. In this post, we are going to talk about this issue and see what you can do to resolve the issue.
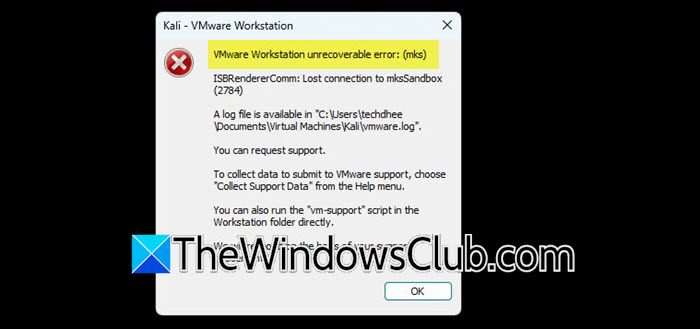
VMware Workstation unrecoverable error: (mks)
ISBRendererComm: Lost connection to mksSandbox
(2784)A log file is available in “C:\Users\techdhee\Documents\VirtualMachinesKali\vmware.log”.
You can request support.
To collect data to submit to VMware support, choose “Collect Support Data” from the Help menu.
You can also run the “vm-support” script in the Workstation folder directly.
We will respond on the basis of your support entitlement.
Fix VMware Workstation unrecoverable error: (mks); ISBRendererComm: Lost connection to mksSandbox (3850)
If you encounter a VMware Workstation unrecoverable error: (mks); ISBRendererComm: Lost connection to mksSandbox (3850), follow the solutions mentioned below.
- Disable Advanced Graphics Presentation
- Disable 3D Acceleration in the Virtual Machine Settings
- Repair VMware Installation
- Clean Up Lock Files after a crash
Let us talk about them in detail.
1] Disable Advanced Graphics Presentation
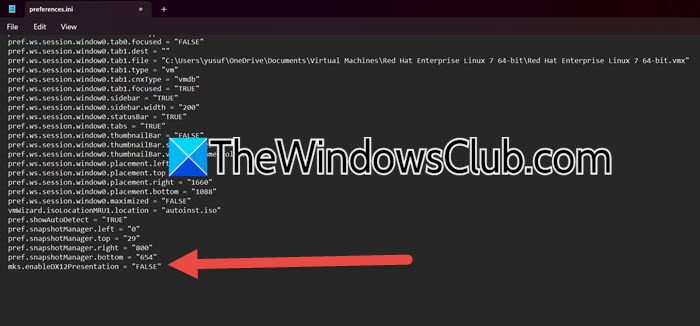
This error is caused by a bug in VMware’s interaction with modern host graphics APIs (DirectX 12/Vulkan). Disabling this feature forces VMware to use an older, more stable rendering path to render the VM’s display, preventing the crash.
First, press Ctrl + Shift + Esc to open the Task Manager. Look for any remaining VMware processes (e.g., vmware.exe, vmware-vmx.exe). If found, select each and click End task. This is crucial because a running VMware process can overwrite the file you are about to edit.
Open Run, type C:\Users\%USERNAME%\AppData\Roaming\VMware\, and press Enter.
Note: The AppData folder is hidden by default. If the path doesn’t work, enable “Hidden items” in the View tab of File Explorer, or type %APPDATA%\VMware directly into the address bar.
In the opened folder, find the file named preferences.ini. Right-click on it, hover over Open with, and choose Notepad or any plain text editor. Do not use WordPad or Microsoft Word. Scroll to the very end of the file.
On a new, blank line at the end, type or paste the following exactly as shown below.
mks.enableDX12Presentation = "FALSE"
Ensure there are no leading spaces at the beginning of the line and that the spelling is correct.
Go to File > Save in Notepad, or press Ctrl + S. Close Notepad. Restart your computer. A full restart is more reliable than just reopening VMware, as it ensures all VMware services reload with the new settings.
2] Disable 3D Acceleration in the Virtual Machine Settings
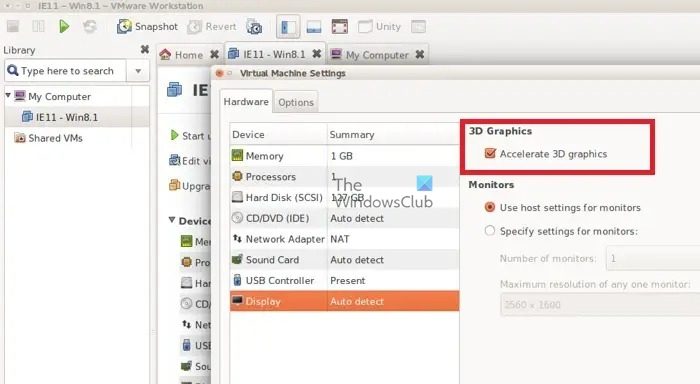
Disabling 3D acceleration completely turns off the virtual machine’s use of the host’s advanced graphics pipeline, which is governed by the buggy MKS subsystem that is failing. By unchecking this option, you instruct VMware to use a basic, software-based display driver for the VM that does not interact with the unstable mksSandbox rendering process, thereby eliminating the source of the crash at the cost of graphical performance. Follow the steps below to do the same.
- First, make sure that your VM is off.
- Right-click on the VM in VMware’s library and select Settings.
- Go to Display.
- Uncheck the box for Accelerate 3D graphics.
Ensure the problematic VM is powered off. Right-click on the VM in VMware’s library and select Settings. Go to Display. Uncheck the box for “Accelerate 3D graphics.” Click OK and power on the VM. Note: While this is highly effective at preventing crashes, it will degrade the VM’s graphical performance, which may be problematic for tasks such as gaming or CAD work.
3] Repair VMware installation
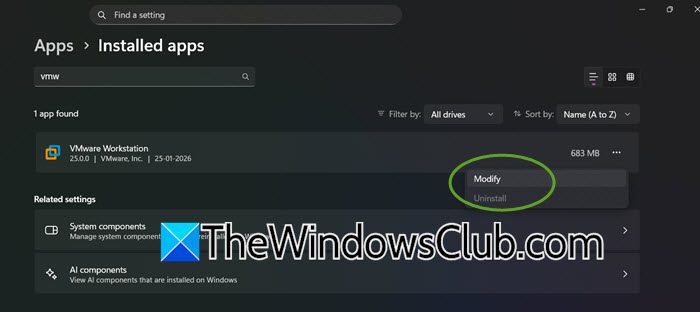
By repairing the installation, we are essentially replacing VMware’s core program files and system libraries with fresh copies from the installer. This fixes the error by eliminating any file corruption, incorrect updates, or accidental deletion by security software that may have broken the critical mks graphics components, causing the sandbox connection to fail. Follow the steps below.
- Open Settings by Win + I.
- Go to Apps > Installed apps.
- Search for VMware Workstation, click on the three dots, and select Modify.
- In the setup wizard, choose the Repair option and follow the prompts.
Restart your host computer after the repair completes. This process is also useful if your antivirus software has incorrectly quarantined or altered VMware executable files, another potential root cause of instability.
4] Clean Up Lock Files after a crash
VMware creates .lck lock files to prevent multiple instances from accessing the same virtual machine simultaneously. After a crash, these files can remain on disk incorrectly, signaling that the VM is still in use. Deleting them removes this false flag, allowing VMware to start the virtual machine with a clean state.
Before powering on your virtual machine, ensure VMware Workstation is fully closed by checking Task Manager and terminating any active vmware-vmx processes. Once you’ve confirmed it is shut down, navigate to the folder where your VM files are stored and delete any files or directories with the extensions .lck or .lock, as these can prevent the machine from starting. After removing the lock files, restart VMware Workstation and try launching the virtual machine again.
Hopefully, with these solutions, you can resolve the issue.
Read: Fix VMware Workstation Unrecoverable Error (vcpu-0)
What is worst case allocation in VMware?
Worst-case allocation in VMware refers to the maximum resource consumption a virtual machine is configured to use, including all reserved memory, CPU, and other resources. This concept is critical for capacity planning, as it ensures the physical host has sufficient resources to meet the peak demand of every VM simultaneously, preventing performance degradation or failure when all VMs operate at their full allocated capacity simultaneously.
Read: Unable to open kernel device \\.vmcidev\vmx in VMware
How to pass through GPU in VMware Workstation?
To pass through a GPU in VMware Workstation, the host system must have a supported GPU and compatible hardware. You enable passthrough by selecting the virtual machine, navigating to its settings, adding a new PCI device, and selecting the specific GPU from the list. After starting the VM, you must install the appropriate GPU drivers within the guest operating system to utilize the hardware directly for graphics-intensive tasks.
Also Read: Fix VMware operating system not found Boot error.
