There are some very useful tips and tricks for Microsoft Word. One of those is Tab Stops. If you want to set up and customize Tab Stops in Microsoft Word on Windows 11/10 computer, then this article will be helpful.

In Microsoft Word, a Tab Stop is a position where the mouse cursor stops after pressing the Tab key. By using the Tab Stop feature, we can align the paragraphs in a Word document perfectly. By default, its position is set to 0.5 inches. If you want, you can customize Tab Stops in Microsoft Word.
What are the types of Tab Stops in Word?
There are 5 different types of Tab Stops in Microsoft Word. These are:
- Left tab: It aligns the text to the left at the Tab Stop
- Center tab: It aligns the text to the center at the Tab Stop
- Right tab: It aligns the text to the right at the Tab Stop
- Decimal tab: You can use this Tab Stop to align the decimal numbers vertically at the decimal point
- Bar tab: It draws a vertical line at the Tab Stop.
What do Tab Stops look like in Word?
Each tab stop is denoted with a different icon or symbol in Microsoft Word. For example, a center tab stop is indicated as an inverted T (⊥). On the other hand, a left tab stop is denoted by the L symbol, and a backward L or reversed L indicates a right tab stop. In addition to that, if there is a decimal tab stop, then it is denoted with an inverted T and a dot. And, if a bar tab stop is added, then it is visible as a vertical line.
Set up and use Tab Stops in Word
You can set up and customize Tab Stops in Microsoft Word by the following two methods:
- Using the Ruler
- Using the Paragraph Settings.
Let’s see both of these methods in detail.
1] Using the Ruler

This is the simplest method to set up or customize the Tab Stops in Microsoft Word. The Ruler in Microsoft Word may be hidden. If you do not see Ruler, click on the View menu and then enable the Ruler checkbox.
Now follow the steps mentioned below:
- Click on the top left side to set the alignment for your Tab Stops. To locate it easily, simply take your cursor to the place where the two rulers intersect
- Now, click on the horizontal ruler to mark the Tab Stop.
You can set the following alignments for your Tab Stops:

- Left
- Center
- Right
- Decimal
- Bar.
When you place your cursor over the marked Tab Stop on the ruler, Word will display its alignment type.
To remove the Tab Stop, place your cursor on the ruler where you have marked the Tab Stop. Now, press and hold the left click of your mouse and drag it downwards.
Related: How to insert a Text field in Microsoft Word.
2] Using the Paragraph Settings
Let’s see another method to customize Tab Stops in Microsoft Word. Follow the steps written below:
- Click on the Home tab in Microsoft Word
- Now, click on the Paragraph dialog launcher or Paragraph Settings icon. It is a small arrow-shaped icon located at the bottom right side of the Paragraph section
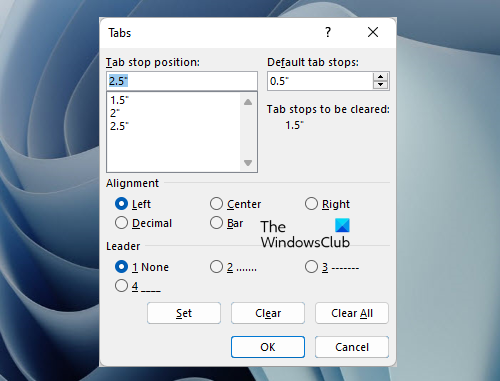
- After that, click on the Tabs button. You will find it on the bottom left side of the Paragraph Settings window
- Type a numerical value in the Tab stop position field
- Select the Alignment and Leader for the Tab Stop
- Click on the Set button
- Click OK.
To remove the Tab Stop position, repeat the first three steps listed above, and then select the Tab Stop position from the box that you want to delete. After doing that, click on the Clear button. Clicking on the Clear all button will delete all the entries in the Tab stop position box.
That’s all! Hope this helps.
Read next: How to insert a Caption in Microsoft Word.