Many Windows 11 users rely on syncing their SharePoint document libraries directly to File Explorer via OneDrive for seamless offline access. However, a common and frustrating issue occurs when this sync process stops working, leaving files outdated or missing locally. In this post, we are going to see what to do if the Sharepoint is not syncing to File Explorer in Windows 11.

Why is my SharePoint not syncing with File Explorer?
When the OneDrive sync client fails to synchronize a SharePoint or Teams library, files may not appear in File Explorer or display persistent error icons, halting all two-way updates. This breakdown is commonly due to corruption in the client’s local cache or configuration, but can also stem from incompatible library elements like excessively long paths, invalid characters, sync limits, or authentication issues.
Sharepoint not syncing to File Explorer in Windows 11
If the Sharepoint is not syncing to File Explorer in Windows 11, you need to follow the solutions mentioned below.
- Reset the OneDrive Sync Client
- Check for selective sync or Library restriction
- Use the Sync Button on SharePoint, Not “Add Shortcut to OneDrive”
- Modify the Registry to Re-enable SharePoint Libraries (if missing)
Let us talk about them in detail.
1] Reset the OneDrive Sync Client
Resetting the OneDrive client completely clears its corrupted sync configuration and cache, which are often the source of the blockage. This forces the application to rebuild a fresh, clean set of instructions for synchronizing your files, effectively bypassing the glitch that was preventing communication with SharePoint. To reset the OneDrive Sync client, you need to follow the steps mentioned below.
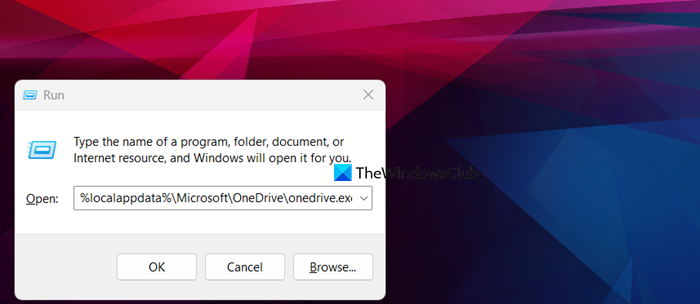
- Press Win + R, type %localappdata%\Microsoft\OneDrive\onedrive.exe /reset, and hit Enter. A command window will flash briefly.
- Press Win + R again, type %localappdata%\Microsoft\OneDrive\onedrive.exe /update, and press Enter.
- Reset OneDrive by searching for it in the Start Menu and launching it, or by restarting your comptuer.
- Once restarted, sign back into your account and re-select your SharePoint libraries to sync. Your files will be re-downloaded from the server.
Finally, check if your issue is resolved.
2] Check for selective sync or Library restrictions
There is a possibility that the sync problem might not be a technical failure, but a simple setting. The library could be unintentionally excluded in your OneDrive’s Choose folders list, or it might be blocked on the SharePoint server due to exceeding size limits or having structural changes that the sync client cannot process. You can follow the steps mentioned below to do the same.
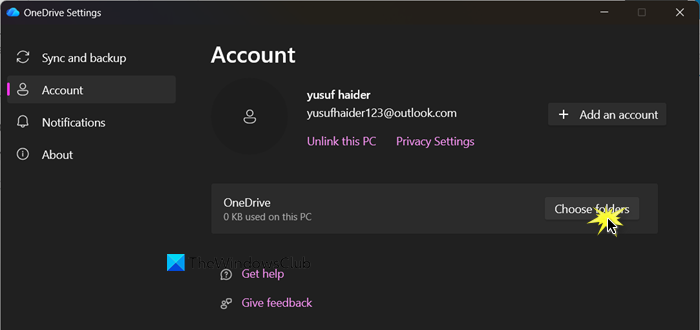
- Click on the OneDrive icon from your system tray.
- Then, click on Settings (gear icon), and navigate to Settings > Account.
- Click Choose folders for your work/school account and ensure the checkbox next to the problematic SharePoint library is selected.
- Additionally, in your web browser, visit the actual SharePoint library online and check for any notifications or restrictions from your IT admin regarding sync limits or recent major changes.
Finally, check if your issue is resolved.
3] Use the Sync Button on SharePoint, Not “Add Shortcut to OneDrive”
The older, dedicated Sync button establishes a direct and stable link between the SharePoint library and your File Explorer, while the newer Add shortcut feature can sometimes create a less reliable mapping that is more prone to connection errors.

Open your web browser and navigate directly to the main page of the SharePoint document library that won’t sync. Look for the Sync button near the top of the library’s file list (you may need to click a dropdown menu like Automate to find it). Click Sync and approve any browser prompts to open the OneDrive app. The library should then begin syncing directly to your File Explorer under SharePoint.
Read: How to upload Documents to a SharePoint Site
4] Modify the Registry to Re-enable SharePoint Libraries (if missing)
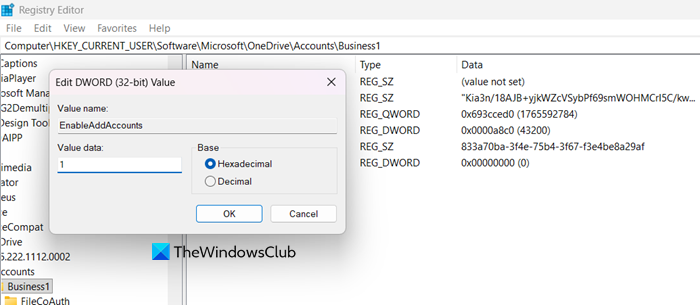
You may encounter this sisue if your Registry option that controls whether OneDrive can add new accounts is disabled. When this specific setting is turned off, the option to sync SharePoint libraries is often hidden or blocked entirely. Creating and enabling the EnableAddAccounts registry key directly re-activates this core function.
First of all, take a backup of your registry and navigate to the following location.
HKEY_CURRENT_USER\Software\Microsoft\OneDrive\Accounts\Business1
Right-click in the right panel, select New > DWORD (32-bit) Value, and name it EnableAddAccounts. Double-click this new value and set its Value data to 1. Click OK, close the Registry Editor, and restart your computer. OneDrive should now allow you to add SharePoint libraries.
Read: How to recover & restore deleted files in SharePoint.
How to sync SharePoint to File Explorer Windows 11?
In Windows 11, you can sync a SharePoint library to File Explorer using the OneDrive app, which creates a continuous two-way connection so you can manage cloud files directly on your PC. Microsoft now suggests using the Add shortcut to My files option in SharePoint for smoother performance and access across all devices. However, you can still use the traditional Sync button in the document library to link files to that specific computer. Once configured, the synced SharePoint files will appear in File Explorer under a folder named after your organization. To know more, you can go through our guide on how add SharePoint to File Explorer in Windows 11.
Also Read: Turn On/Off sync for SharePoint Document Library.