Many users are frustrated because of a common issue where the SD card automatically deletes files and photos without warning. This problem has led to the loss of important memories and data, causing immense stress and confusion among users. There can be varied reasons behind this, such as faulty files or hardware issues. In this article, we will walk through the possible causes and how to resolve them.
Why does my SD card automatically delete files?
The SD card may delete files due to file system corruption, malware, bad sectors, improper ejection, or compatibility issues. However, we have mentioned below how you can recover the deleted content and prevent this peculiar behavior of your SD Card.
SD Card automatically deletes files and photos
Since your SD Card automatically deletes files and photos, your first task should be to restore them. Then, we will discuss the steps you can take to resolve the issue. To get back your content, you can use a free data recovery tool. Once your data is recovered, take a backup of it and explore available solutions.
If your SD card automatically deletes files and photos without a warning on your Windows PC, execute the solutions mentioned below to fix the issue.
- Reinsert the SD card
- Run CHKDSK on the SD card
- Format the SD card
- Run SFC/DISM
- Clean the SD card
Let’s get started with the troubleshooting guide.
1] Reinsert the SD card
First and foremost, reinsert the SD Card to help refresh the connection. If the card wasn’t properly tested or mounted, it might cause files to disappear. Taking it out and reinserting it prompts the device to recognize it
- Click Win + E to open the Windows File Explorer, and go to the SD Card drive from the left panel.
- Right-click on it and select the Eject option.
- Now, manually remove the SD card, wait for some time, and reinsert it.
Ensure that the storage is not deleted again. If it does, move on to the next solution.
2] Run CHKDSK on the SD card
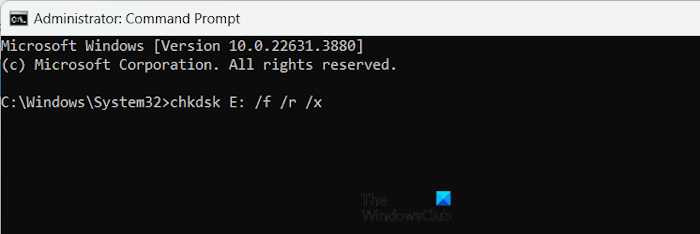
Checking for file system errors is necessary when facing unexpected deletions or file corruption. The CHKDSK command scans the storage for problems and repairs inconsistencies. Before starting, ensure that the SD Card is properly plugged in. After verifying, go to the search menu, search, and open Command Prompt with admin rights.
Type the command: chkdsk E: /f /r /x to run CHKDSK, and hit the Enter button. Here E is the drive where the SD card has been inserted.

This would scan the disk file for any errors and fix them. Wait for the process to complete, and then try to verify if the data is still being automatically deleted. If the data is still deleted, run the next solution.
3] Format the SD card
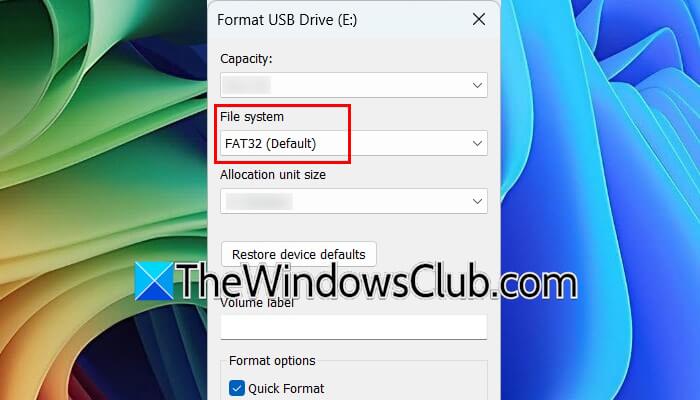
Next, we will format the SD Card to remove hidden errors or viruses, restoring it to a clean, stable state for proper functioning. Follow the steps mentioned below to format the SD card.
- Press Win + E to launch the File Explorer, and choose This PC.
- Right-click on the SD Card drive, click the Format option, and navigate to the File System drop-down menu.
- Click on NTFS for Windows specific use, or FAT32 FOR 32GB cards, and exFAT for 64GB, and check the box for Quick Format; however, it’s an optional choice.
- Lastly, select the Start option to initiate the formatting procedure.
- Alternatively, click Win + X, select Disk Management, and find the SD card in the list.
- Right-click on it, select Format, choose the File format, and follow the on-screen prompts.
Once done, open the SD Card, and see if the information on it is still deleted or not. If the issue persists, see the next solution.
Read: SD Card Reader not working, recognized or showing up
4] Run SFC/DISM
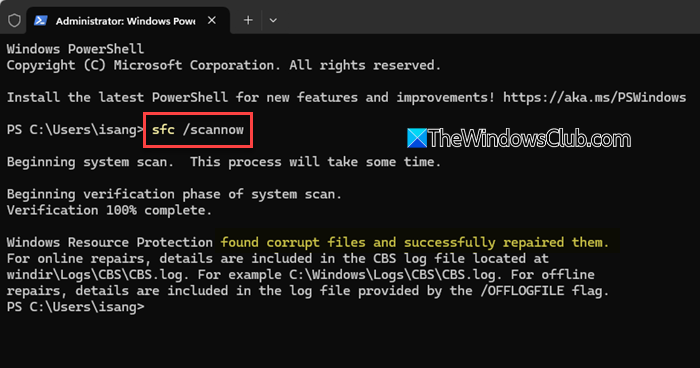
The root cause can lie within the Operating system, and to ensure that this is not the case, we will run SFC/DISM. SFC and DISM, together, restore system integrity and ensure proper connection between Windows and the SD card.
- Go to the search bar, type Command Prompt, and open it with administrative rights.
- Execute the following command to run SFC:
sfc /scannow
- Once done, type the following command to run DISM, and hit Enter:
Dism/Online/Cleanup-Image/RestoreHealth
Wait for the process to scan and repair, and then reboot the device.
5] Clean the SD card
If there is any corruption, bad sectors, or malware on the SD card, cleaning it’s the best solution, and that’s what we are going to do. This rebuilds the card structure and eliminates hidden issues that may be causing the files to be deleted. Here’s how to do the same:
- In the search bar, type cmd, and open Command Prompt with administrative privileges.
- To open the disk partitioning unit, run the following command and hit Enter:
diskpart
- To identify the list of storage devices, run the command “list disk“, and hit the Enter button.
- Run select disk E (E is the letter of your SD Card), and then run the command given below to clean it:
clean - Once done, create a new partition and follow the on-screen prompts.
The partition is active and assigned. It is now ready for data storage.
Read: How to use Windows File Recovery Tool to recover deleted files
How to fix a corrupted SD card?
To fix a corrupted SD card, users can try changing the card reader, running CHKDSK, formatting the card, or using SFC/DISM tools. Check out the article mentioned above to learn how to execute them.
Also Read: SD Card Reader not working or showing up in Windows.