If you recently installed an update, and when you boot your Windows 11/10 computer and you see an error message – Personalized Settings (Not Responding), then some of these suggestions are sure to help you. This error can appear after installing an update and restarting the computer. When this error message appears, users cannot click on any Desktop icons as they see a black screen and a pop-up window stating the error. It can arise because of many reasons, including a corrupted system file, a failed Windows update, a faulty driver, etc.
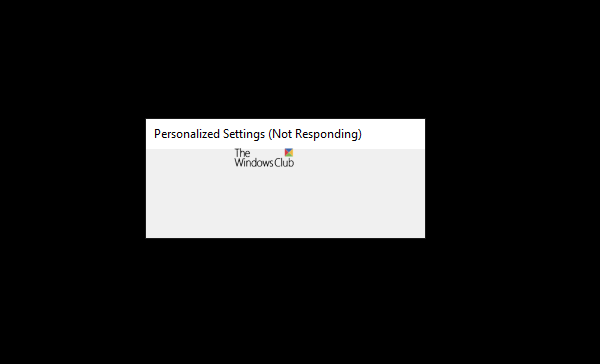
Computer stuck on Personalized Settings Not Responding in Windows 11/10
To fix this Personalized Settings (Not Responding) error in Windows 11/10, try the following suggestions:
- Restart File Explorer
- Open File Explorer using Task Manager
- Delete a Registry key
- Use a System Restore point
- Update Graphics Driver
- Troubleshoot the Black Screen.
Computer stuck on Personalized Settings
1] Restart File Explorer
This problem implies that your Windows Explorer is running in the background but is stuck and cannot be opened correctly. That is why it shows a black screen on your monitor. However, if you restart the Windows Explorer manually, you might be able to fix this issue immediately. To do so, you need to open the Task Manager.
Press Ctrl+Alt+Del and select Task Manager from there. After that, select Windows Explorer in the Processes tab > right-click on it > select Restart.
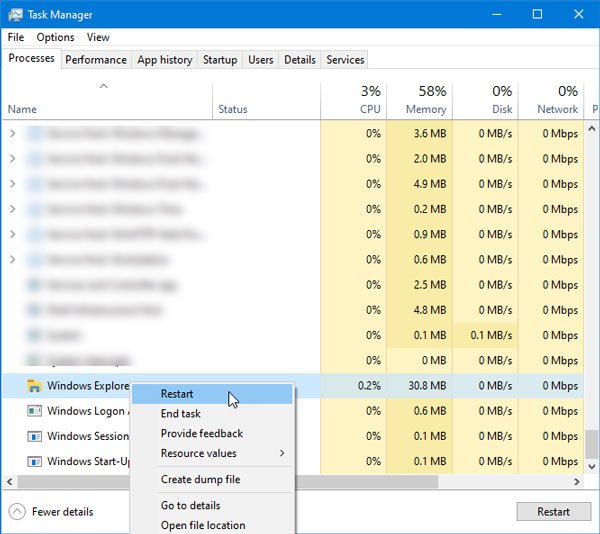
Now, you might be able to see your regular desktop and Taskbar.
2] Open File Explorer using Task Manager
If the above method does not work for you, press Ctrl+Alt+Del and select Task Manager from the list. After that, click the File option and select Run new task.
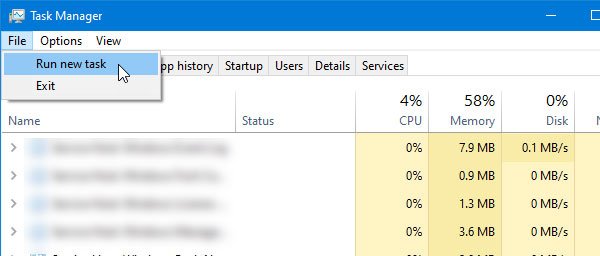
Type explorer.exe in the field and hit the Enter button. Now you should find the File Explorer on your screen.
After that, things should be normal.
3] Delete a Registry key
If installing an update has caused this issue, you can fix the issue by following this solution. You need to delete this key from the Registry Editor:

{89820200-ECBD-11cf-8B85-00AA005B4340}
To do so, create a Registry file backup first and then open the Registry Editor.
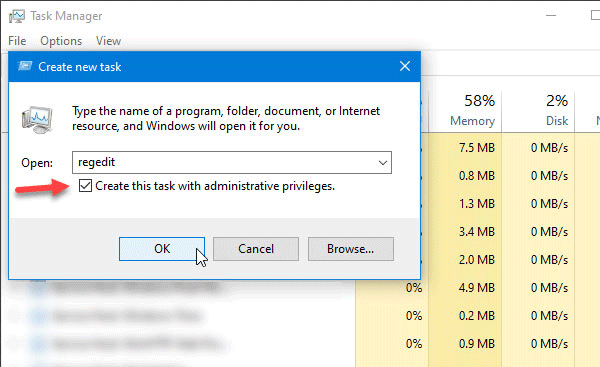
Open the Task Manager on your computer by following the same steps as mentioned earlier.
Next, click File > Run new task option. Type regedit, make a tick in the Create this task with administrator privileges checkbox, and click the OK button. It will run the Registry Editor with administrator permission.
After that, navigate to this path-
HKEY_LOCAL_MACHINE\SOFTWARE\Microsoft\Active Setup\Installed Components
In the Installed Components folder, you should find a key called:
{89820200-ECBD-11cf-8B85-00AA005B4340}
Right-click on it and select Delete.
4] Use System Restore point
If nothing is working, this is probably the last thing that you can use on your computer. If you created a System Restore point earlier, this is a good time to use that to get back your normal computer. Although this is very easy to use System Restore point, you need to use a Windows DVD or bootable USB drive to restore your system as you cannot access the Taskbar search box to open the respective options.
Apart from these, you can follow the following solutions as well-
- Restart your computer
- Use System File Checker to scan for possible file corruption. If an update has made a file corrupted during installation, you can fix that using this method.
- Disconnect all the external devices, such as external hard drives, USB drives, etc.
5] Update Graphics Driver
If the problem repeats, update Graphics Driver and see. At times, the graphics driver can cause the issue as mentioned above. Therefore, updating the graphics driver might help you fix it on your computer.
6] Troubleshoot the Black Screen
Black screen is quite common when your computer fails to load the File Explorer or certain personalization settings. Therefore, you could also troubleshoot the Black Screen and see if that helps you.
Hope something here helps you.
Computer stuck on Customizing features for you screen
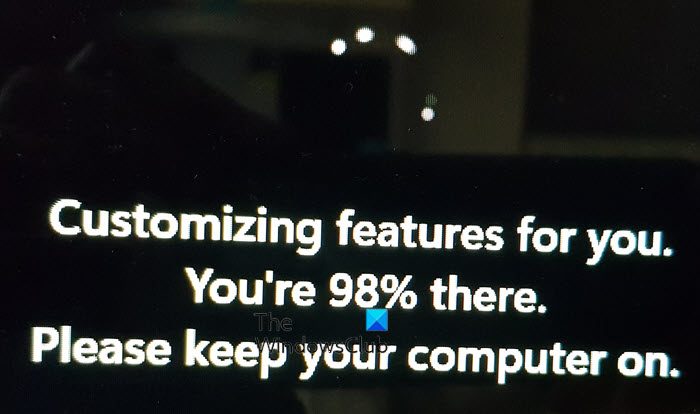
Sometimes you may see a screen Customizing features for you, You’re 98% there, Please keep your computer on and your PC is stuck. In this case too, you need to follow the above-mentioned suggestions.
How do I fix Personalized Settings not responding?
If the Personalized Settings is not responding in Windows 11/10, you need to restart Windows Explorer from the Task Manager, open File Explorer using Task Manager, delete {89820200-ECBD-11cf-8B85-00AA005B4340} key from the Registry Editor, update the graphics driver, etc. Apart from that, you can also consider using a System Restore point.
What are Personalized Settings in Windows 11?
Personalized Settings in Windows 11/10 are nothing but customized settings that users selected before installing an update. For example, you often choose a custom wallpaper, change the color scheme, etc. All these things are called personalized settings in Windows 11/10.