The OneDrive team at Microsoft has introduced a helpful feature for OneDrive for Business and OneDrive Personal users. This feature is called Files Restore.

Sometimes, when we are handling large-capacity cloud storage, there is a chance we may mess up the files. Or, when working in a large company and sharing ample cloud storage with a large group of people, a file may get modified or tampered with the knowledge or consent of the other teammates. In scenarios like this, the new Files Restore feature comes into action and helps you identify and restore files as they were earlier.
However, the only limitation is that it can restore files to any point in the last 30 days. This means if your quarterly budget is modified and you don’t check it for a long time, you might not find the older version unless you have a backup.
This feature is coming along and under the features of Data Loss Prevention (DLP), eDiscovery, Service level encryption with customer-owned keys (this is currently in preview and might contain bugs. But will be coming very soon for the public.), and data retention controls with consistent management across Office 365.
Now, without further ado, let’s dive into how to use this feature.
Files Restore feature in OneDrive
First, to use this feature, you need to have a OneDrive for Business subscription that comes with the Office 365 subscription. Log in to your account portal here to get started. UPDATE: This feature is now available for OneDrive personal users as well
Now, navigate and click on the little gear icon on the top right corner of the webpage. Upon clicking it, you will see a sidebar slide in from the right.
In that sidebar, find and click on the Restore OneDrive button.

This will redirect you to a page showing a histogram showing the activities undertaken on that file for the last 30 days. It would look like this:
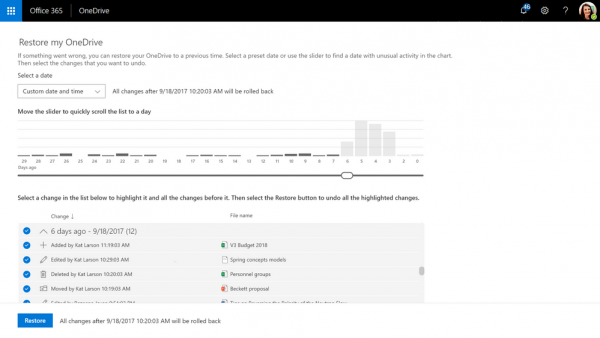 Now, you can slide the slider given to any point to restore the file. This makes it easy and handy at the same time.
Below the slider, you see an activity log showing what type of modifications the user made, with date and time. This keeps track of user modifications even if they correct spelling and save a file. So, in case of modifying the data in the file with false values, the administrator would know who and when did it.
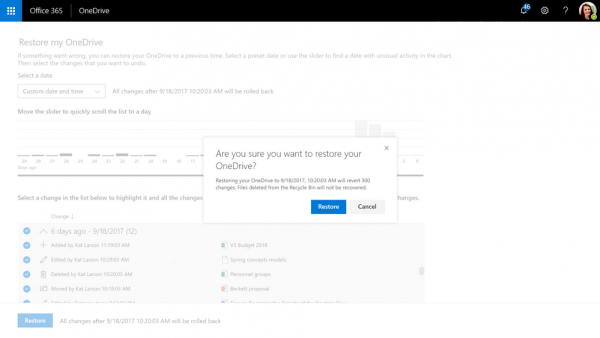
Now, as the user has selected the date range, the user needs to hit the Restore button in a prompt to restore the file to a previous state.
Voila! It just works.
We observed that this feature makes the complex process of file tracking far simpler and faster. By playing with a UI a bit and a few clicks. This eliminates all the complicated hassle that admins had to deal with earlier.
This feature is slowly rolling out to more and more users starting today. If you are not seeing it now, don’t panic. You will get it over the coming weeks in the future.
Recover Ransomware locked files with OneDrive

If you are always worried about your files getting locked by Ransomware, Windows users have the option to fight against it and make sure any of these malicious codes never lock down their files. Using this File Restore feature, you can recover such locked-down files.
The first step is to start saving your files to OneDrive. If not everything, make sure to keep the most important files on OneDrive. The second step is to use Windows Defender as your primary antivirus solution. It’s not just a small program; it’s heavily integrated into Windows 10 and can even take down malicious code in Safe Mode.
Once done, in case a ransomware threat is found on your device, Windows Defender will notify you of the danger, help you remove the ransomware from your device, and give you the option to use OneDrive Files Restore so you can recover your OneDrive files to the state they were in before the attack occurred.
You will see the date and time when Windows Defender detected the attack, which will be pre-selected in Files Restore, making the process simple and easy to use. After Windows Defender removes the ransomware from your device, you can start the OneDrive Files Restore process by clicking the notification.
When you click on the notification, you will be taken to OneDrive online account.
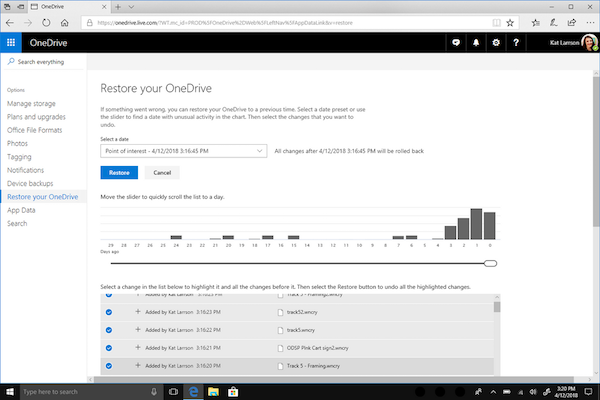
Go to Options > Restore your OneDrive, then select a timeline when you think the problem appeared.
OneDrive will also offer some input when Windows Defender detects the problem, making it easier to choose the date to restore.
The tool lets you slide through the file changes to get an idea when things would have gone wrong, as you can see in the image above. Then choose to restore. You may need to uninstall OneDrive from your computer and reinstall it for the best results.
Read: Recover Ransomware affected files with OneDrive and Windows Defender
How do I restore my entire OneDrive?
Go to the OneDrive website. To restore your OneDrive, click Restore your OneDrive in the left navigation menu at the top of the page. When you reach the Restore page, you can either select a date from the dropdown list or choose a custom date and time.
What happens when you delete files on OneDrive?
When you delete a file in OneDrive, it is moved to the Recycle Bin. While you can restore from there, the file is removed from all devices on which OneDrive is installed.