When selecting a GPU or a Graphics card for our system, the first option we always go for is NVIDIA. It is popular because of its work and support. NVIDIA GPUs are known for delivering the best experience for their users in video editing, gaming, and animation. However, recently gamers are not able to enjoy these facilities as the error NVIDIA Display settings are not available, You are not currently using a display attached to NVIDIA GPU is popping up on their screen when trying to access NVIDIA Control Panel. Also, when some users tried to disable the integrated GPU, the screen went black and the system booted into VGA (800×600), so this clearly is not the solution. In this article, we will talk about solutions that will actually work and resolve the issue for you.
NVIDIA Display Settings are not available
You are not currently using a display attached to NVIDIA GPU

Why am I not able to access NVIDIA Control Panel?
There can be multiple reasons for this error, but one of the most likely is that the monitor is not connected to the GPU. In short, if you are using a monitor that is not connected to a GPU, the error will pop up. Another reason could be that the monitor is connected to the wrong port. So the first thing you should do is check whether the GPU is connected properly to your computer; if there are no issues with the connection, then all heads should turn towards the device driver. More often than not, a glitch prevents users from accessing the NVIDIA Control Panel; however, this can be resolved by simply disabling and then enabling the device driver. If that doesn’t work, then reinstall the drivers, and you will be good to go. We have outlined all the solutions you need to resolve this issue, so go to the troubleshooting guide and start implementing them.
NVIDIA Display settings are not available, You are not currently using a display attached to NVIDIA GPU
Before we start, ensure you revert the settings made to system files and registries if any method does not work for you. Now, there can be a good number of reasons why you are getting such an error. Here are the methods that you should try:
- Make sure that your GPU is plugged into the right port
- Restart NVIDIA services
- Disable and then Enable NVIDIA Graphics
- Update Graphics Card drivers
- Uninstall and Reinstall NVIDIA Drivers
To ensure the applied changes are working, restart your system after completing each method.
1] Make sure that your GPU is plugged into the right port
The most important thing is to check whether the display of your system is connected properly. Check the condition of the cable; look out for any cuts or cracks. Most importantly, check if the cable is connected to the GPU’s output port. Often, when someone buys a new system, the most common mistake is connecting the display to the wrong port.
Also, check whether the NVIDIA GPU is plugged into the right port. It’s quite common to get confused with ports and plug them into the wrong one, causing the said issue to occur. Therefore, we recommend that you check whether the NVIDIA GPU is plugged into the right port. Switching the port will hopefully solve the issue at hand.
2] Restart NVIDIA services
If you are a computer geek, then you may know what this method is about. Windows runs on several services, and these services are the reason why your applications, as well as the OS, run. Disabling any service without prior knowledge can cause your system to malfunction.
Similar to system services, NVIDIA also works on certain services and it is necessary that these services are working. Follow the steps given below and make sure these services are running.
Press Win + R keys. When Run window appears, type services.msc and hit Enter.
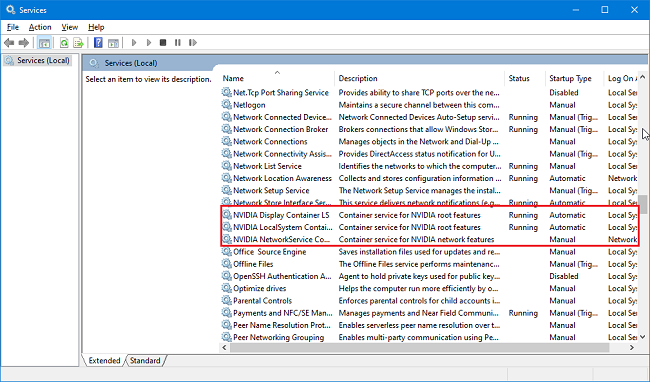
Find the list of services, search for:
- NVIDIA Display Container LS
- NVIDIA LocalSystem Container and
- NVIDIA NetworkService Container.
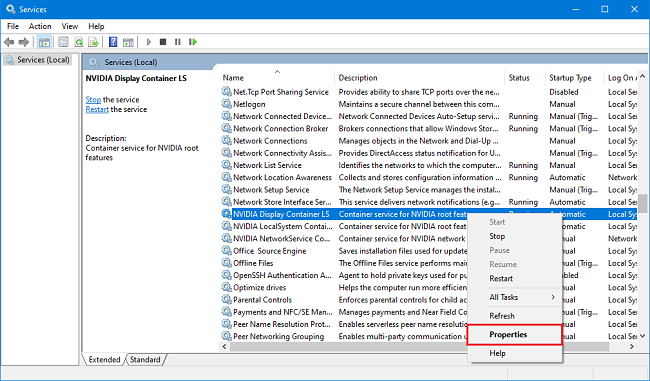
Start from NVIDIA Display Container LS, right-click on the service and click on Properties.
In the General tab look for Startup type and Service status. The former one should be set to Automatic and the lateral one to Running.
If the Startup type is set to Disabled or Manual then Set to Automatic from the dropdown list.
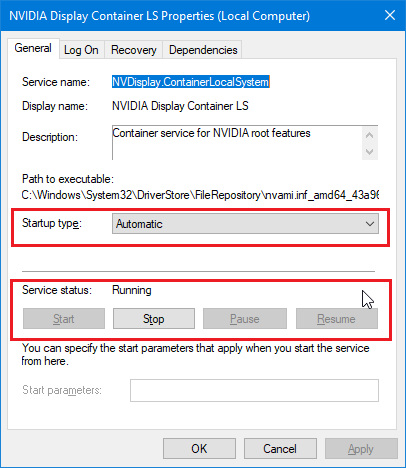
If the Service status is set as Stopped then just click on Start and it will be running.
Repeat Steps 3, 4, 5 and 6 for NVIDIA LocalSystem Container service.
Now select NVIDIA NetworkService Container and perform Steps 3 and 4.
The basic purpose of this service is to download the updates and install them automatically as well as keep you connected to Nvidia’s GPU network. Here you can perform Steps 5 and 6. Or you can set the Startup type to Manual and Stop the service if you don’t have an active connection present.

Please make sure you do not change any other settings or services unnecessarily. It may make your computer work abnormally or not make it work at all.
By now, the error should have gone, and you might be able to use the system with NVIDIA’s display settings.
3] Disable and then Enable NVIDIA Graphics
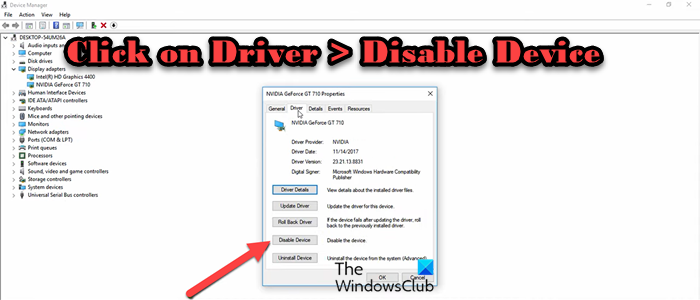
Maybe the issue is due to a glitch in the NVIDIA Graphics drivers. In that case, the easiest solution we can execute is to disable the device and then enable it again. It is quite easy to do the same; all you have to do is follow the prescribed steps, and you will be good to go.
- Open Device Manager by searching it out from the Start Menu.
- Expand Display adapters.
- Right-click on the NVIDIA Driver and select Properties.
- Go to the Driver tab.
- Click on the Disable Device button.
- Reboot your computer.
- Open Device Manager, go to NVIDIA driver’s properties, go to Driver, and click on Enable Device.
Finally, check if the issue is resolved.
4] Update Graphics Card drivers
In most scenarios, the reason behind the error is corrupt, outdated or incompatible drivers. These issues cause Windows to be unable to detect the hardware or run it. Another reason for the errors could be the installation of third-party applications.
Sometimes these applications interfere with display drivers, preventing them from working. The types of errors you get may display different messages, but the culprit could be only one. The only method you should follow in this case is to update the graphics card drivers.
To update Graphics Card drivers, open Start menu, type GeForce Experience. Open the NVIDIA’s GeForce Experience application.
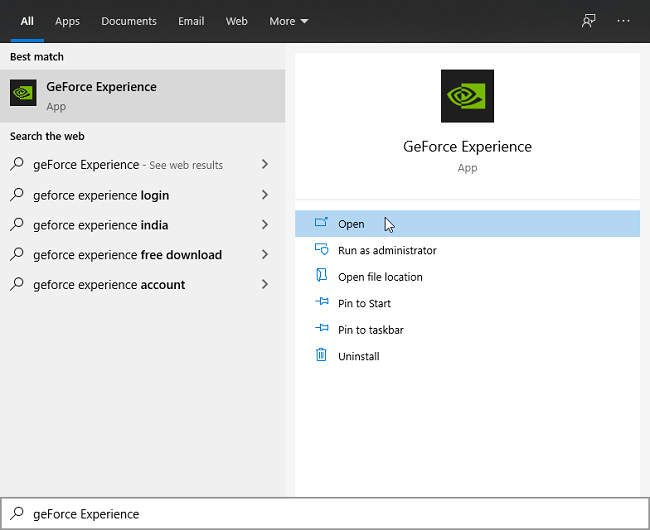
Click on the Drivers tab.
Now, click on Check for updates. If drivers are available then download them.

Once the download finishes, use Express Installation to install the new driver updates.
The following options are also available to update your Graphics driver:
- Go to the manufacturer’s website to download the latest NVIDIA driver.
- Install Driver and Optional Update from Windows Settings.
- Use Device Manager to update GPU Driver.
4] Uninstall and Reinstall NVIDIA Drivers
If none of the above methods work for you, the only option left is to reinstall the drivers. You may find it a bit of a lengthy process, but it is worth it, believe me.
To uninstall NVIDIA Drivers, follow the prescribed steps.
- Click Win+R to open the Run dialog box.
- Type the following to open Device Manager:
devmgmt.msc
- Click on Display Adapters and then right-click on NVIDIA Graphics Driver and select Uninstall option.
- Restart your PC once you have uninstalled the GPU driver.
- Open Device Manager, right-click on Display Adapters, and select Scan for hardware changes.
This will allow the system to scan for connected devices, that is your GPU, and install the appropriate driver.
If this does not help, do the following.
Press Win + R keys. Type control and hit Enter.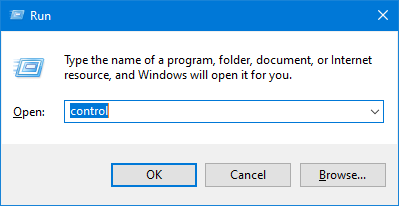
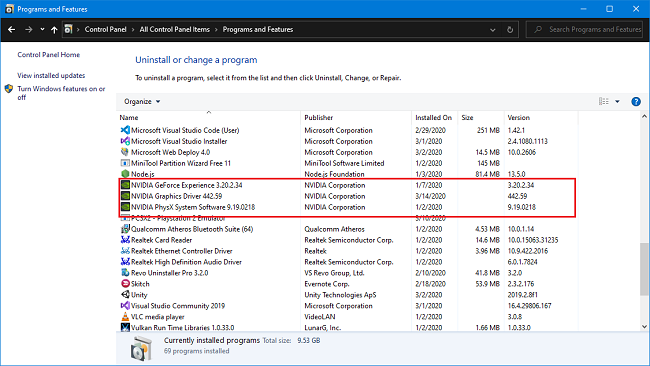
When Control Panel opens up, click on Programs and Features.
Search for all programs named NVIDIA and uninstall them.
Go to NVIDIA’s website to download the latest drivers.
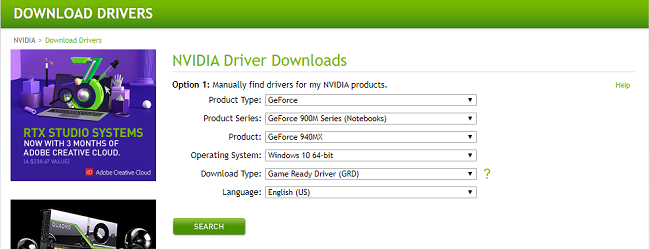
Select the Product Type, Series, OS, and Language as per your requirement. Click on Search.
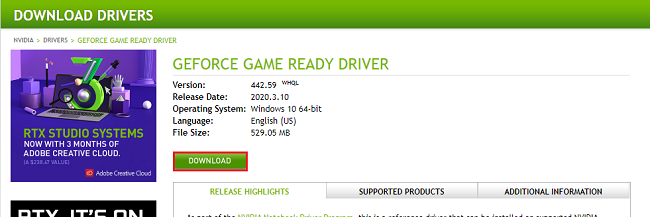
The search will redirect you to the download page. Click on Download.
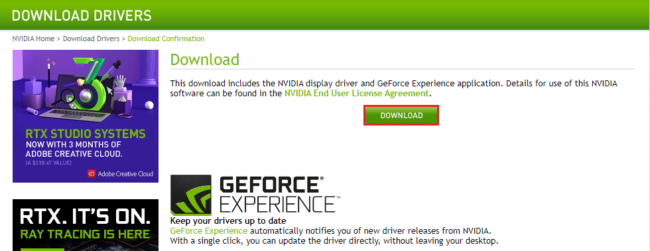
It will again take you a page that says you are about to Download Nvidia’s Display Drivers and GeForce Experience application. Again click on Download.
Once the download is complete, start installing the application. While installing, please select Custom(Advanced) as an Installation option.
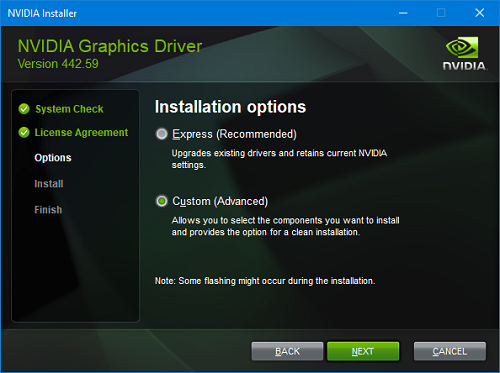
Selecting the Custom installation option will install the drivers as new and delete all old driver-related files. Once the installation is complete, you can check if the error is still present. But it should have long gone by now, and you can enjoy your life again.
Please let us know which of the above methods worked for you, or if the error is still present.
Read: How to fix NVIDIA Control Panel not opening on Windows
How do I know if my HDMI port is connected to my GPU?
One of the simplest ways to ensure that the HDMI port is connected to the GPU is to check whether you can see the video and audio settings. However, if these two options are available when you open Intel Control Panel then it is confirmed that your HDMI port is not connected to the GPU.
Also Read: NVIDIA Control Panel missing on Windows.