
If you want to move WordPress site from a managed/unmanaged or shared/dedicated/VPS hosting to another without any major downtime, this is the guide you need. If you already have SSL or you want to move a site from shared hosting to VPS, you might face a little bit of downtime.
Migrate WordPress site from one server to another
If you have a website hosted on shared hosting, such as HostGator, Bluehost, or SiteGround, follow these steps. Generally, these shared hosting companies provide cPanel, making it quite easy to move everything with its help.
First, you need to backup everything including your files as well as the database.
To back up your files, open the ‘File Manager’ provided by your hosting provider, which can be found in your cPanel. If you have added multiple domains in your hosting account, you need to navigate accordingly. Otherwise, you can find a directory called public_html, where you will get all the files, including WordPress core. Select all the files, create an archive with a .zip extension and make the compressed folder. Download it to your computer. Do not forget a single file – mainly the .htaccess, which is hidden by default.
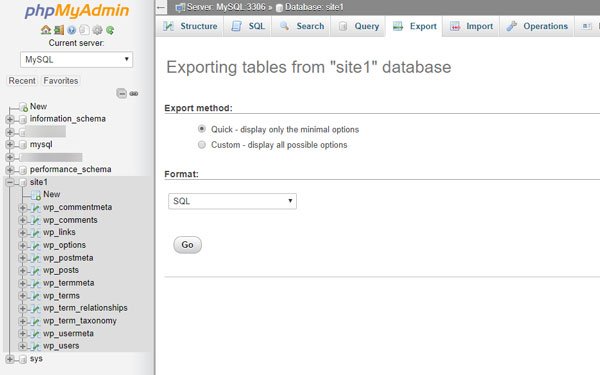
Now you need to backup your database. As you already have cPanel and phpMyAdmin, you can use those tools to download the database. To do so, open up your cPanel and go to phpMyAdmin. You can find your database name on the left-hand side. Select that and switch to Export tab.
From here, you need to choose Quick as Export method, and SQL from the Format drop-down menu. After that, click the Go button to start the download.
Now, you have to go to your new hosting account and add the domain first. If you have already done that while signing up for a new account, you do not have to do that again. However, if you haven’t done that already, you need to add your domain to your cPanel. You can use the Addon Domains option (which may have a different name, but the concept remains similar).
Next, you need to create a database for your new website. While creating, do not forget to note down the database name, user ID and password. Without these, you would not be able to map your files to your database.
You can find the MySQL Database option in your cPanel that you can use to get it done. To create a database, you need to enter a database name, user ID, and password. You have to create the database name file and then add the user ID and password. After that, you have to permit the user ID to access the database. For that, you can use the section called Add user to database.
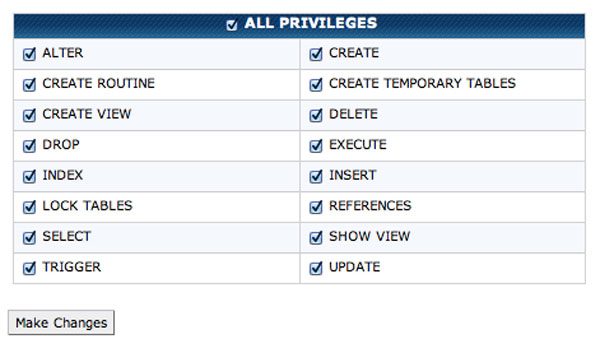
After clicking the Add button, you should find a window where you have to allow/block user ID to access certain things of the database. To get rid of any problem, you can make a tick in the ALL PRIVILEGES option and click the Make Changes button.
Now, you need to upload the database that you downloaded from the old hosting account. To do this, open the phpMyAdmin app and select the database from the left-hand side. After that, go to Import tab. You should find a button called Choose File. Click on that and select the file from your computer.
Do not change anything on the screen and click the Go button directly. It should take a couple of seconds to finish the upload.
The next step is to upload the files that you downloaded from the old server. To do so, open your domain’s root directory using the File Manager and navigate to public_html. If you have one domain, upload all the files here. If you have multiple domains, navigate to that domain’s root directory and upload files there. After uploading, you need to unzip the zipped folder.
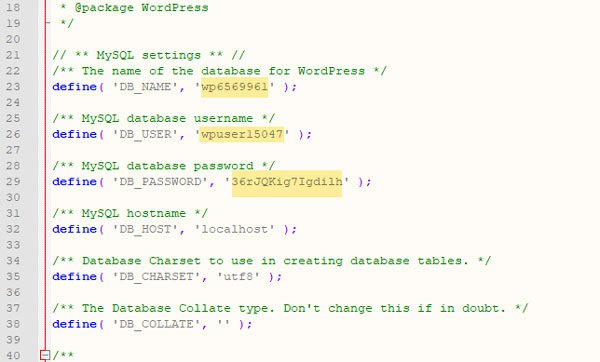
Now, you need to replace the old database details with the new one. For that, open up the wp-config.php file and replace database name, user ID and password. After changing, save the file.
Next, you need to change the name server of your domain. For that, get the name server from your hosting account and enter them in your domain’s control panel. Different domain provider has different options. However, you can search for that or ask the support team for help.
With that step done, you are finished migrating your files from one host to another. It might take up to 48 hours to propagate everything. In the meantime, you can open this website, and check if your site is showing new IP or old one. If the new IP address is visible, the propagation is done. You can also use the ping tool on your computer to check the IP address. If your computer is showing old IP but the online tool is showing the new IP, you need to flush your DNS cache.
How to move WordPress site from shared hosting to unmanaged VPS
It is quite easy to move a WordPress website from one shared hosting to another since both of them have cPanel, which has all the necessary tools like phpMyAdmin, File Manager and so on. However, many people opt for unmanaged VPSs because they offer root access, making them comparatively cheaper than shared hosting.
What is an unmanaged VPS?
VPS means Virtual Private Server. In simple terms, if your VPS hosting account doesn’t have cPanel, it can be considered an unmanaged VPS. To access an unmanaged VPS server, you need some tools like Putty, FTP client like Filezilla or Cyberduck. Some examples of unmanaged VPS providers are Digital Ocean, Linode, Vultr, and so on.
If you have already purchased an unmanaged VPS account, and you do not know anything, but you want to move your WordPress site from shared hosting to unmanaged VPS, you can follow these following steps.
Before getting started, download Cyberduck and Putty from here. Also, you need to download the old site backup, including all files and the database. The steps are mentioned above.
Now, you should know that some companies, like WordPress, Ghost, Joomla, Discourse, etc., provide one-click apps, whereas others, like Linode, do not offer such a thing. In that case, you can use some other third-party tools like ServerPilot, ServerAvatar, EasyEngine, etc. Among them, ServerPilot has recently become a paid tool – but this is the best so far in terms of security and usability.
No matter which hosting account you use, you have to create a server first, install the OS, and note down the root password. Different hosting providers offer various options, but the core concept remains the same. However, if you use ServerPilot, you have to use the 64-bit version of Ubuntu LTS 16.04 or 18.04. They do not support anything else.
Therefore, you need to add the domain name to your hosting account and change the nameserver in your domain account. It is also recommended to use a VPN from now on. Otherwise, you cannot detect the new hosting account from your computer.
If you use the one-click app of Digital Ocean or Vultr, you can install WordPress quickly. If you choose this method, you can find your WordPress installation files here:
/var/html
If you use ServerPilot to install WordPress, you can find your WordPress installation files here:
/srv/users/user_name/apps/app_name/public
You should find a file called wp-config.php. Download it and keep the database username and password. Do not forget to do this.
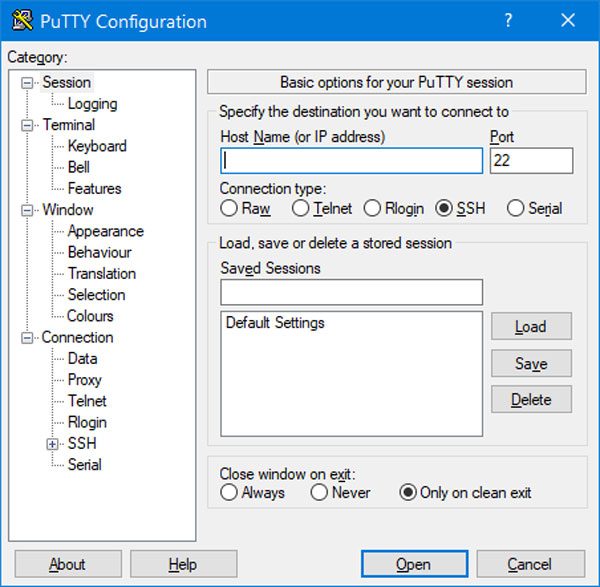
You have to delete all the WordPress installation files. Since the wp-admin, wp-content, and wp-includes folders take a lot of time to delete, you can use Putty to remove them. To do this, open PuTTY and enter the IP address of your server. Make sure the Port is set as 22. Following that, click the Open button and confirm the connection. Next, enter your username and password. Enter root as username. You should get a password on the same page or via email after creating the server in your hosting account.
Next, enter this:
One-click app users:
rm -rf /var/html/wp-admin

rm -rf /var/html/wp-content

rm -rf /var/html/wp-includes
ServerPilot users:
rm -rf /srv/users/user_name/apps/app_name/public/wp-admin

rm -rf /srv/users/user_name/apps/app_name/public/wp-content

rm -rf /srv/users/user_name/apps/app_name/public/wp-includes
After that, you can open the Cyberduck app, navigate to that folder and delete other installation files.
In the next step, you need to upload the zipped backup file. Do that, and unzip the file. If you get any error while unzipping, you can enter this command in Putty:
sudo apt-get update

sudo apt-get install unzip
After unzipping those files, you have to replace the database information. For that, open up the wp-config.php file that you downloaded. Next, open the current wp-config.php file that you just uploaded. Copy the database name, user ID and password from the downloaded wp-config.php file and replace them with the uploaded wp-config.php file.
Following that, you need to install phpMyAdmin. Otherwise, you cannot import the database. For that, follow these steps.
S0 download the latest version of phpMyAdmin from here and upload the zip file to your root directory. After that, unzip the file and rename it. Make sure; you use an unguessable name. For example, if you choose abcd, you can open the phpMyAdmin like this:
http://your-domain-name/abcd
After choosing a name, open the folder and find out config.sample.inc.php file. You can rename it to config.inc.php. After that, open this file with an editor and make a change in the like that says:
$cfg['blowfish_secret']
It should look like this:
$cfg['blowfish_secret'] = 'k7i259684(*^3q42bd^$4353yow*q5Trs^1'
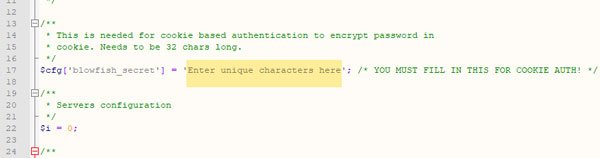
Now, open phpMyAdmin, and enter the database user ID and password to log in. Following that, select the database name on your left-hand side, select all the database tables, and remove them accordingly.
Then, go to Import tab, and import the database that you downloaded earlier.
That’s all! Now your website should run properly on the new hosting account.
How to move WordPress site from unmanaged VPS to shared hosting?
This is quite easy and not very time-consuming. The best thing is that the steps are almost the same. Except that if you haven’t installed phpMyAdmin, you need to do that to download the database.
In a nutshell, these are the steps you need to follow.
- Download all files from VPS account.
- Download the database.
- Create a database in your shared hosting account and assign the database to a user.
- Upload all the files to your new hosting account.
- Change the database name, username, and password in the wp-config.php file.
- Change the nameserver in your domain control panel.
That’s all!
Common problems after changing the server
You might face different problems after completing the migration. Some of them are mentioned below.
Homepage is opening, but posts are showing 404 error
Check your .htaccess file and use this as default:
# BEGIN WordPress

<IfModule mod_rewrite.c>

RewriteEngine On

RewriteBase /

RewriteRule ^index\.php$ - [L]

RewriteCond %{REQUEST_FILENAME} !-f

RewriteCond %{REQUEST_FILENAME} !-d

RewriteRule . /index.php [L]

</IfModule>

# END WordPress
Also, go here:
/etc/apache2/apache2.conf
And make this change:
<Directory /var/www/>

AllowOverride All

</Directory>
Unable to install plugins, asking FTP login details
This is a very common problem that people encounter. You need to open your wp-config.php file and paste this at the bottom;
define( 'FS_METHOD', 'direct' );
Installation failed: Could not create directory
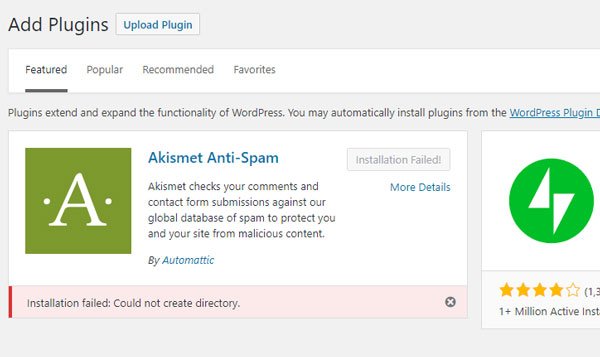
If you are unable to upload an image, install plugins, update theme or plugin, and you are getting the error above, you can fix that by changing the permission. Open Putty and enter this:
chmod -R 775 directory_path
You can learn more about file permission from here.
Redirect non-www to www using htaccess
RewriteEngine on

RewriteCond %{HTTP_HOST} ^your-domain-name.com [NC]

RewriteRule ^(.*)$ http://www.your-domain-name.com/$1 [L,R=301,NC]
Redirect www to non-www
RewriteEngine on

RewriteCond %{HTTP_HOST} ^www.your-domain-name.com [NC]

RewriteRule ^(.*)$ http://your-domain-name.com/$1 [L,R=301]
However, you should also enter a CNAME record with www as well as @ or blank.
Please note that you need to install the SSL separately. If your hosting provider offers free SSL, you can ask them to install that for you. Otherwise, you can use Let’s Encrypt, which provides free but shared SSL certificate.
