If you are unable to make a video call because the Microsoft Teams Camera is greyed out or not working, here are some solutions to fix this problem. Whether you are using an external webcam or the in-built webcam of your laptop, this problem can occur on your PC at times. Although it is mainly a camera-related issue, you can look at some other suggestions as well.
Microsoft Teams Camera greyed out or not working.
To the camera is greyed out when using Microsoft Teams, follow these suggestions to resolve the issue-
- Choose camera from Settings
- Verify the camera
- Allow access to the camera on your PC
- Allow apps to access the camera
1] Choose camera from Settings
If Microsoft Teams displays an error message saying that it doesn’t find any camera to make a conference call, you should check the given setting. It is for verification purposes so that we can walk you through all the troubleshooting steps.
You need to open up the Microsoft Teams app and click on the profile picture. From the list, do select Settings.

Now switch to the Devices section, and make sure that “None” appears under the Camera section.

If so, you can follow other steps. If this section is not greyed out, you can expand the list and choose a camera that you want to use to make all the calls.
Read: Microphone not working in Microsoft Teams.
2] Verify the camera
If your camera is faulty, Microsoft Teams may not detect it—whether it is an in-built or external webcam. Therefore, it is necessary to check if the camera is in working condition. For that, you can open the Camera app on your Windows 10 PC and check if the camera is working or not.
If it is working, you should follow other steps. If not, it is time to change your camera.

Read: Laptop Camera not working.
3] Allow access to the camera on your PC
Windows 10 allows users to disable the camera even if they have an in-built webcam. Therefore, you should check if you have blocked camera access on your PC or not. If you did it earlier by mistake, there is a chance of receiving such an error using the Microsoft Teams app.
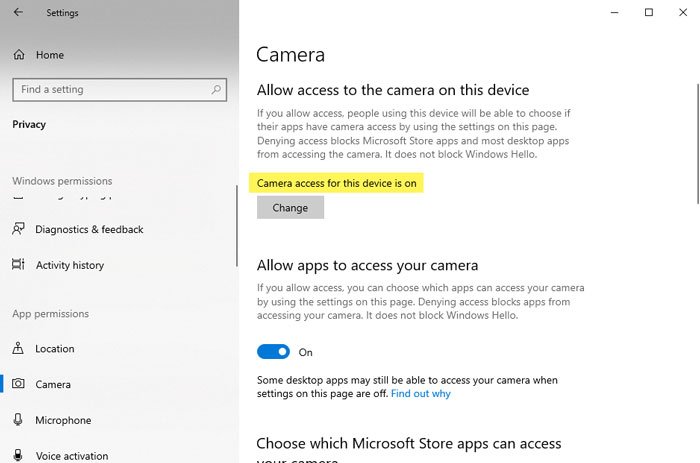
Therefore, open the Windows Settings by pressing Win+I and go to Privacy > Camera.
Under the Allow access to the camera on this device, make sure that this text appears – Camera access for this device is on.
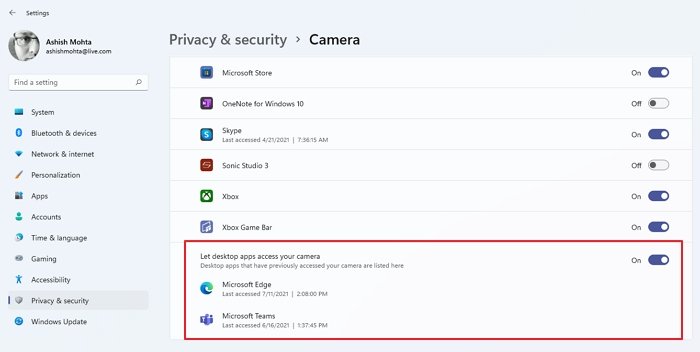
In Windows 11, go to Settings > Privacy & Security. Turn on access to desktop apps for Camera. Now Launch Microsoft Teams and if it asks, give permission for camera access.
If not, click the Change button, and toggle the corresponding button to turn it on.
Read: Skype webcam not working.
4] Allow apps to access your camera
It is another privacy setting in Windows that lets you block all apps from accessing the webcam. If it is turned off, Microsoft Teams cannot detect the camera even if it is working. Therefore, open the Windows Settings panel and go to Privacy > Camera. Here, you can find a heading saying Allow apps to access your camera.
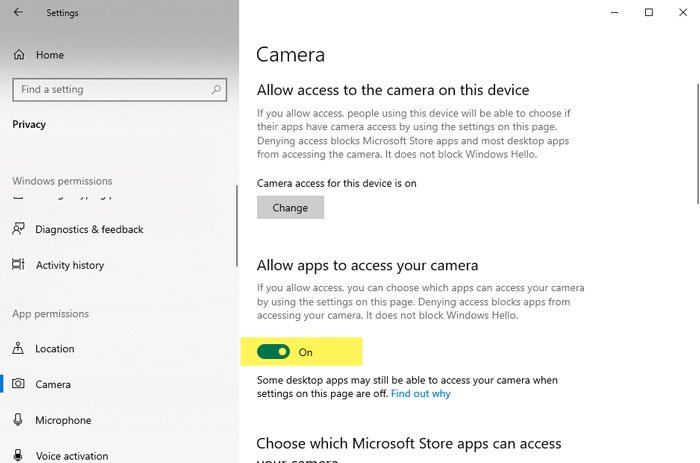
Make sure that it is turned on. If not, toggle the respective button to enable it.
These are some of the working solutions that you should follow. However, you could also try some other things.
- Restart Microsoft Teams and PC: Sometimes, a simple restart solves many problems. If you think the webcam is working fine, restart the app and your computer.
- Reinstall the webcam driver: If the webcam’s driver has some problem, you should uninstall and reinstall it. It is possible to do that from the Device Manager.
- Verify webcam connection: If you are using a wireless webcam, it is recommended that you check and reconnect the connection.
I hope one of these solutions will help you.
Why does my camera only show black?
If you are using a laptop with both front and rear cameras, try switching. If not, disconnect the camera and plug it back in. It is usually a temporary issue that can be resolved by unplugging. Also, ensure nothing has covered the camera lens.
How do you crop the camera on a Team?
Microsoft Team can adjust the frame to fit you better on display. However, if there is more than one person and the other is cropped out, right-click on the preview and select Fit To frame to see the entire video.
How do I make the camera bigger on the Team?
There is no direct way, but you can use Screen Sharing if you want a bigger camera output. In Screen sharing the camera app, and whatever you are presenting in split-screen mode. Now you can adjust the camera on any side and drag and make it bigger.
Read next: Doh! Something went wrong error in Microsoft Teams.