
Microsoft Scout includes native shell integration. Unlike standard AI extensions that are locked inside an IDE sandbox, Scout uses the Model Context Protocol (MCP) to interact directly with your local terminal. This means you can use the tool to run local terminal commands, manage Git repositories, and handle debugging tasks from a text prompt. In this post, we will see how to use Microsoft Scout for Developers to automate Git and shell commands.
System Prerequisites for Microsoft Scout
Before attempting to leverage these shell automations, it is crucial to understand that Microsoft Scout cannot be used with a standard, personal Microsoft account. The tool is an enterprise-gated application built for organizational networks.
To run the software on Windows 11, you must fulfill the following prerequisites.
- M365 Enrollment: Your organization must explicitly enroll in the Frontier preview program through the Microsoft 365 admin center.
- Intune Policy: An IT administrator must deploy a specific desktop policy to your device to unblock local terminal management capabilities.
- Dual Licensing: You must have an active Microsoft 365 Copilot license and a valid GitHub Copilot Business or Enterprise license mapped to your account.
If you meet the prerequisites, let’s learn more about Microsoft Scout for Developers.
Read: How to install Microsoft Scout Agent
Microsoft Scout for Developers
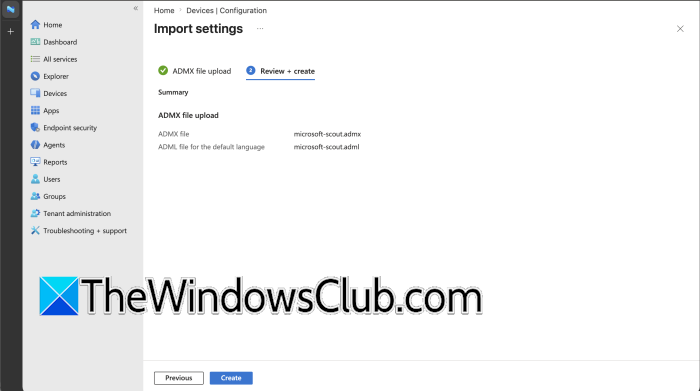
If your enterprise environment meets the rules listed above, use these steps to install the agent.
- You need to grab the official execution setup package (MicrosoftScout-Windows-x64-Setup.exe) from your company’s internal software delivery system or Microsoft Learn portal.
- Then, run the installer on your Windows 11 system and advance through the standard desktop wizard prompts.
- Open the application and log in first using your corporate Microsoft 365 credentials. Immediately following this, complete the secondary sign-in prompt to link your GitHub Enterprise account.
- Set your local workspace path. Scout operates strictly inside this specified directory to ensure it does not touch sensitive operating system configurations.
Scout connects to your local operating system through an MCP bridge. When you give it a command, it creates a plan and generates the required CLI syntax. By default, the tool operates in Semi-Autonomous Mode. It will not execute a command automatically. Instead, it generates the script and waits for you to click a confirmation button in the UI. You can grant full autonomy to specific folders so they can run tasks without pausing.
The Test-and-Fix Loop
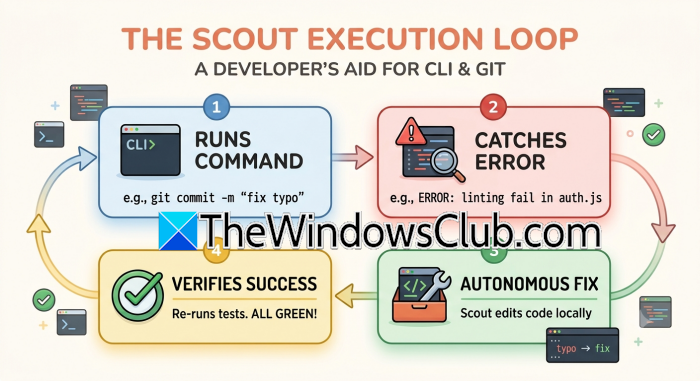
Scout reads the actual output of your terminal to determine its next step. If a command fails, it analyzes the error logs to fix the issue. The attached diagram shows how this loop works during a standard task, like fixing a code formatting error.
The process follows four basic steps.
- Runs Command: Scout executes your instruction, like running a project linter.
- Catches Error: The tool reads the terminal output and finds a specific syntax error.
- Autonomous Fix: Scout opens the file locally and corrects the code.
- Verifies Success: It runs the linter a second time to ensure the error is gone.
You can use Scout to handle multi-step Git tasks with plain-text instructions. This eliminates the need to run multiple individual commands manually.
Read: How to manage Local File System autonomously with Microsoft Scout
Commits and Branching
If you have multiple modified files in your workspace, you can tell Scout.
Review the staged changes, write a conventional commit message, and push to a new branch named feature/login-update.
Scout runs git status and git diff to see what changed. It then writes the commit message, builds the new branch, and pushes the code to your repository.
Handling Merge Conflicts
When a Git pull results in a merge conflict, you can direct Scout to the affected file. The tool parses the standard conflict markers, compares the branches and rewrites the file to resolve the conflict.
Security Configurations
Giving an AI tool access to a local shell requires proper security boundaries to prevent accidental file deletion or system changes.
If you are setting up Scout, make sure to apply these configurations.
- Directory Whitelisting: Limit Scout’s access to specific project folders. Do not give it access to your root directory or system folders.
- Enforce Confirmations: Keep the confirmation prompt active for destructive commands. Scripts containing rm -rf or git reset –hard should always require a manual click.
- Review Execution Logs: Scout records every command it runs along with the console outputs. Check these logs regularly to monitor what the tool is doing on your machine.
That’s it!
Read: Microsoft Scout: An always-on Personal AI Agent for Microsoft 365
Does Microsoft Scout work with personal Microsoft accounts?
No, Microsoft Scout does not support personal Microsoft or standard Outlook accounts. The application is strictly an enterprise-gated tool built for corporate and academic networks. To bypass the initial sign-in block, your device must be managed via Microsoft Intune, and your organization must actively participate in the Frontier preview program. Additionally, you need a corporate Microsoft 365 Copilot license running alongside an active GitHub Copilot Business or Enterprise subscription. Without these specific backend cloud permissions, the application will simply fail to authenticate.
How do developers keep local shell execution secure?
Developers secure local shell execution by forcing Scout to operate in Semi-Autonomous Mode by default. In this configuration, the tool generates terminal scripts but cannot execute them until you click a manual confirmation button in the user interface. Security can be tightened further by configuring directory whitelisting, which restricts the agent’s file access solely to designated project folders rather than your root system. Finally, reviewing the application’s native execution logs lets you track every command and console output the agent handles.
