DeepSeek Prover V2 is an advanced LLM model designed for formal theorem proving in Lean 4. Unlike DeepSeek R1, DeepSeek Prover V2 can not be installed directly into a Windows computer; instead, one needs to use WSL to access it. In this post, we are going to see how you can run DeepSeek V2 7B on Windows.

What is DeepSeek Prover V2
DeepSeek Prover V2 is an advanced Large Language Model, and it is primarily used for solving mathematical equations with the help of Lean 4. Lean 4 is a functional programming language and interactive theorem prover designed for formal verification and mathematical proofs.
This method uses a step-by-step approach to solve complex math problems by breaking them down into smaller, more manageable parts. It also creates organized proofs. The model improves its reasoning skills with reinforcement learning, which helps it connect informal and formal mathematics. Its advanced features allow it to perform very well on theorem-proving tests, such as MiniF2F and PutnamBench.
We will use the 7B parameter as this version offers a good balance between power and efficiency. It is suitable for formal theorem proving and accessible for researchers who have limited hardware resources.
Run DeepSeek Prover V2 7B on Windows 11/10
You can’t just install DeepSeek Prover V2 7B on your Windows computer. You will have to use WSL. We have given a step-by-step guide on how to run the LLM model:
- Meet the system requirements
- Configure the environment
- Download and install Anaconda
- Set up the environment
- Download Deepseek Prover V2 7B.
1] Meet the system requirements
You can’t just use any computer to run DeepSeek Prover V2; you will need to make sure that your machine meets certain hardware requirements. We have mentioned the system requirements below.
- Graphics: NVIDIA RTX A6000 or equivalent with 32GB or more VRAM.
- Available Space: 100 GBs
- Memory: 64 GB
- Processor: Mordern Intel i7/i9 or AMD Ryzen 7/9
- Software: Windows 11/10 and Windows Subsystem for Linux.
After meeting the given system requirements, let’s start with the installation.
2] Configure the environment
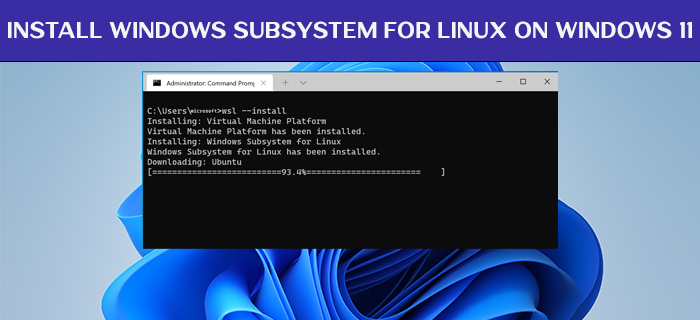
As mentioned earlier, we need WSL for this installation. WSL allows us to run Linux distributions natively without needing a virtual machine or dual boot. To install WSL, you can either use the CLI command or get it from the Microsoft Store.
You can open the Command Prompt and run the following command to install WSL.
wsl --install
Now, we need to install Ubuntu as well.
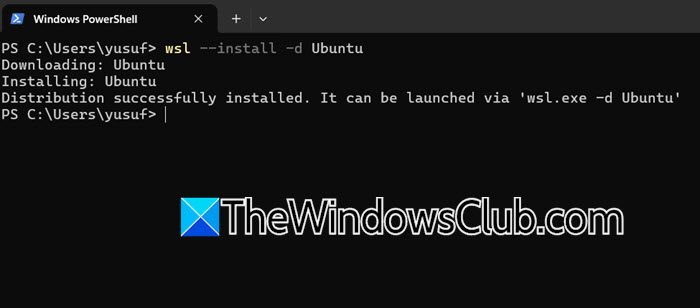
To do so, run the following command in Command Prompt or PowerShell.
wsl --install -d Ubuntu
You need to wait for Windows to download and install on your computer.
3] Download and install Anaconda
Anaconda is a popular open-source tool for Python and R. It is designed for data science, machine learning, and AI development. You can go to anaconda.com to download Anaconda distribution.
4] Set up the environment
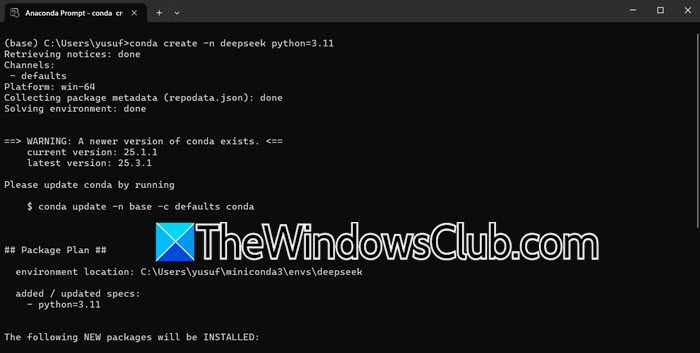
Now that we have Anaconda, we are good to set up the Python environment and install other dependencies. To do so, open Anaconda Prompt or WSL Ubuntu Terminal, which you can do by searching for it in the Start Menu. Then, run the following command.
conda create -n deepseek python=3.11
It will take a little time, and it will even ask for your permission to install the missing packages. Once done, you can run the command given below to activate the environment.
conda activate deepseek
Once done, we need to install dependencies. To do so, in the environment that we activated, run the following commands.
pip install torch torchvision torchaudio --extra-index-url https://download.pytorch.org/whl/cu117
pip install "transformers>=4.38.0" "accelerate>=0.25.0" "bitsandbytes>=0.41.0" einops
conda install -c conda-forge notebook ipywidgets -y
These commands install PyTorch with CUDA support, essential for deep learning, along with TorchVision and Torchaudio for image and audio processing. They also set up Transformers, Accelerate, BitsAndBytes, Einops, and Jupyter Notebook with interactive widgets, enabling efficient AI model development and experimentation.
Read: How to use DeepSeek R1 on Perplexity
5] Download DeepSeek Prover V2 7B
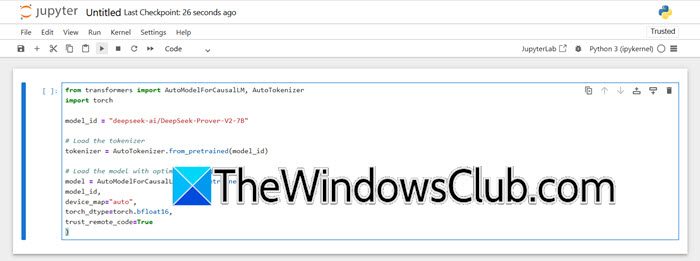
Now that we have all installed the dependencies, let us go ahead and download DeepSeek Prover V2 7B. Open a Jupyter Notebook and use it to run the following script.
from transformers import AutoModelForCausalLM, AutoTokenizer
import torch

model_id = "deepseek-ai/DeepSeek-Prover-V2-7B"

# Load the tokenizer
tokenizer = AutoTokenizer.from_pretrained(model_id)

# Load the model with optimal settings
model = AutoModelForCausalLM.from_pretrained(
model_id,
device_map="auto",
torch_dtype=torch.bfloat16,
trust_remote_code=True
)
Setting device_map=”auto” allows the model to automatically assign processing to either the GPU or CPU, optimizing performance based on available hardware. On the first execution, both the model and tokenizer will be downloaded from Hugging Face, ensuring the latest version is retrieved for use.
Now, you can run your script. The following is a simple Python script that you can run after running the script mentioned earlier.
input_text = "What is 25 minus 7?"
inputs = tokenizer(input_text, return_tensors="pt").to(model.device)
outputs = model.generate(**inputs, max_length=512)
print(tokenizer.decode(outputs[0], skip_special_tokens=True))
Hopefully, with the help of this post, you will be able to run DeepSeek V2 7B on Windows. That being said, not every computer will be able to match the strenuous demands of this Large Language model, if your device is one of them, go to app.nodeshift.com and create a virtual machine with the configurations mentioned earlier. Do keep in mind that it is not free, you may have to pay a little to attain the GPU and CPU requirements mentioned in the system requirements. Once you have the required machine, you can just follow the steps mentioned earlier to install DeepSeek Prover V2 7B.
Read: How to run DeepSeek locally on Windows 11
How do I run DeepSeek Prover V2 7B after installation?
Activate your Conda environment using conda activate deepseek, then start Jupyter Notebook (optional) with jupyter notebook. Load the model in Python with AutoModelForCausalLM.from_pretrained(model_id, device_map="auto", torch_dtype=torch.bfloat16, trust_remote_code=True), ensuring model_id = "deepseek-ai/DeepSeek-Prover-V2-7B". To generate proofs, run input_text = "Prove that the sum of two even numbers is even" followed by inputs = tokenizer(input_text, return_tensors="pt").to(model.device), then outputs = model.generate(**inputs, max_length=512), and finally print(tokenizer.decode(outputs[0], skip_special_tokens=True)) to display the formal proof.
Also Read: How to use DeepSeek V3 Coder in Windows 11.