You can update or install Windows Subsystem for Linux with a single command line. It is now officially available, and you can easily install WSL on Windows 11. In this post, we will show you how to install or uninstall WSL in Windows 11.

How to install Windows Subsystem for Linux on Windows 11
Earlier, the process to install Windows Subsystem for Linux is too complicated, involving many packages. You need to work around multiple settings and install WSL on your PC. Microsoft has now eased the process, and it is just a command away.
You can just enter a command and let it handle the entire process of installing Windows Subsystem for Linux on your PC. All you need is an account with administrative privileges.
To install Windows Subsystem for Linux (WSL) on Windows 11,
- Run Command Prompt as an administrator
- Copy/paste the command
wsl.exe --installand press Enter - Restart your PC to make the installation ready for use.
To get started, open Command Prompt with administrative privileges from the Start menu and enter the following command, and press Enter.
wsl --install
Now, the command will enable the WSL and Virtual Machine Platform components on your PC, eliminating all the manual steps that were required to install WSL. Then, it will download and install the latest version of the Linux kernel and the Linux distribution. You will see the status in the Command Prompt window. When it is done, restart your PC with Windows Subsystem for Linux (WSL), ready to use.
It will take a few minutes to open the WSL for a time after the installation as it needs to decompress files and store it on your PC. When the process is completed, create a user account for your WSL. After that, you would be able to open it in a jiffy.
How to see a list of available Linux distributions
In addition to the command to install Windows Subsystem for Linux (WSL) on your PC, there are a couple more commands that let you see the complete list of Linux distributions that are available to install on your PC.
To see them, open Command Prompt with administrator privileges and type the following command and press Enter:

wsl --list --online
It will show you the list from which you can choose a version to install using the following command, where you have to replace the distribution name with the one you see in the list.
wsl --install -d <Distribution Name>
This command will stop installing the default version of Linux distribution and start installing the selected one. It can also be used to install additional Linux distributions to the existing installation. To see the Windows Subsystem for Linux status with general information of the configuration, distribution type, default distribution, kernel version, you can use the following command.
wsl --status
It will display all the information about the WSL on your PC.
How to manually update Windows Subsystem for Linux
There are commands available that can be used to update your WSL Linux kernel or roll back and update to the previous one.
To manually update the Windows Subsystem for Linux, type the following command in the Command Prompt and press Enter.
wsl --update
How to switch between WSL versions in Windows 11?
To switch between WSL1 and WSL2 execute these commands:
To set a specific version for ALL distributions:
wsl --default-version "1 or 2"
To replace the version for a specific distribution:
wsl --set-version "distribution-name" "1 or 2"
How to rollback Windows Subsystem for Linux
To roll back an update to the previous version, use the following command.
wsl --update rollback
These are the various commands which can be used to install Windows Subsystem for Linux (WSL) on your PC, see the list of available Linux distributions, update or roll back the updated WSL.
How to install WSL using Windows Features?
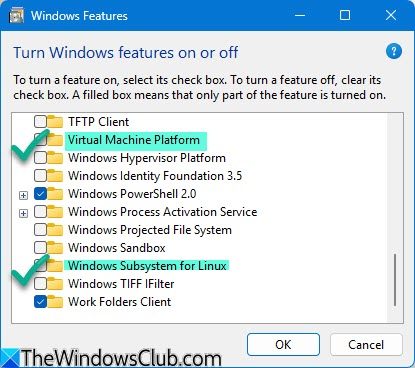
To install WSL using Windows Features, open the Turn Windows features on or off dialog box, select the boxes for Windows Subsystem for Linux and Virtual Machine Platform, click OK and restart your computer. Now open the Microsoft Store, search for the preferred Linux distribution and download it.
How to uninstall or remove WSL from Windows 11
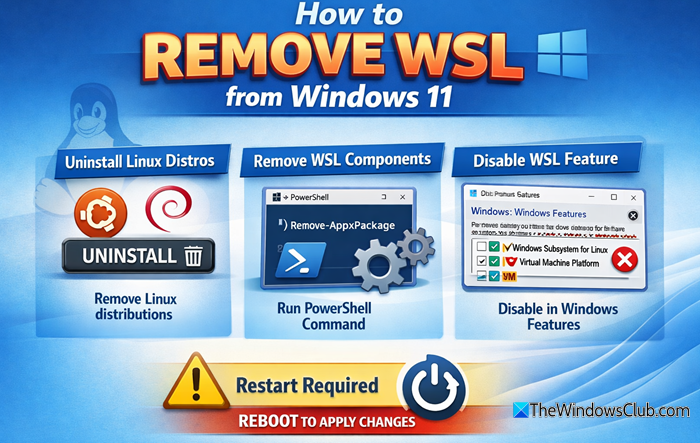
To completely remove Windows Subsystem for Linux from Windows 11, you have to take these steps:
Open Windows Settings > Apps > Installed apps, and locate the Linux distribution, such as Ubuntu or Debian.
Click the three-dot menu and select Uninstall for each distro.
This will remove the installed Linux Distros
Now open PowerShell as Administrator and execute the following command:
Get-AppxPackage MicrosoftCorporationII.WindowsSubsystemForLinux | Remove-AppxPackage
This will uninstall the WSL kernel and GUI components.
Finally, open the Run box, type OptionalFeatures.exe and hit Enter.
Locate and uncheck Windows Subsystem for Linux.
Also, uncheck Virtual Machine Platform if enabled.
Restart your computer.
What can I do with Windows Subsystem for Linux?
With Windows Subsystem for Linux installed on your PC, you can use command-line Linux tools and apps along with the existing Windows tools. You can access all the files from the WSL using commands.
How do I manually install WSL?
You can install WSL on Windows 11/10 in two ways. The good-old method, where you have to download all the installation packages, enable Virtual Machine Platform components on your PC, etc. Now, on the latest Windows 11 and Windows 10 versions, you have to simply run a single command as explained in this post
How do I get WSL 2 on Windows 11?
To get WSL or Windows Subsystem for Linux 2 on Windows 11/10 computer, you must have Hyper-V virtualization enabled. Following that, you can follow the steps above one after one. You can use Windows Features and enable Windows Subsystem for Linux and Virtual Machine Platform. Then, you need to install a distribution and configure the Linux distribution.
How do I get Linux Subsystem using PowerShell on Windows 11?
To get Linux Subsystem on Windows 11/10, using PowerShell, enter this command to enable the optional feature: Enable-WindowsOptionalFeature -Online -FeatureName Microsoft-Windows-Subsystem-Linux. Then, download a Linux distribution from the Microsoft Store and turn on the Virtual Machine Platform optional feature using Windows PowerShell by entering this command: Enable-WindowsOptionalFeature -Online -FeatureName VirtualMachinePlatform. Following that, you can configure the installation as you like.
EARLIER WAY to install Windows Subsystem for Linux 2 on Windows 11

WSL 2 or Windows Subsystem for Linux 2 is an iterative update to Windows Subsystem for Linux 1. Being so much better than WSL 1, it is obvious that one must upgrade to WSL 2. That is what we will be checking out in this guide.
The following are the requirements that your computer must fulfill for Windows Subsystem for Linux 2 to run properly:
- Windows 11 and Windows 10 Build 18917 or newer
- Hyper-V Virtualization
To install Windows Subsystem for Linux on Windows 11/10, follow these steps:
- Enable the Optional feature.
- Install a distro.
- Enable Virtual Machine Platform optional feature.
- Configure the installed distro.
1] Enable the Optional feature
In order to enable the WSL Optional feature, open Windows PowerShell with Administrator privileges.

Execute the following command:
Enable-WindowsOptionalFeature -Online -FeatureName Microsoft-Windows-Subsystem-Linux
If will ask for a confirmation if you want to reboot your computer, hit Y to do it straight away or to reboot it manually, hit N.
2] Install a distro
You can try to download and install a suitable Linux distro for your computer from the Microsoft Store.
3] Enable Virtual Machine Platform optional feature
Open Windows PowerShell as an Administrator and execute the following command:
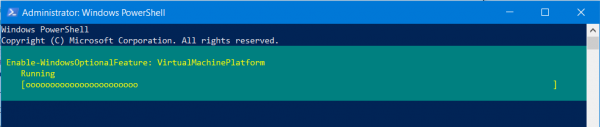
Enable-WindowsOptionalFeature -Online -FeatureName VirtualMachinePlatform
If it asks for a confirmation, to reboot your computer, hit Y to do it straight away or to do it later, hit N.
4] Configure the installed distro
Finally, we have to configure the installed distro to WSL 2.
Open Windows PowerShell and execute this command to list all the available WSL distros on your computer:
wsl -l -v
Set the desired distro to WSL 2. execute the following command:
wsl --set-version DistroName 2
Finally, set the selected distro as default by executing the following command:
wsl --set-default-version 2
You would be experiencing the new seamless and faster experience with Windows Subsystem for Linux.
This new update to the command line utility brings in the new architecture. This will drastically improve the file system performance and the compatibility of the full system call. This new update is based on virtualization (which is based on Hyper-V), which works on a real Linux kernel.
You should be all set now!