
DBeaver is a popular tool for managing databases. It allows you to connect to databases, run SQL queries, browse tables, edit data, and manage database objects all in one place. DBeaver works with many databases, including PostgreSQL, Oracle, MySQL, SQL Server, and SQLite. If you are using Windows 11 and want an easy way to work with databases, you can install DBeaver easily using this guide.
Download, install, and set up DBeaver on Windows computer
DBeaver is a desktop SQL client and database administration tool. It uses database drivers to communicate with different database systems, so the same application can work with several types of databases. The Community Edition is free and open source. It also includes common features such as SQL editing, syntax highlighting, database browsing, data editing, and database structure management.
Before starting the installation, make sure you have a Windows 11 computer and an internet connection. You should also know which database you want to connect to. For example, if you are connecting to PostgreSQL, you will normally need the database server address, port, database name, username, and password. Since DBeaver’s current Windows installer includes the required Java runtime, you generally do not need to install Java separately. The official download page currently lists Java 25 or later as required, while the distributed packages include an OpenJDK bundle.
To install and set up DBeaver, follow the steps mentioned below.
- Download DBeaver
- Start DBeaver for the first time
- Create your first database connection
- Install a database driver if required
Let’s cover each step in detail.
1] Download DBeaver
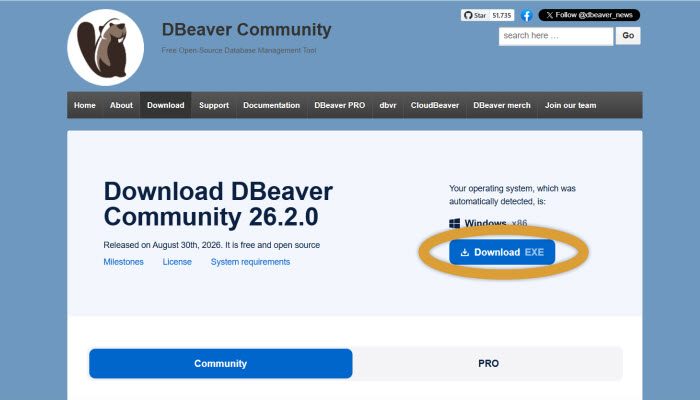
Open the official DBeaver download page and look for the Community Edition Windows downloads. For most Windows 11 PCs, the x86_64 Windows installer is the appropriate choice. DBeaver also provides an ARM version for compatible Windows systems. The official page currently provides both EXE installers and ZIP packages.
For a normal installation, download the Windows EXE installer rather than the ZIP version. The installer is easier to set up and automatically creates the required shortcuts.
Once you download the installer, open the .exe file. If Windows asks if you want to allow changes, click Yes if you got the installer from the official DBeaver website. The installation wizard will open. Follow the steps and choose the installation location if you want to change it; the default location works for most users. Click Install to copy the files and create the shortcuts. When the installation is done, click Finish to launch DBeaver.
2] Start DBeaver for the first time
When DBeaver opens for the first time, you may see a workspace selection or configuration screen. The workspace is where DBeaver stores project information and other application data. For a normal installation, the default workspace location is usually sufficient. After the main window opens, you will see the Database Navigator on the left side. This is where your database connections, schemas, tables, views, and other objects will appear.
3] Create your first database connection
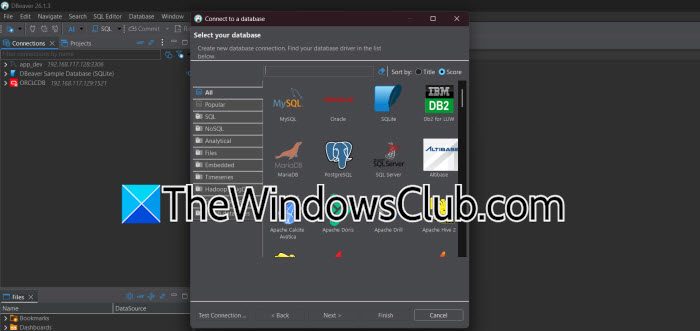
To connect to a database, click the New Database Connection (Ctrl + Shift + N) button in the toolbar.
You will see a list of supported database systems. Select the database you want to use.
For example, select PostgreSQL if you are connecting to a PostgreSQL server. DBeaver will then display the connection settings. The exact fields depend on the database you selected.
For a typical PostgreSQL connection, you may enter the following details.
Host: localhost
Port: 5432
Database: postgres
Username: postgres
Password: your database password
If your PostgreSQL server is running on another machine, replace localhost with the server’s hostname or IP address. Click Test Connection after entering the details. DBeaver will check whether it can reach the database and authenticate successfully.
If the connection works, you should receive a successful connection message. You can then save the connection.
Read: Install PostgreSQL on Windows: Step by Step guide
4] Install a database driver if required
The first time you connect to some database systems, DBeaver may ask you to download a database driver. This is normal. DBeaver uses drivers to communicate with different database systems. Click Download when prompted, and let DBeaver install the required driver. Once the driver has been installed, try the connection again.
Hopefully, these solutions will resolve your issue.
Also Read: Error resolving driver libraries in DBeaver
Is DBeaver free or paid?
DBeaver is available in both free and paid editions. The Community Edition is free and open source, making it suitable for most users who need to connect to databases, write SQL queries, browse tables, and manage database objects. DBeaver also offers paid editions with additional features aimed at professional developers, database administrators, and teams. For basic database work on Windows 11, the free Community Edition is usually more than enough.
Read: How to Download and Install MySQL in Windows?
Where is DBeaver installed on Windows?
By default, DBeaver is installed in the C:\Program Files\DBeaver folder on Windows when you use the standard installer. The exact location can be different if you choose another folder during installation. You can also find DBeaver through the Windows Start menu by searching for “DBeaver.” The installation folder contains the program files, while your workspace and user-specific settings are stored separately.
Also Read: Best Open Source SQL Clients for Database Management.
