
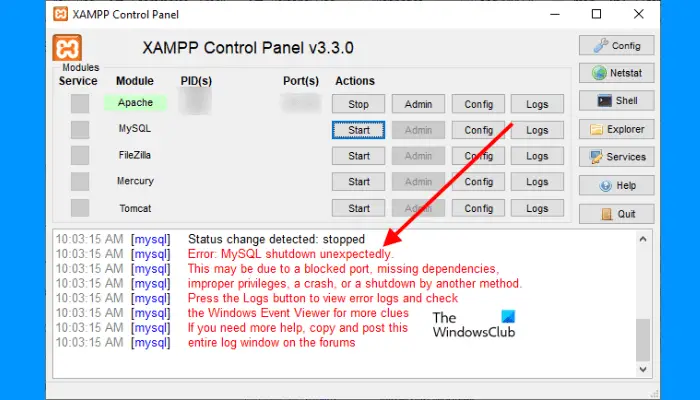
Some users are unable to start MySQL in XAMPP. According to them, every time they start MySQL in XAMPP, they receive an error message that says “Error: MySQL shutdown unexpectedly.” The most common cause of this problem is corrupted XAMPP database files. If you are experiencing this issue with MySQL, the suggestions in this post may help you resolve it.
Why does MySQL shut down unexpectedly?
It is necessary to stop MySQL before exiting XAMPP. If you exit XAMPP without stopping MySQL, it may corrupt the MySQL data files. As a result, you may experience several problems with MySQL, such as MySQL shutting down unexpectedly. If you are experiencing this problem, the MySQL data files on your system may be corrupted. We have outlined some troubleshooting methods that may help you resolve this issue.
Error: MySQL shutdown unexpectedly
Try the following solutions to fix the issue. Before you proceed, we recommend you create a backup of the XAMPP folder. For this, copy the XAMPP folder and paste it into another partition of your hard drive or your external hard drive.
- Launch XAMPP as administrator
- Repair MySQL Database
- Modify the my.ini file
- Delete all the files inside the Data folder
- Rename the aria_log_control file
- Stop all the SQL services and start them again
- Copy the files from the Backup folder to the Data folder
- Delete the INFO file(s) from the Data folder
- Rename the Data folder and copy the ibdata1 file to the Data folder
- Uninstall and reinstall Xampp
Let’s see all these solutions in detail. Before trying any of the methods below, make sure you have closed XAMPP properly.
1] Launch XAMPP as administrator
It is recommended to always launch XAMPP as an administrator to avoid data file corruption. Launch XAMPP as administrator and see if it fixes the problem. If this helps, you will save time on other troubleshooting methods. To launch XAMPP as administrator, follow the steps below:
- Click on Windows Search and type XAMPP.
- Right-click on XAMPP and select Run as Administrator.
- Click Yes if you receive the UAC prompt.
You can also set XAMPP to always run as administrator.
2] Repair MySQL Database
As described above in this article, the main cause of this problem is the corruption in XAMPP data files. If the problem is occurring on your computer due to this issue, repairing the MySQL database can fix the issue. The steps to repair the MySQL database are given below:
Click on Windows Search and type PowerShell. Select Windows PowerShell from the Search Results.
Type the following command and press Enter.
mysqld --console --skip-grant-tables --skip-external-locking
The above command will start the MySQL server without loading the grant tables. When the above command is executed successfully, type the following command and press Enter.
mysqlcheck -r --databases mysql --use-frm
The above command will repair the MySQL database. After the above commands are executed successfully, check if the issue persists.
3] Modify the my.ini file
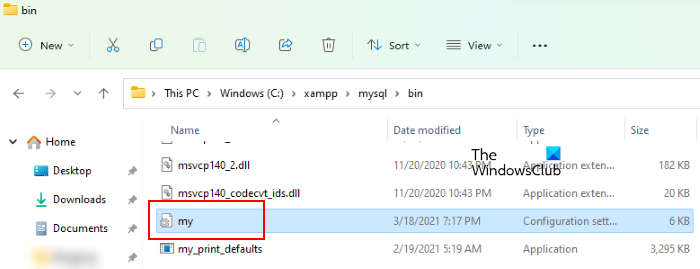
Changing the port by modifying the my.ini file has fixed the issue for some users. You can also try this. Open the my.ini file and change the port 3306 to something else. By default, the my.ini file is located at the following location:
C:\xampp\mysql\bin
- Open the File Explorer.
- Copy the above path and paste it into the address bar of File Explorer. After that hit Enter.
- Now, scroll down and locate the my.ini file.
- Once you find it, right-click on it and select “Open with > Notepad.”
If you do not find the my.ini file at the location mentioned above, you can follow the instructions below.
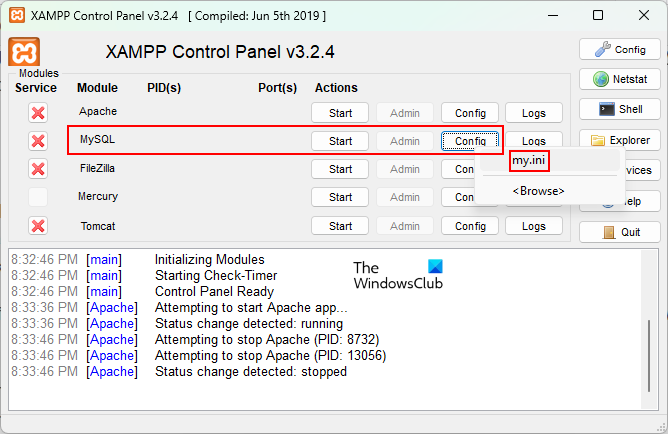
- Click on Windows Search and type XAMPP.
- Right-click on XAMPP from the search results and select Run as Administrator.
- Click Yes in the UAC prompt. This will open the XAMPP Control panel.
- Click on the Config button next to MySQL and select my.ini. This will open the my.ini file in your default text editor software.
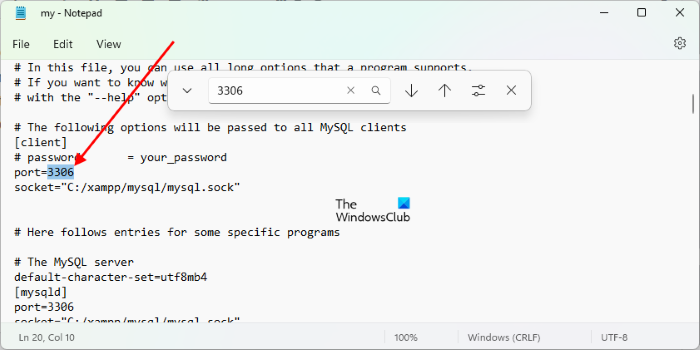
After opening the my.ini file in Notepad, press the Ctrl + F keys and type 3306. Replace any of the 3306 ports with a different port number. You can enter any random port number, such as 3307 or 3308. For some users, replacing the 3306 port with 2811 fixed the issue.
Save the my.ini file and close Notepad. Restart your computer and then launch XAMPP. Check if the issue is fixed. If this does not work, revert the changes you made to the my.ini file and try the next solution.
4] Delete all the files inside the Data folder
If the above solution did not fix your problem, revert the changes in the my.ini file that you have just made. Now, open the File Explorer and go to the following path:
C:\xampp\mysql\data
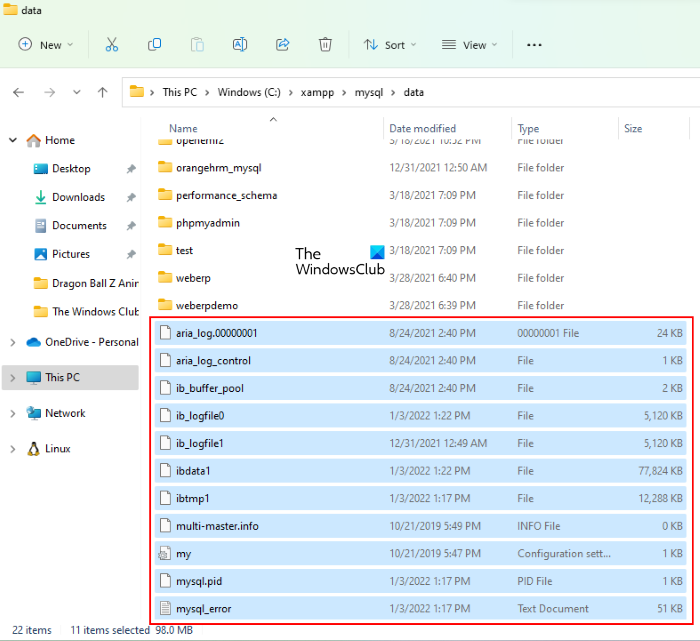
The above path opens the Data folder directly. Now, delete all the files except the folders. After deleting the files inside the Data folder, go to the following path in File Explorer:
C:\xampp\mysql\bin
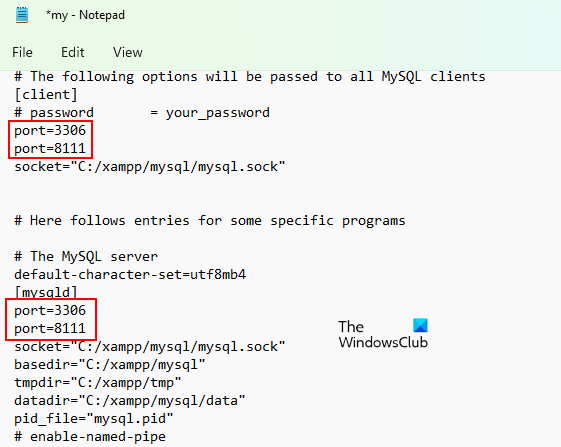
Locate the my.ini file and open it with Notepad. Now, type port=8111 just below port=3306 (as shown in the screenshot above). Press the Ctrl + S keys to save the changes you made in the my.ini file and close Notepad. Now, run XAMPP as administrator and start MySQL. The problem should not occur this time.
5] Rename the aria_log_control file
If the above solution did not fix your problem, open the XAMPP folder that you copied to your external hard drive or on another hard drive partition and copy all the contents inside it. Now, open XAMPP on your C drive and paste the copied content there. Replace the files and folders if you are asked to do so. Now, go to the following path:
C:\xampp\mysql\data
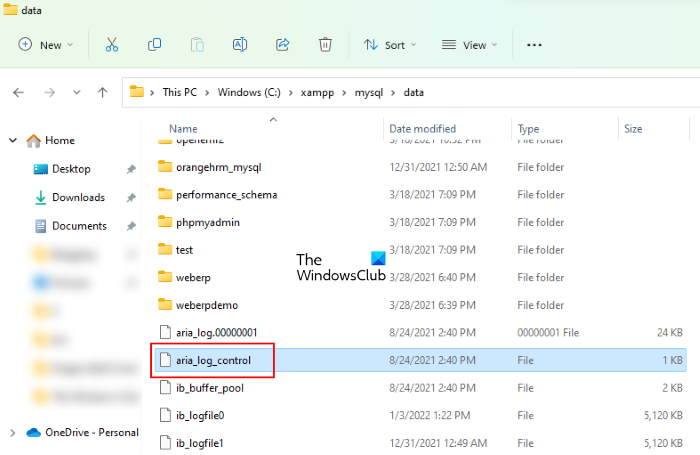
Rename aria_log_control to aria_log_control_old and launch XAMPP. Start MySQL and see if this brings any changes. If this does not help, revert the changes and try the next solution.
Read: Best free Xampp Server alternatives for developers.
6] Stop all the SQL services and start them again
Restarting the SQL services has fixed the issue of some users. This method may work for you too. Open the Services app, stop all SQL services, then start them again. The steps to do this are written below:
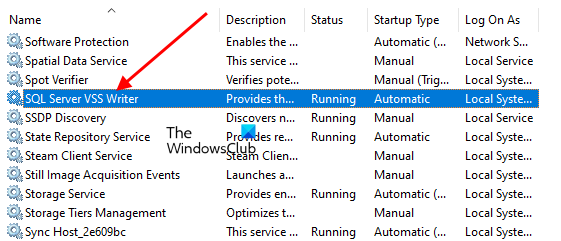
- Press the Win + R keys. This will launch the Run command box.
- Type
services.mscand click OK. The Service Management window will appear. - In the Services app, scroll down and locate the SQL services. You may find more than one SQL service on your computer.
- Stop all the SQL services. For this, right-click on SQL service and select Stop.
- Now, right-click SQL services again and select Start.
After restarting the SQL services, close the Services app and launch XAMPP as administrator. Start MySQL and see if the error occurs again.
7] Copy the files from the Backup folder to the Data folder
Another effective solution to fix this problem is to copy all the data inside the Backup folder and paste it into the Data folder. To do so, first, copy the below path and paste it into the address bar of the File Explorer. After that press Enter.
C:\xampp\mysql\backup
This will open the XAMPP Backup folder in your C drive. Now, copy all the data from there and go to the following path:
C:\xampp\mysql\data
Paste the copied data there. If you are prompted to replace the files, select Yes. Launch XAMPP as administrator and check if you can start MySQL this time. If not, try the next solution.
8] Delete the INFO file(s) from the Data folder
If the problem still persists, delete the INFO file and check if it helps. The INFO file(s) is/are located at the following location on your C drive.
C:\xampp\mysql\data
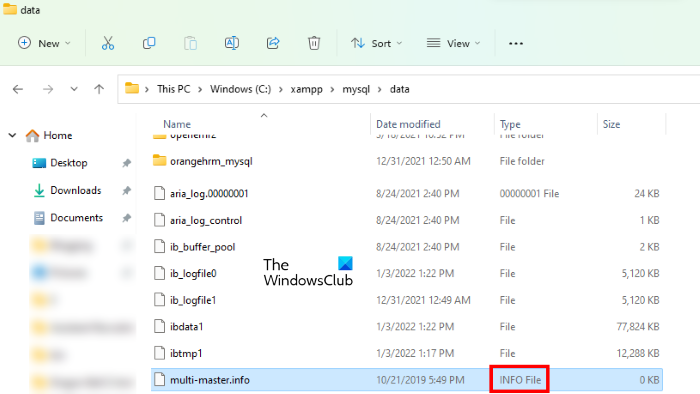
Whether there is one or more INFO files at the above location, you have to delete all of them. After deleting the INFO file(s), launch XAMPP and start MySQL. MySQL should start without giving any error.
If this does not work, copy all the files from the XAMPP folder you created as a backup to your external hard drive or another hard drive partition, then paste them back into the XAMPP folder on your C drive. Replace the files and folders if you are asked to.
9] Rename the Data folder and copy the ibdata1 file to the Data folder
This solution has helped many users. If the above solutions did not fix your problem, this method should work for you. Rename the Data folder and copy the ibdata1 file into it. The process to do this is explained below.
- Open the XAMPP folder located on your C drive.
- Now, open the mysql folder.
- Rename the data folder to data_old.
- Copy the backup folder on another partition of your hard drive or on an external hard drive. Now, rename the backup folder located inside the mysql folder on your C drive to data.
- Open the data_old folder and copy all the database folders inside it and the ibdata1 file. Do not copy the mysql, performance_schema, and phpmyadmin folders. Now, open the data folder (which was actually the backup folder earlier) and paste the copied data there. Replace the files if you are asked to do so.
- Launch XAMPP Control Panel and start MySQL.
10] Uninstall and reinstall XAMPP
If none of the above solutions fixed your problem, uninstall and reinstall XAMPP. You can uninstall XAMPP from the Control Panel or from Windows 11/10 Settings. After uninstalling XAMPP, download its latest version from the official website of Apache and install it again.
Read: How to increase phpMyAdmin upload size on XAMPP.
What to do if MySQL is not opening in XAMPP?
You may encounter issues with XAMPP if you install it elsewhere instead of its default location. The default location to install XAMPP is c:\xampp. Therefore, if you have installed XAMPP elsewhere, uninstall it and reinstall it in its default location. If you have installed XAMPP in its default location but MySQL is still not opening or running in XAMPP, open the Services app in Windows 11/10, stop all SQL services, then restart them.
Another effective solution to fix this problem is to change port 3306 to 3308. To do this, you have to edit the my.ini file, which is located at the following location:
C:\xampp\mysql\bin
Hope this helps.
Read next: Apache is not starting from XAMPP Control Panel in Windows.
