
In this tutorial, we will show you how to find wake timers in Windows 11/10. A wake timer is a timed event in Windows 11/10 that wakes your system from sleep at a specified time. For example, if you have set a task (created in Task Scheduler) with the condition to Wake the computer to run this task, then such a task is known as a timed event. If you are wondering what causes your computer to wake randomly, it’s most likely a wake timer.
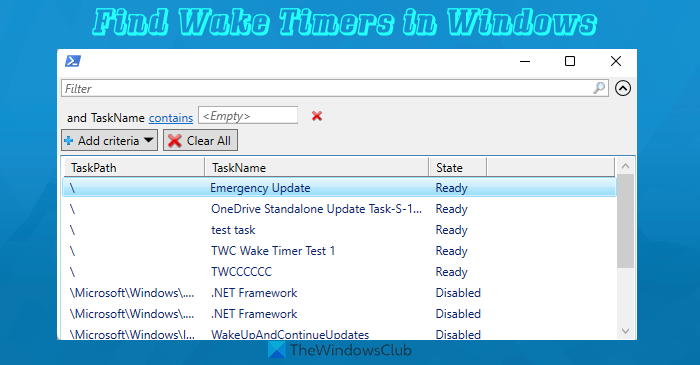
This post will help you check the list of wake timers, or an upcoming wake timer, on your Windows 11/10 computer in two ways so you can disable or change the events or services that use wake timers. While finding wake timers in the full Task Scheduler list can be difficult and time-consuming, the options below make it easier.
How to find Wake Timers in Windows 11
To find wake timers in Windows 11/10, you can take the help of two built-in options. These are:
- Command Prompt
- Windows PowerShell.
Before using any of these two options, do note that you must log in as an administrator to your Windows 11/10 computer. Now let’s have a look at these options.
1] Find an Active Wake Timer in Windows using Command Prompt
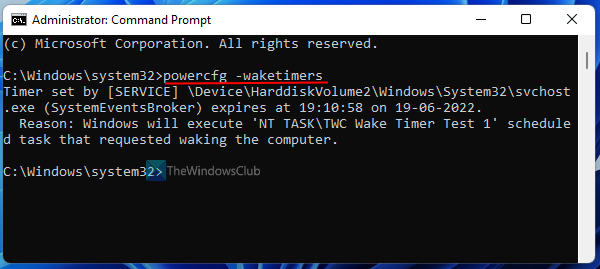
The steps are as follows:
- Click on the Search box
- Type cmd
- Click on the Run as administrator option available in the right-hand section of the search results. This will open an elevated Command Prompt window
- Execute the following command:
Powercfg -waketimers
This command shows the next wake timer or timed event that will wake your computer. You will also be able to see the date and time when the event will trigger and you will also see the reason why Windows will execute that scheduled task.
Once the time for that wake timer expires, you can execute the same command to find the next or upcoming wake timer.
2] Find all Active Wake Timers in Windows using Windows PowerShell
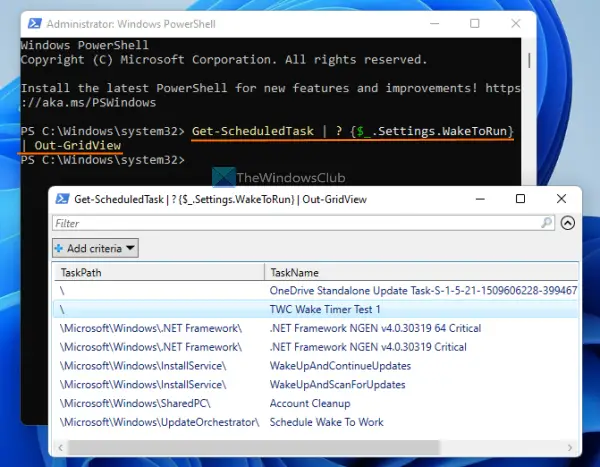
This option is more helpful because it shows a list of all active wake timers, along with their paths, task name, and state (Ready or Disabled), as shown in the screenshot above. The steps to use this option are as follows:
- Open Windows Search box
- Type powershell in the Search box
- Right-click on the Windows PowerShell option that appears in the search results
- Click on the Run as administrator option. This will open an elevated PowerShell prompt
- When the elevated PowerShell window is opened, execute this command:
Get-ScheduledTask | ? {$_.Settings.WakeToRun} | Out-GridView
Wait for a moment to complete the command. After that, a new window will open that shows a list of scheduled tasks with a wake timer that is either enabled or disabled.
What is Allow wake timers in Windows 11?
Allow wake timers is a feature in Windows 11/10 that makes an event trigger an action to wake your computer from sleep automatically at the scheduled time. If a scheduled task with a wake timer option enabled and pending Windows updates are able to wake up your computer at the scheduled time automatically in Windows 11/10, then Allow wake timers feature could be the reason behind that. You can also enable or disable Allow wake timers on Windows as per your needs.
How do I turn off auto wake on Windows 11?
If your computer is automatically waking up from sleep, then you can turn off this auto-wake function using the following ways:
- Disable wake timers using the Power Options window
- Prevent devices from waking up your computer using Command Prompt
- Using Power troubleshooter
- Disable Wake on Magic Packet for Network Adapters
- Find and uninstall programs that are causing your system to wake automatically, etc.
Read next: Windows computer goes to sleep automatically randomly.
