A local Proxy Server can improve the throughput of your broadband connection and at times even protect against malware infections. Therefore Proxy settings have a key role to play. These settings let a browser know the network address of an intermediary server used between the browser and the Internet on some networks (local).
Windows has built Global Proxy settings in its Operating System that allows your computer to communicate with other devices, servers, and services. A Proxy Server retrieves information on the Internet in place of a user. For example, if you request a website, such as www.google.com, the Proxy Server acts as a middleman, retrieving the website and then sending it directly to your computer.
Two of the biggest benefits of Proxy Server are Privacy and Speed. Because of the Proxy Server, your identity will be anonymous as it hides your public IP address, maintaining your Privacy.
It increases your browsing speed by retrieving the data on your behalf and storing it into a centralized cached database, so, if another user on a different computer visits the same webpage, the proxy server won’t have to search the web to retrieve information again and will send it directly from the proxy database to that particular user.
Normally, you change the proxy settings only when you are connecting to the Internet through a corporate network. By default, browsers such as Internet Explorer automatically detect proxy settings. However, you might need to manually set a proxy with information supplied by your network administrator.
Microsoft seems to have offered an alternative option here via Windows 11/10/8.1 – as different from in Windows 8. One of the biggest additions to the Windows Settings and upgrade is the proxy settings. This makes it much easier to configure automatic and manual proxies in Windows 11/10.
Configure Proxy Server Settings in Windows 11/10
In Windows 11 you can access these settings at Settings > Network & Internet > Proxy.
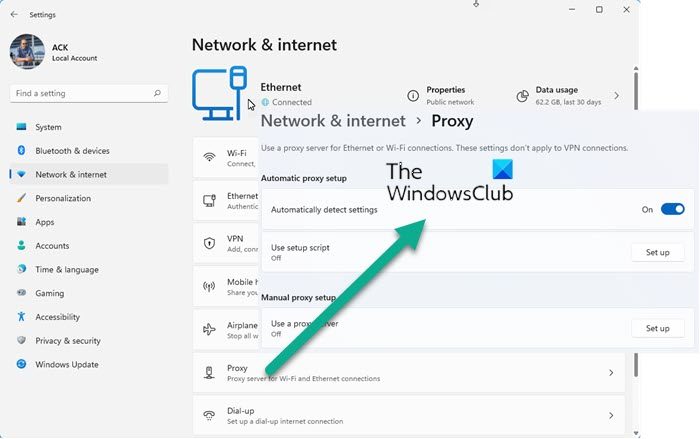
In Windows 10 you can access these settings at Settings > Network & Internet > Proxy.
There are two methods to set up Global Proxy settings. These methods are
- Automatic proxy setup
- Manual proxy setup
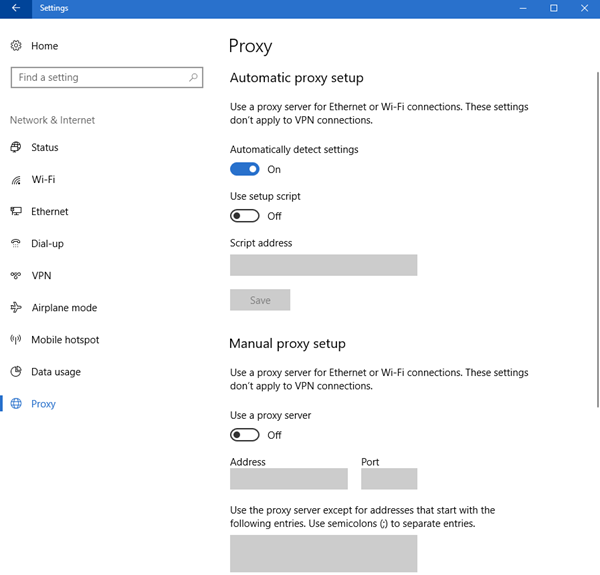
1] Automatic proxy setup
Microsoft has enabled Automatic proxy setup by default, however, if you are connected to a business network you should enter the Proxy URL given to you by your Network Administrator. This method lets you join the company proxy server with ease.
To do that, hit Win + S, type “Proxy settings” and hit Enter.
You will be redirected to the Proxy setup window, make sure that the toggle of Automatically detect settings is turned ON, enable Use setup script, type the given proxy URL in Script address, and click Save.
This way, you can configure the Global Proxy Settings on Windows automatically.
2] Manual proxy setup
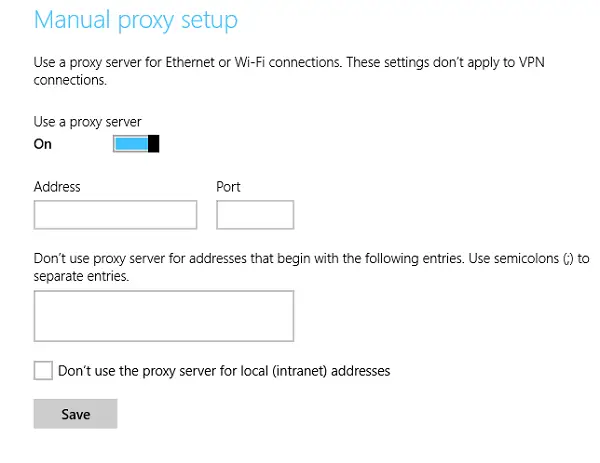
If you know the IP address and the port number of the network, you can set up the Proxy server manually. If your Network Administrator has provided you with an IP address and port number instead of a Proxy URL, this method is for you.
Launch Proxy Settings by searching it out of the Start menu, scroll down to Manual proxy setup, enable Use a proxy server, insert the IP address and port number in Address and Port section respectively. You can also launch it via Windows 10 Settings > Network and Internet > Proxy > Manual proxy setup.
You can even exclude certain websites and LAN Addresses by typing the URL in the given box and checking the “Don’t use the proxy server for local (intranet) addresses” respectively and click Save.
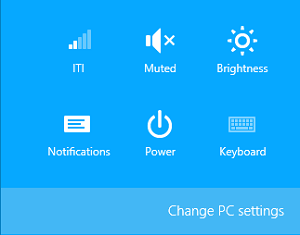
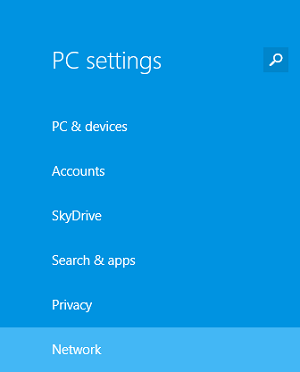
Windows 8.1
To configure the proxy settings in Windows 8.1, first, bring up the charms-bar by pointing the mouse cursor to the lower-left corner of your computer screen or by using Keyboard shortcut – Win+C. Choose ‘Settings’ icon and select the ‘Change PC Settings’ option.
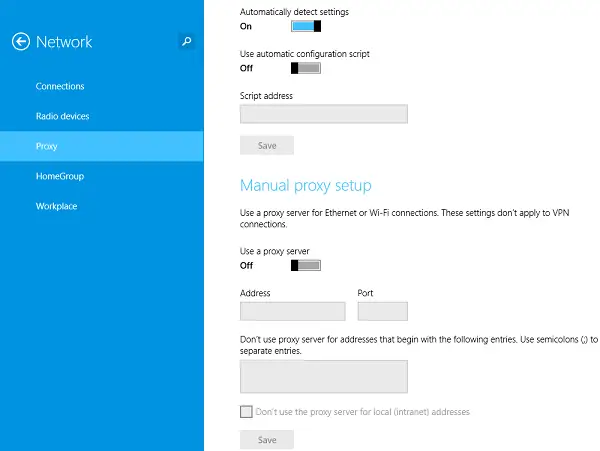
Next, select the option from the left-pane that reads as ‘Network’. It is in this category where proxy settings are hidden.
Scroll down until you find ‘Manual Proxy Setup’ section.
Also see: