
If you want to change the Network profile type in Windows 11/10, here is how to do that using Windows Settings, Registry Editor, Windows PowerShell, Command Prompt and Group Policy. There are three network types, and you can switch from one to another using this tutorial.

There are mainly two Network profile types if you are a regular home computer user – Public and Private. However, if your computer is connected to an organization, you may also find Domain network option on your Windows computer. If you want to switch from Public to Private or vice versa, follow the guide below.
For a Network in Public places, you do not need to share it, while if your system is confined to your home or private place, you can allow sharing with the devices. This setting could be managed in the Control Panel under the hood of Network section. However, if you need to change the sharing settings of the Network at short notice and navigate to different places, there are shorter ways to easily configure these settings.
Read: Difference between Public Network and Private Network.
Before getting started, please note that these changes are specific to the network. For instance, if you have an Ethernet connection and change the network profile type from Public to Private, the change will only be applied to that particular Ethernet connection. If you want to do the same for a Wi-Fi connection (even different SSIDs), you need to repeat the same steps.
How to change Network Profile Type in Windows 11/10
To change the Network profile type in Windows 11/10, follow these methods:
- Using Windows Settings
- Using Registry Editor
- Using Windows PowerShell
- Using Group Policy Editor
- Using Command Prompt.
To learn more about these ways, keep reading.
1] Using Windows Settings
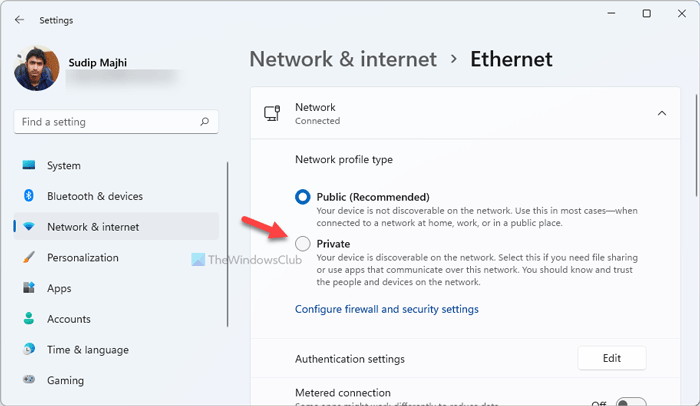
It is probably the most effective and straightforward method for switching between various network profile types in Windows 11. As Windows Settings comes with a user-friendly interface, you can quickly navigate to the path and make the change. To change network profile type using Windows Settings, do the following:
- Press Win+I to open the Windows Settings panel.
- Go to Network & internet.
- Click on the internet source (Ethernet or Wi-Fi).
- Select either Public or Private.
- Restart your computer.
Once done, your computer will continue using the selected network profile type unless or until you change it manually.
In Windows 10, to change Network Status from Public to Private or vise versa, you can:
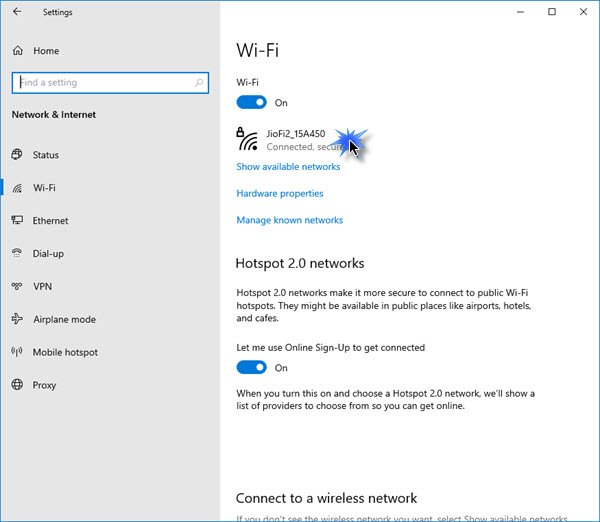
- Open Settings
- Select Network and Internet
- Click WiFi section
- Click on the network
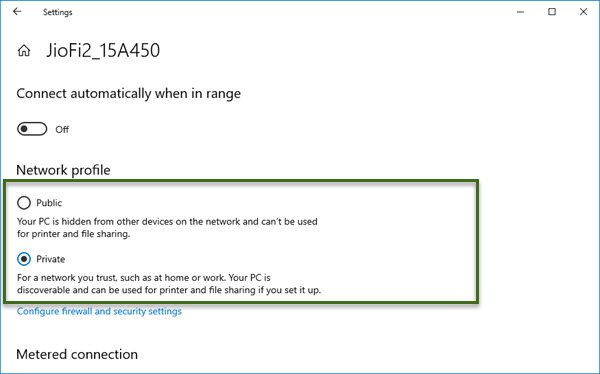
- In the next panel, select Private or Public.
2] Using Registry Editor
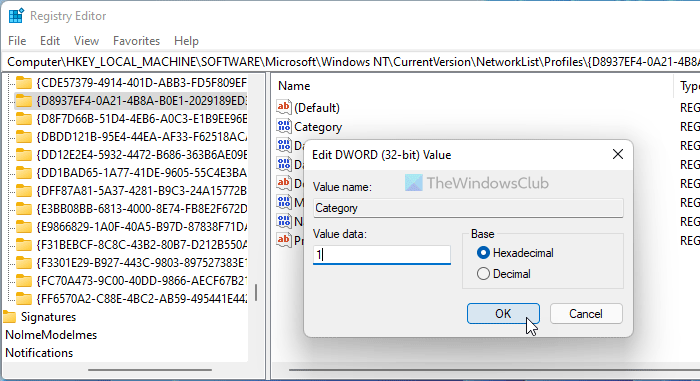
It is possible to change the network profile type using Registry Editor. It doesn’t take much time as long as you have the network name noted. You may need to review each entry individually to find the network name and make the necessary change. To change the network profile type using Registry Editor, do the following:
Press Win+R to open the Run dialog.
Press regedit > hit the Enter button.
Click on the Yes option on the UAC prompt.
Go to this location:
HKEY_LOCAL_MACHINE\SOFTWARE\Microsoft\Windows NT\CurrentVersion\NetworkList\Profiles
Click on the sub-key that represents your desired network profile.
Double-click on the Category REG_DWORD value.
Select the Value data 0 for Public, 1 for Private, and 2 for Domain.
Click the OK button.
Restart your computer.
In the Profiles key, you may find many sub-keys. Each sub-key denotes a particular network you have been connected to. You need to check the ProfileName String Value to find out a particular network.
3] Using Windows PowerShell
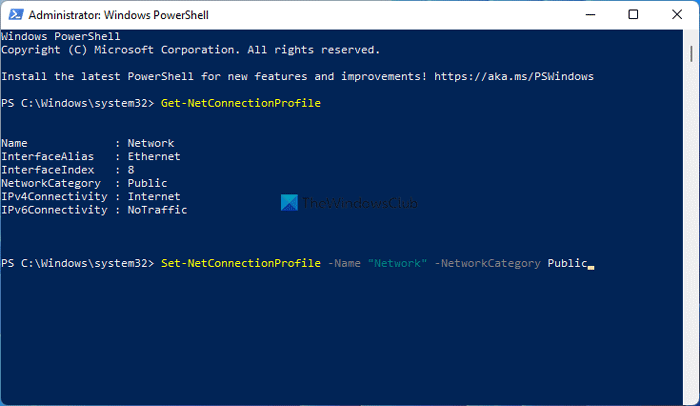
Windows PowerShell can let you do the same thing in Windows 11. You can use either Windows PowerShell or open it in Windows Terminal. For that, do the following:
- Search for powershell in the Taskbar search box.
- Click on the Run as Administrator option.
- Click the Yes button.
- Enter this command: Get-NetConnectionProfile. Note down the Name of the profile.
- Enter this command: Set-NetConnectionProfile -Name “Network-Name” -NetworkCategory Public
- Close Windows PowerShell and restart your computer.
Alternatively, you can enter the following command to change the network profile type to Private:
Set-NetConnectionProfile -Name "Network-Name" -NetworkCategory Private
Also, you must replace the Network-Name with your original network profile name.
4] Change Network Status using Group Policy Editor
1. Press Windows Key + R combination and put gpedit.msc in Run dialog box.
2. In the left pane, navigate to:
Computer Configuration > Windows Settings > Security Setting > Network List Manager Policies
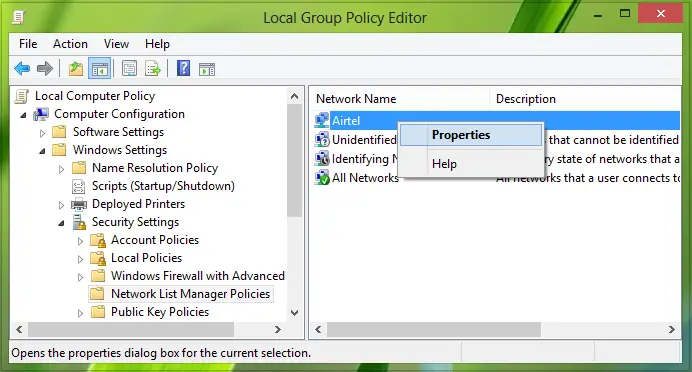
3. Now, in the above-shown window, right-click on the network whose status you want to change for and click Properties.
Moving on, in the Properties window, you can easily select the status for the network. Click Apply followed by OK after making your choice.

5] Change Network Status using Command Prompt
Open an administrative Command Prompt and paste the following command and hit Enter:
netsh wlan delete profile name="HomeNetwork"
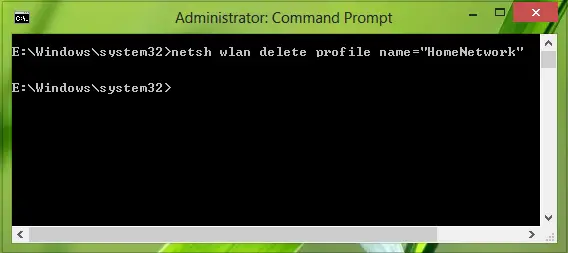
This command will delete the Public network profile, and you can reconnect the network this time, you can select the Private mode at the time of connecting.
If you wish to show the name of all the network profiles listed on your system, you can reveal them by executing netsh wlan show profiles command at the Command Prompt.
That’s all! I hope this guide helped.
Read: Option to change Network Profile from Public to Private is missing.
How do I change my network profile type?
You can use Windows Settings, Windows PowerShell, and Registry Editor to change your network profile type. In Windows Settings, go to Network & internet > click on the network profile > select Private or Public.
How do I change my network from public to private?
To change network from Public to Private in Windows 11, you need to go to Network & internet in Windows Settings, click on the Ethernet or Wi-Fi, and select the Private option. For your information, it changes the network profile type for a particular network.
