Backing up your VMware ESXi host configuration is critical for disaster recovery. If hardware fails or settings are accidentally changed, a backup allows you to quickly restore the host to its original state. In this post, we are going to see how you can take a backup of VMware ESXi Host Configuration and how to restore the backup in ESXi as well. So, if your organization’s virtual machines are hosted on or managed by VMware ESXi, this post is for you.
Backup VMware ESXi Host Configuration
If you want to take a backup of a VMware ESXi host and restore it to a newly deployed ESXi host, follow the steps mentioned below.
- Enable SSH
- Create a backup of the configuration
- Restore the configuration on the target
1] Enable SSH
First, we need to enable SSH to connect to the ESXi host. By doing so, we enable remote command-line access for management and troubleshooting purposes. To do so, follow the steps outlined below.
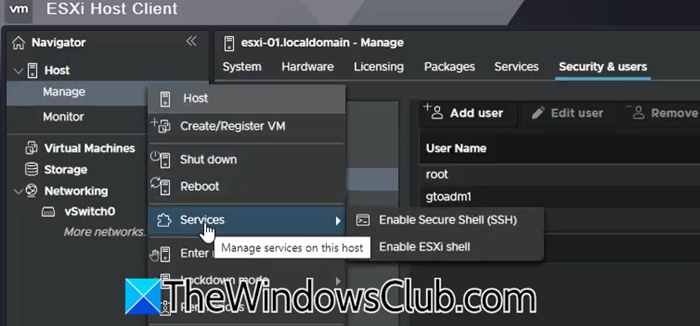
- First of all, you need to access your machine in the ESXi web interface.
- Then, from the left side, called Navigator, click on Manage.
- Now, click on Services > Enable Secure Shell (SSH).
Once done, move on to the next step.
2] Create a backup of the configuration

Now, you need to start an SSH session to your host. To do this, there are various SSH clients, but we would go with PuTTY. You can easily download PuTTY from chiark.greenend.org.uk.
Open PuTTY, in the Host name field, enter the IP address of your ESXi host, and click OK. You need to sign in with an appropriate user, or stick to the root user for simplicity.
After logging into the session, run the following command to synchronize the ESXi host’s current configuration with persistent storage, ensuring that all recent changes are saved.
vim-cmd hostsvc/firmware/sync_config
Then run the following command to make a backup of the ESXi host’s configuration.
vim-cmd hostsvc/firmware/backup_config
You will get an output URL from which you can download the resulting .tgz archive containing the config bundle. Copy the URL, replace the asterisk (*) with the Host’s IP, then paste it into a browser. Your browser will start downloading the configuration file.
3] Restore the configuration on the target
We are going to restore the host configuration to a different ESXi host. To do so, you first need to enable SSH on the target using the steps mentioned earlier. Then, you need to download WinSCP from winscp.net to connect to the target server and place the configuration file. Once downloaded, connect to the target using its IP address and root credentials. Then, upload the backup file to the tmp directory.
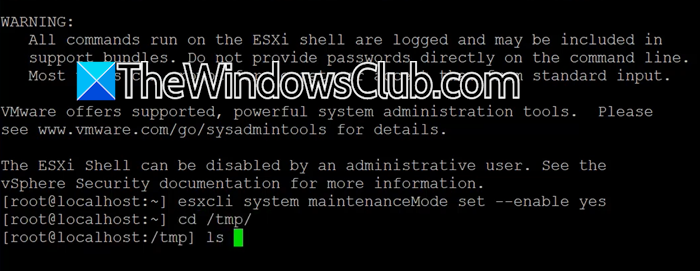
Once done, connect to the target using PuTTY and run the following command. This command places the ESXi host into maintenance mode, preventing new VMs from being powered on until existing ones are migrated or shut down
esxcli system maintenanceMode set --enable yes
Now, you need to change the directory to tmp using the cd /tmp/ command.
Just to confirm if the backup file is there, run ls command to list all the files inside the tmp folder.
Run the following command and note down the UUID.
esxcfg-info -u
Now, unzip the configuration file using the following command.
tar zxvf <file-name>.tgz
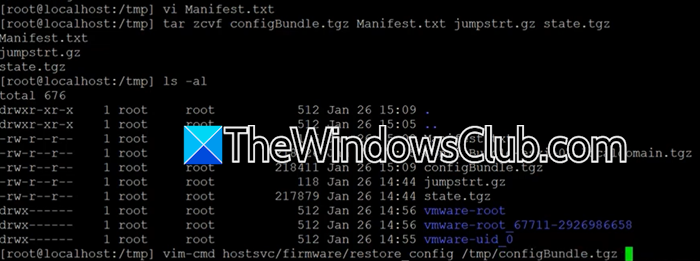
Now, open the Manifest file using the VI Editor by running the command – vi Manifest.txt.
Replace the UUID of the file with the UUID that we copied earlier.
Now, we need to pack the backup file by running the following command.
tar zcvf configBundle.tgz Manifest.txt jumpstrt.gz state.tgz
Now run, ls -al, to list all the files inside the tmp folder.
Finally, run the following command to start the restoration process.
vim-cmd hostsvc/firmware/restore config /tmp/configBundle.tqz
If you encounter a network error, please ignore it, as it indicates that the host has been rebooted as part of the restoration process.
Finally, go ahead and access the target host using the original IP address of the source host. Once you log in, you will notice that the configuration has been restored.
Hopefully, with the help of this post, you will be able to back up and restore the ESXi host configuration.
Read: How to enable AutoStart of VMs on VMware ESXi and Workstation
How to regenerate ESXi host certificate?
To regenerate the ESXi host’s self-signed certificate, connect to the host via SSH as root, then run these commands.
## Remove the current certificate.
rm /etc/vmware/ssl/rui.crt /etc/vmware/ssl/rui.key
## Regenerate a new certificate.
/sbin/generate-certificates
## Restart management services to apply changes.
services.sh restart
This replaces the certificate with a new self-signed one.
Read: Host TPM Attestation Alarm in VMware vSphere
How to export ESXi network configuration?
To export an ESXi host’s network configuration, connect to the host via SSH as root and run the following command.
esxcli network ip interface list > network_config.txt && esxcli network vswitch standard list >> network_config.txt && esxcli network ip netstack list >> network_config.txt
This creates a file called network_config.txt that captures all network interfaces, virtual switch settings, and netstack configurations. For a full system backup including network settings, use esxcli system configbackup save to generate a .tgz bundle, which includes network details in /etc/vmware/ files.
Also Read: Install VMWare ESXi Hypervisor in Hyper-V Virtual Machine.