The Hosts file in Windows 11/10, is used to map hostnames to IP addresses. This Hosts file is located deep down in the Windows folder. It is a plain text file, and the size of the original default Hosts file is around 824 bytes.

The HOSTS file is used by Microsoft TCP/IP for Windows. This file contains the mappings of IP addresses to host names. Each entry should be kept on an individual line. The IP address should be placed in the first column, followed by the corresponding host name. Moreover, the IP address and the host name should be separated by at least one space.
Hosts File in Windows 11/10
In this post, we will see its location and also how to manage, lock, or edit the Hosts file in Windows 11/10. We will discuss the following:
- Host file location
- Lock Hosts file to prevent hijacking
- Block website using the Hosts file
- How to edit the Hosts file
- Using free Hosts File Editor software.
Let us take a look at them.
Host file location in Windows
The Hosts file in Windows is located at the following location:
C:\Windows\System32\drivers\etc
Lock Hosts file to prevent hijacking
Imagine clicking on www.thewindowsclub.com and seeing a completely different website load in your browser. Malware can redirect Web addresses on your computer by altering your Hosts file. This is referred to as the Host File Hijack.
To prevent Host file hijacks, you may navigate to it, right-click on it, select Properties and make it a Read-only file. This will lock down your Hosts file and prevent anyone or any malware from writing to it.
Block website using the Hosts file
To block a website using the Hosts File, simply add the following entry:
127.0.0.1 blocksite.com
Although I do not do it, many users like to manually add entries to it in order to block the opening of one or more particular websites. Others, like to download and use List from well-known sources like mvps.org, to add entries that block malware sites from opening.
How to edit Hosts file in Windows 11/10
To edit the Hosts file in Windows 11/10:
- Open Explorer
- Navigate to \System32\drivers\etc\ location
- Locate Hosts file
- Right-click on it and select Notepad
- Make the changes and Save.
Now let us go into a detailed explanation.
To edit the Hosts file, navigate to the following folder location:
C:\Windows\System32\drivers\etc\
Here you will see the Hosts file. Right-click on it and select Notepad. Make the changes and Save.
But sometimes, even when you are logged on with administrative credentials, you may receive the following error message:
Access to C:\Windows\System32\drivers\etc\ hosts was denied
Or
Cannot create the C:\Windows\System32\drivers\etc\hosts file. Make sure that the path and file name are correct.
In this case, type Notepad in Start search and right-click on the Notepad result. Select Run as administrator.
Open the Hosts file, make the necessary changes, and then click Save.
Using free Hosts File Editor software
If you are looking for an easier way, you can use a free Hosts file Editor software.
1] Using HostsMan
While you can always manually manage or edit Hosts file manually, I would like to suggest that you use a third-party freeware tool like HostsMan to do it.
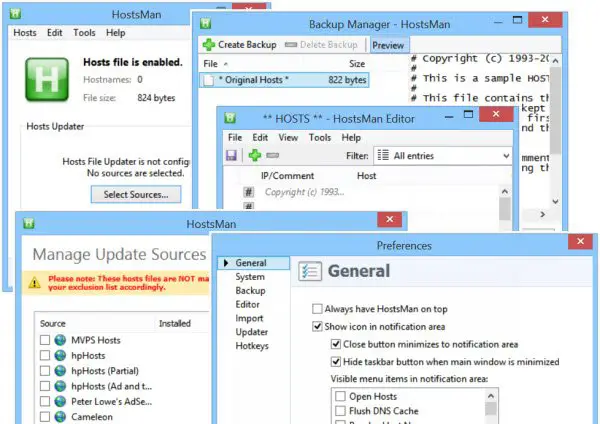
HostsMan is a feature-rich tool that lets you add, remove, edit entries in the Hosts file. It also lets you easily add third-party Hosts lists that help in blocking malware sites and lets you easily enable or disable the Hosts file. It includes a built-in hosts file updater & a hosts editor. It lets you scan the hosts file for errors, duplicates, and possible hijacks – and also lets you create an Exclusion list. One more useful feature it offers is the Hosts file backup manager. Backup your Hosts file to a safe place and use it to restore it, should the need arise.
Hostman also lets you Flush DNS cache, open Hosts with a text editor, count the number of hosts, find duplicates, replace IP, scan hosts for malicious entries, rearrange hosts, manage DNS Client Service, and more. In short, it’s the only Hosts Manager that you will ever need. You can download it from its home page.
TIP: SwitchHosts is a Hosts file switcher for Windows that allows you to change your Hosts file with a click. It is useful if you need to have two Hosts files on your PC.
2] Using SysMate Hosts File Manager

SysMate Hosts File Manager and is another tool that lets you do so. With Host File Walker you can add as many records to the system hosts file. It even lets you backup and restore the Hosts File.
3] Using Host File Editor tool
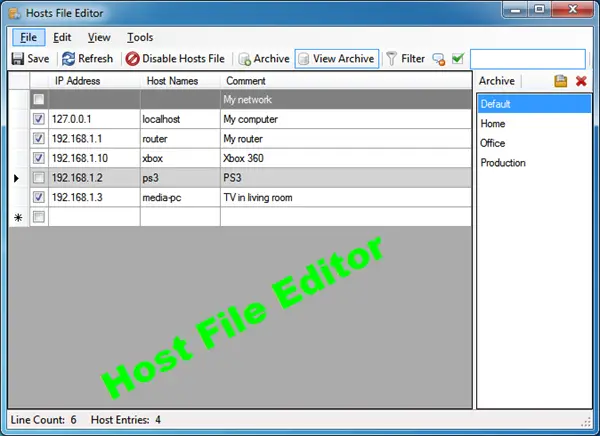
Host File Editor is another good tool that you can use. It has the following features:
- Enable and disable hosts file from the system tray
- Cut, copy, paste, duplicate, enable, disable and move entries
- Filter and sort host entries
- Backup and restore various hosts file configurations when switching between environments
- Ping endpoints to check availability.
You can download it from here. It offers a portable version too.
4] HostsDock

HostsDock is another useful software to edit the hosts file on Windows 11/10 computers. This is an open-source hosts file editor software that also lets you create new local hosts files and save them. You can also connect to a remote hosts file which is an important option. Some other interesting features are also available which are as follows:
- Syntax Highlighter that can automatically highlight IP addresses, comments, domains, etc., present in the hosts file. It detects all these items by itself and then highlights them
- Basic editing options like undo/redo, search and replace, cut, paste, etc.
- Create folding block
- Test IP addresses in the hosts file with the ping command
- A navigation pane to quickly switch to local and remote hosts files, check system hosts info, etc.
You can download this tool from eshengsky.github.io. Launch the tool after installation and it will show the system hosts file. After that, you can use the available options to add or create a new hosts file, use editing options, export the hosts file, and more.
5] Hosts File Editor PowerToy
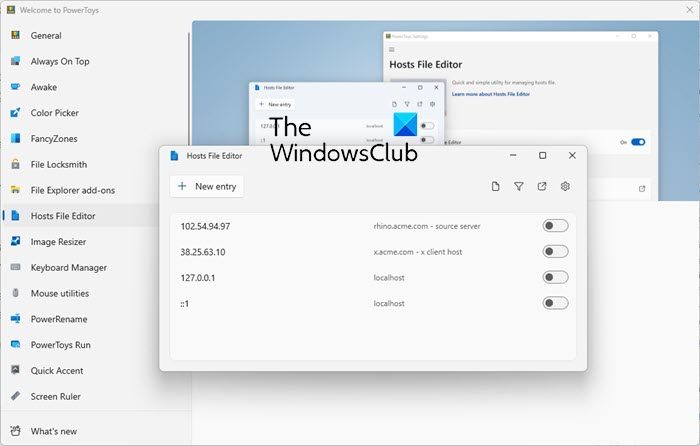
The Hosts File Editor PowerToy also lets you edit the Hosts file.
How do I grant permission to edit the Hosts file in Windows 11/10?
If you want to grant permission to edit the hosts file in Windows 11/10 using Notepad, then you need to run Notepad as an administrator. You should also sign in to your Windows 11/10 system with an administrator account to edit hosts file so that you won’t get any errors while saving the hosts file.
Read: What is LMHOSTS file in Windows?
Do not have permission to edit the Hosts file?
If you are unable to edit the hosts file on Windows 11/10 or you do not have permission to edit the hosts file, then you can use the following solutions:
- Use Notepad with administrative privileges and then open a hosts file to edit it
- Copy the hosts file from the original location to the desktop or some other location, edit that file, and then copy the edited file and paste it into the original location to overwrite the hosts file
- Use some third-party hosts file editing tools, etc.
TIP: See this post if Hosts File is not working in Windows. How to manually reset the Hosts file back to default in Windows may also interest you.
If your browser has been hijacked, you might find this post on Browser Hijacking and Free Browser Hijacker Removal Tools helpful.

I need help with browser hijacking
This may help you: https://www.thewindowsclub.com/free-browser-hijacker-removal-tool
boy, this site sucks — it takes 50-75% cpu. done with MS products?
I used this one
http://filehippo.com/download_adwcleaner
Often windows host files have commented entries, e.g. #127.0.0.1 localhost; still, localhost is resolved by the DNS. Is it not wasting networking resources-i.e. having to check DNS to know I have to use a local port?
This line is commented out. There is no need to uncomment it. It is purely for explanatory purposes and you should not really do that
I need to come back every few times because I keep forgetting the file path to the file. >_<
Wrong. Any software writer who tries to connect to “localhost” needs an address. Why pester the DNS server when it’s not needed. Furthermore, by not including localhost in the hosts file, if a program wants to connect to a localhost port, and the computer is NOT hooked up to a working network, then the program won’t work as designed — because now there HAS to be a DNS lookup, which REQUIRES connection to a working network.
THAT
IS
INSANE.
localhost 127.0.0.1
belongs in the hosts file, WITHOUT a # comment marker.
Hi,
I did get the denial to change the host file.
I was unable to edit the allow list & did not want to dwnld anything to ‘help’.
I opened msconfig, chose safe boot
and changed the host file there, no problem
It’s useful, Thank you so much
Wrong. Since Windows 7, dnsapi.dll has localhost, local machine, local and loopback embedded in its code. This is why the hosts file provided with Windows7+ has both the v4 and v6 localhost entries commented.
Very true. It also ran on 300/110 split-baud modems. Times change and improvements are made.
Are you Right Clicking the Notepad app and using ‘Run As Administrator’ to open the HOSTS file after you are done with ur msconfig edit?
I broke my computer trying this. :(
Couldn’t be because of this. At most you may not be able to connect to the Internet. Reset the Hosts file – https://www.thewindowsclub.com/how-to-set-the-windows-7-hosts-file-back-to-default
Thanks Tom.