DLL files are important files on your system and if they are missing or corrupt, certain applications on your computer will cease to function correctly. One such DLL file is SETUPAPI.dll. If this OS file is missing or corrupt, you will encounter the error SETUPAPI.dll is missing or not found. In this article, we will discuss the causes and resolutions to this error.

What is SETUPAPI.dll?
Windows Setup API (setupapi.dll) file is located in the System32 folder. It is statically linked to several Windows OS files, and if any one of them fails to load, setupapi.dll will not load.
The SETUPAPI.dll file is important for installing applications and their setup on the system. If this Windows OS file is missing or corrupt, you will not be able to install the associated application. The SETUPAPI.dll file is a part of the Windows Setup API. This means it is critical to the installation of the operating system too.
What is the use of SetupAPI.dll?
The SetupAPI.dll file has 2 functions – The first function is to assist with the installation of the Windows operating system. The second function is to assist in the installation and setup of applications on the system.
Fix SETUPAPI.dll is missing or not found error

If you wish to resolve the error SETUPAPI.dll is missing or not found on your system, then try the following solutions sequentially:
- Run an SFC Scan
- Run the DISM commands
- Restore the system to an earlier point
- Download the dll file from Microsoft.
1] Run an SFC Scan
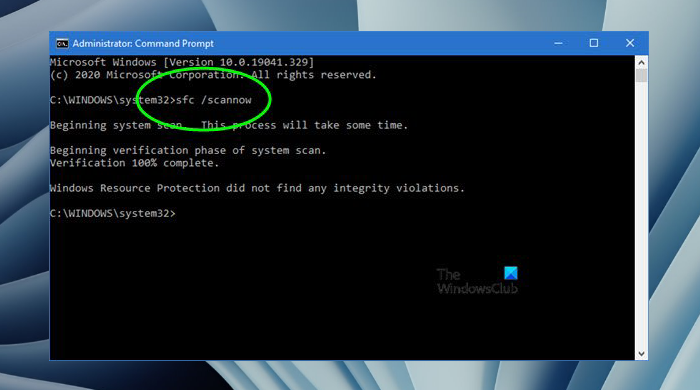
The primary cause of the error is the missing SETUPAPI.dll file. This file can be replaced by performing an SFC Scan on your system. The purpose of an SFC Scan is to search for missing and corrupt files on the system and replace them if possible. The procedure to perform an SFC Scan on your system is as follows:
Search for Command Prompt in the Windows Search bar.
In the right pane, select Run as administrator to open the elevated Command Prompt window.
In the elevated Command prompt window, type the following command.
SFC /SCANNOW
Hit Enter to execute the SFC Scan.
Reboot the system once the scan has been completed.
2] Run the DISM commands
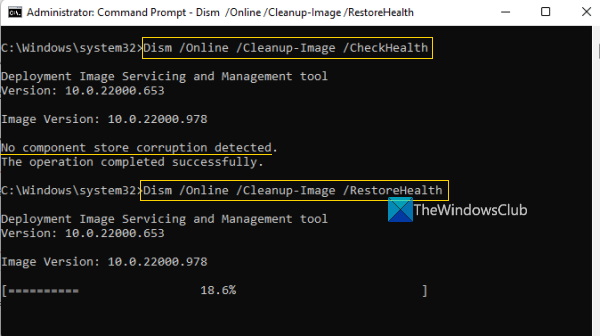
If the SFC Scan didn’t help, you can try running the DISM commands. The DISM commands repair the system image.
Search for the words Command Prompt in the Windows Search bar.
When the option appears, click on Run as administrator in the right pane to open the elevated Command Prompt window.
In the elevated Command Prompt window, copy-paste the following commands individually and hit Enter after each command:
Dism /Online /Cleanup-Image /ScanHealth
Dism /Online /Cleanup-Image /CheckHealth
Dism /Online /Cleanup-Image /RestoreHealth
Reboot the system once the commands have been executed.
3] Restore the system to an earlier point

If you have tried the SFC and DISM scans and then have not helped, you may have to consider restoring your system to an earlier point. The procedure is as follows:
- Search for Recovery in the Windows Search bar.
- Open the Recovery application.
- Click on Open System Restore.
- Select Next.
- Select the Restore point and then click on Next.
- Click on Finish.
- Select Yes to initiate the System Restore process.
By the time you exhaust these three solutions, your problem should be fixed.
4] Download the dll file from Microsoft
You can download the dll file from Microsoft, place it in the System32 folder and register this DLL file.
One of the suggestions is sure to help you.
How do I fix a missing DLL file in Windows?
I suggest 2 solutions to solve the problem of a missing DLL file. The first solution is to reboot the system. The second solution is to run an SFC Scan. The SFC Scan will search for missing and corrupt files on the system and replace them if possible.
I hope this was helpful! Please let us know in the comment section below.

Leave a Reply