If you see the message An error occurred while attempting to checkpoint the selected virtual machines, with Event ID 3280, this post will help you resolve the issue.
A Hyper-V checkpoint captures the state, data, and configuration of a virtual machine at a specific point in time. This is crucial for applying updates or creating a restore point before making significant changes. However, the operation can sometimes fail unexpectedly, leaving your VM’s state unsecured and halting your workflow. In this post, we will see what you can do if the Hyper-V VM Checkpoint operation failed.

What is a checkpoint in Hyper-V?
A checkpoint in Hyper-V is a snapshot that captures the exact state, configuration, and data of a virtual machine at a specific moment in time. It preserves the VM’s memory, processes, and hard disk state, allowing you to revert to that precise point if needed. This feature is invaluable for testing software updates, configuration changes, or development work without risking your production environment.
An error occurred while attempting to checkpoint the selected virtual machines
This Hyper-V checkpoint failure indicates a problem with the virtual hard disk connection. This issue arises when the link between the parent and child disks is broken or inaccessible. It is important because it prevents Hyper-V from creating or managing checkpoints properly, risking your virtual machine data. The error message says, “The chain of virtual hard disks is broken,” and points out that the “parent virtual hard disk for the differencing disk” is missing. This happens when the AVHDX (differencing disk) file cannot find or access its parent VHDX file. Reasons for this can include deleting files by mistake, losing storage connections, file damage, or making incorrect changes to the virtual machine that disrupt the disk setup.
Since the Hyper-V VM Checkpoint operation failed and you are unable to create a checkpoint, follow the solutions below.
- Compare the checkpoint chains
- Inspect the Disk Chain with PowerShell
- Use VHD Repair Tools to Rebuild the Chain
- Merge the Current Checkpoint to Create a New Base Disk
Let us talk about them in detail.
Hyper-V VM Checkpoint operation failed
1] Compare the checkpoint chains
In this solution, we will address the main problem by fixing the broken link between disk files. Checkpoints depend on the parent-child links of VHDX files. By restoring the missing parent VHDX, we re-establish this important connection, allowing the differencing disk to reference its base image correctly. You can follow the steps mentioned below.
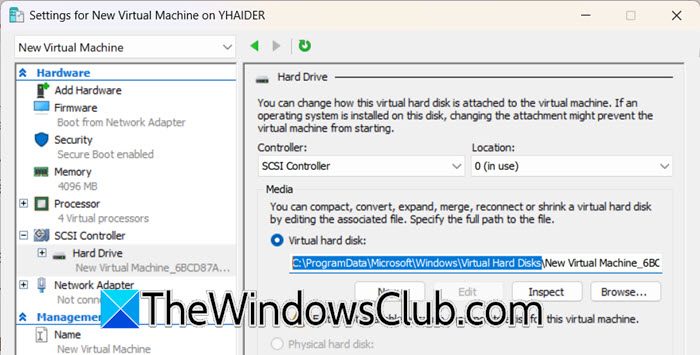
- Open Hyper-V Manager.
- Right-click on the virtual machine and select Settings.
- Go to the Hard Drive and check the location where your file is stored.
- Open File Explorer and navigate to that location.
- Compare the files present against known checkpoint chains, look for any VHDX files that were recently modified, moved, or deleted
- Check your backup systems (Windows Server Backup, VSS backups, or third-party solutions) for the missing parent VHDX file
- Restore the exact parent VHDX file to its original location with an identical file name and path
- Verify file permissions, ensure SYSTEM and Hyper-V administrators have Full Control rights on the restored file
- Test the checkpoint operation again after the parent disk is restored.
Hopefully, this will do the job for you.
2] Inspect the Disk Chain with PowerShell
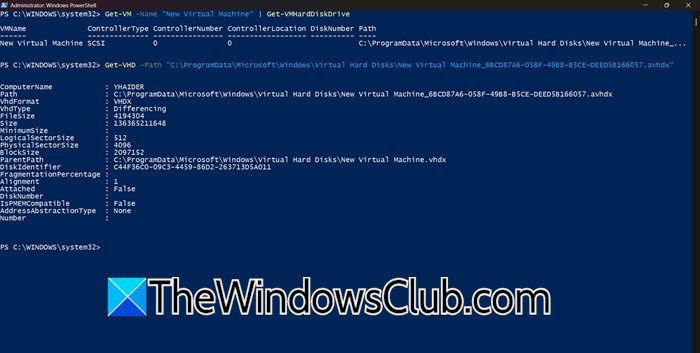
The Get-VHD cmdlet reads the virtual disk’s metadata to map the entire parent-child relationship, visually revealing exactly which link in the chain is broken or missing. This precise diagnosis prevents guesswork and directs you to the specific file causing the failure.
Open PowerShell as an administrator and then run the following command.
Get-VM -Name "Your-VM-Name" | Get-VMHardDiskDrive
We can run the aforementioned command to get the exact path of the VM’s virtual hard disk. Once we have that, run the following command for disk inception.
Get-VHD -Path "C:\Path\To\Your\VirtualDisk.vhdx"
Check the output carefully. Focus on the ParentPath field, which shows where the parent disk should be located. Make sure each file in the chain exists by verifying the paths in the output. Start with the current disk and check its parent, and then the parent’s parent if needed.
3] Use VHD Repair Tools to Rebuild the Chain
The Repair-VHD cmdlet fixes damaged metadata in the virtual disk file that controls how parent and child disks relate to each other. It rebuilds the internal pointers that Hyper-V needs to navigate the disk chain correctly, without changing the actual user data stored on the disks.
Before repairing, create a backup of all VHDX files in the chain before proceeding, and take the VM offline completely, so shut it down or turn it off.
Run PowerShell as Administrator and execute.
Repair-VHD -Path "C:\Path\To\Your\BrokenDisk.vhdx"
Monitor for completion and wait for the cmdlet to display progress, and let it complete.
Reattach the repaired VHD to the VM and test checkpoint functionality
If the repair fails, the disk may be too corrupted, and you’ll need to restore from backup.
Read: Hyper-V Virtual Machine stuck in Saved State
4] Merge the Current Checkpoint to Create a New Base Disk
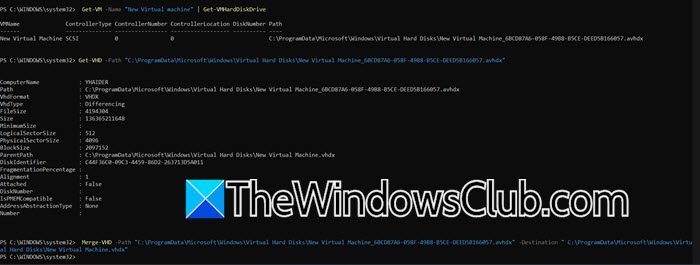
Merging the AVHDX differencing disk into a new base VHDX consolidates all changes from the checkpoint and its parent into one healthy file. This eliminates dependency on corrupted checkpoint metadata, ensuring the VM can boot from a clean, consistent disk.
First of all, you need to fetch ParentPath using the steps mentioned earlier.
Merge-VHD -Path "C:\ProgramData\Microsoft\Windows\Virtual Hard Disks\VHDFILE.avhdx" -Destination "ParentPath"
Finally, check if the issue is resolved.
That’s it!
Read: Enable, create, rename, delete, restore Checkpoints in Hyper-V
How to enable checkpoints in Hyper-V?
To enable checkpoints in Hyper-V, open Hyper-V Manager, right-click your virtual machine, and select Settings. Navigate to the Checkpoints section in the Management category. Here you can configure the checkpoint type (Production or Standard) and choose the storage location for checkpoint files. Checkpoints are enabled by default, but this is where you manage their specific settings and behavior.
Also Read: Virtual machine could not initiate a checkpoint, Error 0x800423F4.