If you are a bit concerned about the safety of your eyes, then this article is for you. Windows 11/10 prioritizes user health, and Adaptive brightness is one of its many features. If you spend more than 4 hours daily on your PC, you should care about the brightness, contrast, and color level of your PC’s display.
Adaptive Brightness in Windows 11
Adaptive brightness is a feature that allows Windows 11/10 to automatically adjust the brightness and contrast level based on the lighting conditions of your computer’s surroundings.
The Adaptive Brightness feature is built on top of the Windows Sensor Platform. This feature will adjust the screen brightness according to the ambient light level. If the ambient light level gets darker, then the screen brightness will decrease if it increases, then the brightness increases.
To use adaptive brightness, you must have light sensors installed and enabled on your computer.
Turn Adaptive brightness on or off in Windows 11

1. Click Start and open Control Panel. Now select Power Options from the list.
2. Under any plan, click Change plan settings.
3. Click Change advanced power settings.
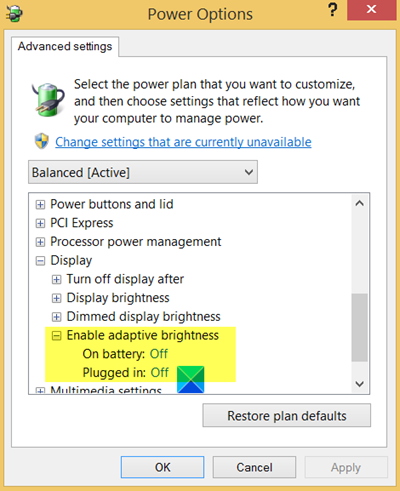
4. In the list, expand Display, and then expand Enable adaptive brightness.
- To turn adaptive brightness on or off when your computer is running on battery power, click On Battery, then click On or Off in the list.
- To turn adaptive brightness on or off when your computer is plugged into an outlet, click Plugged in, then click On or Off in the list.
5. If you don’t see it, it means that Light Sensors may not be installed or that your computer does not support adaptive brightness
- Go here and see if Light Sensors are installed: Control Panel > Hardware and Sound > Location and Other Sensors. Else press WinKey, type ‘Sensors’ and hit Enter to open it.
- To find out if your laptop or computer monitor supports adaptive brightness, look for the Enable adaptive brightness setting in Power Options.
6. Click Apply. Click OK.
If this does not work for you, you may need to disable the Sensor Monitoring Service (SensrSvc) in Services Manager or services.msc. This Windows Service monitors various sensors and makes the system adapt to the user state.
If this service is disabled, the display brightness will not adapt to lighting conditions. It may even affect other system functions.
Adaptive brightness is only available in select editions of Windows and on select laptop or desktop models.
TIP: See this post if your Windows laptop screen brightness is flickering.
Add or remove Adaptive display from Power Options
To add or remove Adaptive Display from the Power Options in Windows 11/10, you’ll need to make changes in the registry or use the Command Prompt. You see this setting here – Control Panel > Power Options > Change plan settings > Change advanced power settings.
Open Command Prompt as Administrator.
To add Adaptive Display to Power Options, run:
powercfg -attributes SUB_VIDEO ADAPTBRIGHTNESS -ATTRIB_HIDE
To remove Adaptive Display from Power Options, run:
powercfg -attributes SUB_VIDEO ADAPTBRIGHTNESS +ATTRIB_HIDE
You can also use the Registry. Open REGEDIT and go to:
HKEY_LOCAL_MACHINE\SYSTEM\CurrentControlSet\Control\Power\PowerSettings\7516b95f-f776-4464-8c53-06167f40cc99\aded5e82-b909-4619-9949-f5d71dac0bcb
Locate the Attributes DWORD value.
- 1 means Adaptive Display will be hidden.
- 2 means Adaptive Display will be visible in Power Options.
Change its Value according to your need.
Read next: How to disable Content Adaptive Brightness Control (CABC) on Windows 11.